SUSE HA Automation Project – Fast Start Documentation for AWS.

Friday, 7 May, 2021

Anyone following SUSE’s HA automation project over on Github will be aware that recently, a new major release was made available, v.7.

For those, not familiar with the project goal, the aim is to reduce the complexity of deploying an SAP High Availability solution by using  Terraform and Salt to perform and automated deployment and configuration of an SAP landscape, from the CSP infrastructure through to the OS configuration, SAP Software install and HA Cluster configuration.  The deployments follow SUSE and CSP Best practice and are possible across multiple CSP frameworks.

https://github.com/SUSE/ha-sap-terraform-deployments

As part of the new v7 release, there are many changes, but one of the notable one is the unification of many variables and settings in the project across all cloud providers.  Other key updates include the use of Pay-As-You-Go (PAYG) images to simplify the initial deployment.

As you would expect, there is comprehensive documentation as part of the project in GitHub.  But for those looking just to try out the project there is a ‘quick-start’ style document detailing the minimum steps required to deploy a limited sandbox environment in order to help understand both SUSE HA the SUSE HA Automation project and how it works.

Currently the documentation shows how to achieve this on the AWS Cloud.

https://documentation.suse.com/sbp/all/single-html/TRD-SLES-SAP-HA-automation-quickstart-cloud/index.html

Happy Reading!


Connecting SUSE Manager’s Virtual Host Manager to AWS

Friday, 19 March, 2021

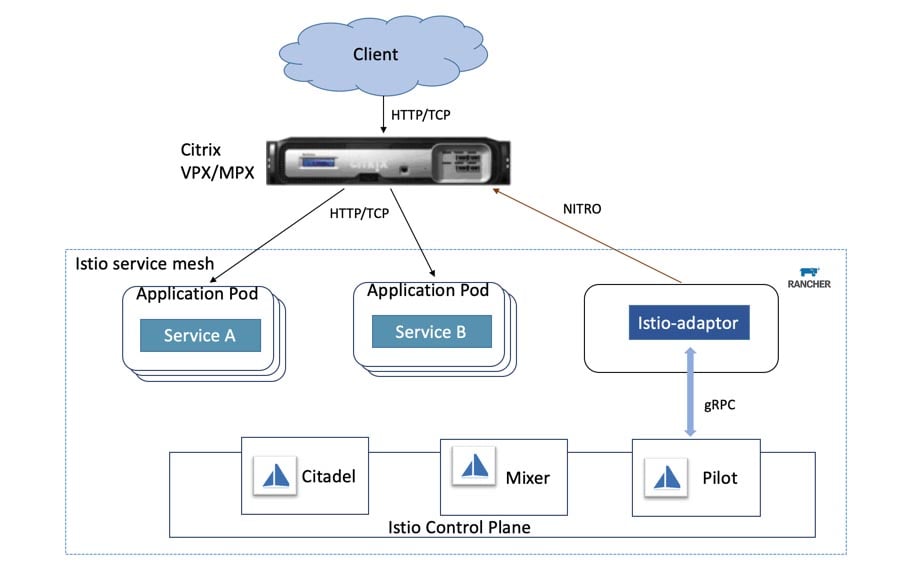
One of the newer features of SUSE Manager is the Virtual Host Manager. This allows the SUSE Manager server to connect to the AWS Cloud and gather information about instances running there. This detail can then be displayed in the SUSE Manager Web UI.

For customers managing their own subscription on AWS, this data can be useful when performing operations such as subscription matching.

In order to configure the VHM and connect to an AWS account, the following steps should be followed:

Firstly, install the required packages.

We need to provide a mechanism to let SUSE Manager connect to AWS, this is provided via the ‘virtual-host-gatherer-libcloud’ package.   This is not installed by default when launching a SUSE Manager instance from the images published in AWS, but once it is registered with the SUSE Customer Center, the latest version of the package is available in the ‘SLE-Module-SUSE-Manager-Server-4.x-Updates’ channel.

Secondly, Connect SUSE Manager to AWS

In the SUSE Manager UI from the Systems > Virtual Host Manager menu, click create and select AWS EC2 from the drop-down menu and fill out the required fields.  It is on this page where the AWS Access ID and Secret Access Key are provided and enable SUSE Manager to gather the instance information.


The Least Privilege

One question that gets asked regularly, and the reason for this article, is ‘Which AWS permissions are required for the Virtual Host Manager to function?’

The standard security advice when using AWS is to always grant the least privilege possible for a task to be performed, so using the Access Key for a user with excessive permissions to AWS is not advised.

In order for SUSE Manager to gather the information required from AWS, the VHM needs permission to describe EC2 instances and addresses.  One method to grant this is to create a new IAM user specific to this task, create a policy as below and attach to the user.


{
    "Version": "2012-10-17",
    "Statement":[
        {
            "Effect": "Allow",
            "Action": [
                "ec2:DescribeAddresses",
                "ec2:DescribeInstances"
            ],
            "Resource": "*"
        }
    ]
}


You can limit permissions further by restricting access to specific regions. Additional detail on creating ‘read-only’ users in AWS can be found at:

https://docs.aws.amazon.com/AWSEC2/latest/UserGuide/ExamplePolicies_EC2.html#iam-example-read-only


Monitoring Activity

For the very curious, it’s also possible to monitor the AWS operations that the Virtual Host Manager sends to AWS.  The gatherer.log file in the /var/log/rhn/ directory will provide detail of both the requests sent to the EC2 Endpoint from SUSE Manager and the responses back.

2021-03-17 11:11:54 urllib3.connectionpool - DEBUG: https://ec2.eu-west-2.amazonaws.com:443 "GET /?Action=DescribeInstances&Version=2016-11-15 HTTP/1.1" 200 

2021-03-17 11:11:54 urllib3.connectionpool - DEBUG: https://ec2.eu-west-2.amazonaws.com:443 "GET /?Action=DescribeAddresses&Version=2016-11-15 HTTP/1.1" 200

To see this level of output in the gatherer log, the debug level of logging should be temporarily increased.

Finally, A big thank you to Pablo Suárez Hernández from the SUSE Engineering for bringing his SUSE Manager knowledge to this.

Links

Check out the SUSE Manager Client Configuration Guide in the SUSE Documentation site at:

https://documentation.suse.com/#suma


Category: Uncategorized Comments (0)

SUSE Achieves AWS Outposts Ready Designation

Monday, 23 November, 2020

SUSE today announced it has achieved AWS Outposts Ready designation, as part of the Amazon Web Services (AWS) Service Ready Program. This designation recognizes that SUSE Linux Enterprise Server and SUSE Linux Enterprise Server for SAP Applications have demonstrated successful integration with AWS Outposts deployments. AWS Outposts is a fully managed service that extends AWS infrastructure, AWS services, APIs, and tools to virtually any datacenter, co-location space, or on-premises facility for a truly consistent hybrid experience.

Joshua Burgin, General Manager, AWS Outposts, Amazon Web Services, Inc., said, “We are delighted that SUSE Linux Enterprise Server and SUSE Linux Enterprise Server for SAP Applications have been tested and validated on AWS Outposts and we welcome them to the AWS Outposts Service Ready program. With SUSE Linux Enterprise Server and SUSE Linux Enterprise Server for SAP Applications running on AWS Outposts, customers gain a consistent hybrid experience between the AWS Region and their on-premises environment for business-critical workloads.”

Achieving the AWS Outposts Ready designation differentiates SUSE as an AWS Partner with a product fully tested on AWS Outposts. AWS Outposts Ready products are generally available and supported for AWS customers, with clear deployment documentation for AWS Outposts. AWS Service Ready Partners have demonstrated success building products integrated with AWS services, helping AWS customers evaluate and use their technology productively, at scale and varying levels of complexity.

You can learn more about SUSE Linux Enterprise Server and SUSE Linux Enterprise Server for SAP Applications on AWS Outposts on our website. There you will also find more information on technical information, including a reference architecture to help you get started.

SUSE and AWS – 10 Years of Collaboration and Innovation

Saturday, 31 October, 2020

This year marks 10 years since Amazon Web Services (AWS) and SUSE first collaborated to bring SUSE’s open source technologies to AWS customers looking for elastic, scalable and cost-effective cloud solutions. Over the past decade, SUSE has been a leader in driving innovation for Linux solutions on AWS, accumulating an ever-growing list of milestones and achievements along the way. (more…)

Integrate AWS Services into Rancher Workloads with TriggerMesh

Wednesday, 9 September, 2020
Don’t miss the Computing on the Edge with Kubernetes conference on October 21.

Many businesses use cloud services on AWS and also run workloads on Kubernetes and Knative. Today, it’s difficult to integrate events from AWS to workloads on a Rancher cluster, preventing you from taking full advantage of your data and applications. To trigger a workload on Rancher when events happen in your AWS service, you need an event source that can consume AWS events and send them to your Rancher workload.

TriggerMesh Sources for Amazon Web Services (SAWS) are event sources for AWS services. Now available in the Rancher catalog, SAWS allows you to quickly and easily consume events from your AWS services and send them to your workloads running in your Rancher clusters.

SAWS currently provides event sources for the following Amazon Web Services:

TriggerMesh SAWS is open source software that you can use in any Kubernetes cluster with Knative installed. In this blog post, we’ll walk through installing SAWS in your Rancher cluster and demonstrate how to consume Amazon SQS events in your Knative workload.

Getting Started

To get you started, we’ll walk you through installing SAWS in your Rancher cluster, followed by a quick demonstration of consuming Amazon SQS events in your Knative workload.

SAWS Installation

  1. TriggerMesh SAWS requires the Knative serving component. Follow the Knative documentation to install the Knative serving component in your Kubernetes cluster. Optionally, you may also install the Knative eventing component for the complete Knative experience. We used:
    kubectl --namespace kong get service kong-proxy

    We created a cluster from the GKE provider. A LoadBalancer service will be assigned an external IP, which is necessary to access the service over the internet.

  2. With Knative serving installed, search for aws-event-sources from the Rancher applications catalog and install the latest available version from the helm3-library. You can install the chart at the Default namespace.

    Image 01

Remember to update the Knative Domain and Knative URL Scheme parameters during the chart installation. For example, in our demo cluster we used Magic DNS (xip.io) for configuring the DNS in the Knative serving installation step, so we specified 34.121.24.183.xip.io and http as the values of Knative Domain and Knative URL Scheme, respectively.

That’s it! Your cluster is now fully equipped with all the components to consume events from your AWS services.

Demonstration

To demonstrate the TriggerMesh SAWS package functionality, we will set up an Amazon SQS queue and visualize the queue events in a service running on our cluster. You’ll need to have access to the SQS service on AWS to create the queue. A specific role is not required. However, make sure you have all the permissions on the queue: see details here.

Step 1: Create SQS Queue

Image 02

Log in to the Amazon management console and create a queue.

Step 2: Create AWS Credentials Secret

Create a secret named awscreds containing your AWS credentials:

$ kubectl -n default create secret generic awscreds 

--from-literal=aws_access_key_id=AKIAIOSFODNN7EXAMPLE 

--from-literal=aws_secret_access_key=wJalrXUtnFEMI/K7MDENG/bPxRfiCYEXAMPLEKEY

Update the values of aws_access_key_id and aws_secret_access_key in the above command.

Step 3: Create the AWSSQSSource Resource

Create the AWSSQSSource resource that will bring the events that occur on the SQS queue to the cluster using the following snippet. Remember to update the arn field in the snippet with that of your queue.

$ kubectl -n default create -f - << EOF

apiVersion: sources.triggermesh.io/v1alpha1

kind: AWSSQSSource

metadata:

name: my-queue

spec:

arn: arn:aws:sqs:us-east-1:043455440429:SAWSQueue

credentials:

  accessKeyID:

    valueFromSecret:

     name: awscreds

     key: aws_access_key_id

  secretAccessKey:

    valueFromSecret:

     name: awscreds

     key: aws_secret_access_key

sink:

 ref:

    apiVersion: v1

   kind: Service

   name: sockeye

EOF

Check the status of the resource using:

$ kubectl -n default get awssqssources.sources.triggermesh.io

NAME READY REASON SINK AGE

my-queue True http://sockeye.default.svc.cluster.local/ 3m19s

Step 4: Create Sockeye Service

Sockeye is a WebSocket-based CloudEvents viewer. Our my-queue resource created above is set up to send the cloud events to a service named sockeye as configured in the sink section. Create the sockeye service using the following snippet:

$ kubectl -n default create -f - << EOF

apiVersion: serving.knative.dev/v1

kind: Service

metadata:

name: sockeye

spec:

template:

 spec:

   containers:

    - image: docker.io/n3wscott/sockeye:v0.5.0@sha256:64c22fe8688a6bb2b44854a07b0a2e1ad021cd7ec52a377a6b135afed5e9f5d2

EOF

Next, get the URL of the sockeye service and load it in the web browser.

$ kubectl -n default get ksvc

NAME URL LATESTCREATED LATESTREADY READY REASON

sockeye http://sockeye.default.34.121.24.183.xip.io sockeye-fs6d6 sockeye-fs6d6 True

Step 5: Send Messages to the Queue

We now have all the components set up. All we need to do is to send messages to the SQS queue.

Image 03

The cloud events should appear in the sockeye events viewer.

Image 04

Conclusion

As you can see, using TriggerMesh Sources for AWS makes it easy to consume cloud events that occur in AWS services. Our example uses Sockeye for demonstration purposes: you can replace Sockeye with any of your Kubernetes workloads that would benefit from consuming and processing events from these popular AWS services.

The TriggerMesh SAWS package supports a number of AWS services. Refer to the README for each component to learn more. You can find sample configurations here.

Don’t miss the Computing on the Edge with Kubernetes conference on October 21.

Protect Kubernetes Containers on AWS Using the Shared Responsibility Model

Friday, 21 August, 2020

Editor’s note: This post was updated on August 17, 2022

Deploying an AWS container security solution is a critical requirement to protect your data and assets running on AWS, including EC2, EKS, ECS, Kubernetes, or RedHat OpenShift. In its ‘Shared Responsibility Model,’ AWS states that the security responsibility is shared between AWS and the customer, you. ‘Security of the cloud’ is the responsibility of AWS, while ‘Security in the cloud’ is the customer’s responsibility. If you have sensitive data, critical business applications, or valuable assets to protect, deploying an AWS container security solution such as NeuVector will provide the defense in depth required for ‘Security in the cloud.’ Let’s take a look at these additional security controls required and how they can be provided by NeuVector.

(more…)

3 Ways to Run Kubernetes on AWS

Tuesday, 12 May, 2020

Kubernetes is hugely popular and growing, and is primarily used on the cloud — 83 percent of organizations included in a large CNCF survey said they run Kubernetes on at least one public cloud. Amazon is a natural option for Kubernetes clusters, due to its mature and robust infrastructure, and a variety of deployment options with a varying degree of automation.

Read on to understand three key options for running Kubernetes on AWS, how they work and which is best for your organization’s needs.

In this article you will learn:

  • The options for running Kubernetes on AWS
  • How to create a Kubernetes cluster on AWS with kops
  • How to create a Kubernetes cluster with Elastic Kubernetes Service
  • How to create a Kubernetes Cluster with Rancher on EKS

Kubernetes on AWS: What are the Options?

Kubernetes is an open source container orchestration platform created by Google. You can use Kubernetes for on-premises, cloud or edge deployments. When used in combination with AWS, you use Kubernetes to manage clusters of Amazon Elastic Compute Cloud (EC2) instances that host your containers.

When deploying Kubernetes in AWS, you can configure and manage your deployment by yourself for full flexibility and control. You also have the option of using either AWS-provided services or third-party services to manage your implementation.

Alternatives to self-management include:

  • kops — an open source tool you can use to automate the provisioning and management of clusters in AWS. Although not a managed tool, kops does enable you to simplify deployment and maintenance processes. It is officially supported by AWS.
  • Amazon Elastic Kubernetes Service (EKS) — a managed service offered by AWS. EKS uses automatically provisioned instances and provides a managed control plane for your deployment.
  • Rancher — a complete enterprise computing platform to deploy Kubernetes clusters everywhere: on-premises, in the cloud and at the edge. Rancher unifies these clusters to ensure consistent operations, workload management and enterprise-grade security.

Creating a Kubernetes Cluster on AWS with kops

Kops lets you create Kubernetes clusters in a few simple steps.

Prerequisites for kops:

  • Create an AWS account
  • Install the AWS CLI
  • Install kops and kubectl
  • Create a dedicated user for kops in IAM
  • You can set up DNS for the cluster, or, as an easy alternative, create a gossip-based cluster by having the cluster name end with k8s.local

To create a cluster on AWS using kops:

  1. For convenience, create two environment variables: NAME set to your cluster name, and KOPS_STATE_STORE set to the URL of your cluster state store on S3.
  2. Check which availability zones are available on EC2, by running the command aws ec2 describe-availability-zones --region us-west-2 (ending with the region you want to launch the instances in). Select an available zone, for example us-west-2a.
  3. Build your cluster as follows – this is a basic cluster with no high availability:
    kops create cluster 
        --zones=us-west-2a 
        ${NAME}
  4. View your cluster configuration by running the command kops edit cluster ${NAME}. You can leave all settings as default for now.
  5. Run the command kops update cluster ${NAME} --yes. This boots instances and downloads Kubernetes components until the cluster reaches a “ready” state.
  6. Check which nodes are alive by running kubectl get nodes.
  7. Validate that your cluster is working properly by running kops validate cluster.

For more details, refer to the kops documentation.

Creating a Kubernetes Cluster with Elastic Kubernetes Service

EKS helps manage cluster set up and creation. It offers multi-AZ support and provides automatic replacement of failed or nodes. It also enables on-demand patches and upgrades to clusters. EKS automatically creates three master nodes for each cluster, spread out across three availability zones, as illustrated below. This prevents single points of failure and provides high availability out of the box.

Source: Amazon Web Services

A few prerequisites for creating a cluster on EKS:

  • Create an AWS account
  • Create an IAM role that Kubernetes can use to create new AWS resources
  • Create a VPC and security group for your Kubernetes cluster – Amazon strongly recommend creating a separate VPC and security group for each cluster
  • Install kubectl – see instructions for installing the Amazon EKS-vended version
  • Install the Amazon CLI

To create a Kubernetes cluster using EKS:

  1. Open the Amazon EKS console and select Create cluster.
  2. On the Configure cluster page, type a name for your cluster, and select the Kubernetes version – if you don’t have a reason to run a specific version, select the latest.
  3. Under Cluster service role, select the IAM role you created for EKS.
  4. The Secrets encryption option lets you encrypt Kubernetes secrets using the AWS Key Management Service (KMS). This is an important option for production deployments, but you can leave it off just for this tutorial. Another option is Tags, which lets you apply tags to your cluster so you can manage multiple Kubernetes clusters together with other AWS resources.
  5. Click Next to view the Specify networking page. Select the VPC you created previously for EKS. Under Subnets, select which subnets you would like to host Kubernetes resources. Under Security groups, you should see the security group defined when you created the VPC (as defined in the CloudFormation template).
  6. Under Cluster endpoint access, select Public to enable only public access to the Kubernetes API server, Private to only enable private access from within the VPC, or Public and Private to enable both.
  7. Select Next to view the Configure logging page and select logs you want to enable (all logs are disabled by default).
  8. Select Next to view the Review and create page. Have a look at the cluster options you selected you can click Edit to make changes. When you’re ready, click Create. The status field shows the status of the cluster, until provisioning is complete (this can take between 10-15 minutes).
  9. When the cluster finishes creating, save your API server endpoint and Certificate authority – you will need these to connect to kubectl and work with your cluster.

To learn more, see the EKS getting started guide.

Creating a Kubernetes Cluster with Rancher on EKS

Using Rancher, you can manage Kubernetes clusters directly on AWS, within the EKS service or across hybrid or multi-cloud systems. Rancher enables you to centrally manage your cluster policies and helps ensure consistent and reliable container access.

Image Rancher AWS architecture

Rancher provides the following additional capabilities not fully available in plain Amazon EKS:

  • Centralized user authentication & RBAC – you can integrate Rancher with LDAP, Active Directory or SAML-based authentication services. This enables you to consistently enforce role-based access control (RBAC) policies across your environments. Centralized RBAC is the preferred way to manage access and permissions as it reduces administrative requirements and makes management of permissions easier.
  • UI in a single pane of glass – you manage Rancher from an intuitive web interface. This enables DevOps teams to easily deploy and troubleshoot workloads and operations teams to smoothly release and link services and applications across environments. Simplified management also eliminates the need to know specifics of your infrastructure of Kubernetes distribution and promotes greater workflow efficiency.
  • Enhanced cluster security – Rancher enables you to centrally define security policies and procedures. Security teams can set policies dictating how users are allowed to interact with clusters and how workloads operate across infrastructures. These policies can then be immediately pushed to any clusters as needed.
  • Multi and hybrid-cloud support – included with Rancher are global application catalogs that you can use across Kubernetes clusters, regardless of location. These catalogs provide access to apps ready for immediate deployment, creating standardized application configurations across your services. Using these apps, you can significantly reduce the load on your operations and development teams.
  • Tools integration – Rancher includes built-in integrations with the Istio service mesh, Prometheus and Grafana for monitoring, Fluentd for logging. In combination, these integrations help you manage deployments across clouds regardless of service variations.

Let’s see how to create a cluster on AWS with Rancher. The prerequisites are the same as for EKS (see the previous section).

To create a Kubernetes cluster on AWS with Rancher and EKS:

  1. Prepare a Linux host with a supported version of Linux, and install a supported version of Docker on the host (see all supported versions).
  2. Start the Rancher server by running this Docker command:
    $ sudo docker run -d --restart=unless-stopped -p 80:80 -p 443:443 rancher/rancher
  3. Open a browser and go to the hostname or address where you installed your Docker container. You will see the Rancher server UI.
    Rancher Serve UI
  4. Select Clusters and click Add cluster. Choose Amazon EKS.
  5. Type a Cluster Name. Under Member Roles, click Add Member to add users that will be able to manage the cluster, and select a Role for each user.
  6. Enter the AWS Region, Access Key and Secret Key you got when creating your VPC.
  7. Click Next: Select Service Role. For this tutorial, select Standard: Rancher-generated service role. This means Rancher will automatically add a service role for the cluster to use. You can also select an existing AWS service role.
  8. Click Next: Select VPC and Subnet. Choose whether there will be a Public IP for Worker Nodes. If you choose No, select a VPC & Subnet to allow instances to access the Internet, so they can communicate with the Kubernetes control plane.
  9. Select a Security Group (defined when you created your VPC).
  10. Click Select Instance Options and select:
    a. Instance type – you can choose which Amazon instance should be used for your Kubernetes worker nodes.
    b. Customer AMI override – you can choose a specific Amazon Machine Image to install on your instances. By default, Rancher provides its EKS-optimized AMI.
    c. Desired ASG size – the number of instances in your cluster.
    d. User data – custom commands for automated configuration, do not set this when you’re just getting started.
  11. Click Create. Rancher is now provisioning your cluster. You can access your cluster once its state is Active.

For more details, refer to the Rancher AWS quick start guide, or learn more about the Rancher platform.

Conclusion

In this article we showed three ways to automatically spin up a Kubernetes cluster:

  • kops – an open source library that lets you quickly create a cluster using CLI commands.
  • Amazon Elastic Kubernetes Service – creating a cluster managed by Amazon, with high availability and security built in.
  • Rancher with EKS – creating a cluster with Rancher as an additional management layer, which provided user authentication and RBAC, enhanced security, and the ability to launch Kubernetes clusters on other public clouds or in your local data center, and manage everything on one pane of glass.

Learn more about the Rancher platform and see how easy it is to manage Kubernetes across multiple cloud environments.

Tags: ,,,, Category: Products, Rancher Kubernetes Comments closed

Running Containers in AWS with Rancher

Tuesday, 10 March, 2020

READ OUR FREE WHITE PAPER:
How to Build an Enterprise Kubernetes Strategy

This blog will examine how Rancher improves the life of DevOps teams already invested in AWS’s Elastic Kubernetes Service (EKS) but looking to run workloads on-prem, with other cloud providers or, increasingly, at the edge. By reading this blog you will also discover how Rancher helps you escape the undeniable attractions of a vendor monoculture while lowering costs and mitigating risk.

AWS is the world’s largest cloud provider, with over a million customers and $7.3 billion in 2018 operating income. Our friends at StackRox recently showed that AWS still commands 78 percent market share despite the aggressive growth of rivals Microsoft Azure and Google Cloud Platform.

However, if you choose only AWS services for all your Kubernetes needs, you’re effectively locking yourself into a single vendor ecosystem. For example, by choosing Elastic Load Balancing for load distribution, AWS App Mesh for service mesh or AWS Fargate for serverless compute with EKS, your future is certain but not yours to control. It’s little wonder that many Amazon EKS customers look to Rancher to help them deliver a truly multi-cloud strategy for Kubernetes.

The Benefits of a Truly Multi-Cloud Strategy for Kubernetes

As discussed previously, multi-cloud has become the “new normal” of enterprise IT. But what does “multi-cloud” mean to you? Does it mean supporting the same vendor-specific Kubernetes distribution on multiple clouds? Wouldn’t that just swap out one vendor monoculture for another? Or does it mean choosing an open source management control plane that treats any CNCF-certified Kubernetes distribution as a first-class citizen, enabling true application portability across multiple providers with zero lock-in?

Don’t get me wrong – there are use cases where a decision-maker will see placing all their Kubernetes business with a single vendor as the path of least resistance. However, the desire for short-term convenience shouldn’t blind you to the inherent risks of locking yourself into a long-term relationship with just one provider. Given how far the Kubernetes ecosystem has come in the past six months, are you sure that you want to put down all your chips on red?

As with any investment, the prudent money should always go on the choice that gives you the most value without losing control. Given this, we enthusiastically encourage you to continue using EKS – it’s a great platform with a vast ecosystem. But remember to keep your options open – particularly if you’re thinking about deploying Kubernetes clusters as close as possible to where they’re delivering the most customer value – at the edge.

Kubernetes on AWS: Using Rancher to Manage Containers on EKS

If you’re going to manage Kubernetes clusters on multiple substrates – whether on AKS/GKE, on-prem or at the edge – Rancher enhances your container orchestration with EKS. With Rancher’s integrated workload management capabilities, you can allow users to centrally configure policies across their clusters and ensure consistent access. These capabilities include:

1) Role-based access control and centralized user authentication
Rancher enforces consistent role-based access control (RBAC) policies on EKS and any other Kubernetes environment by integrating with Active Directory, LDAP or SAML-based authentication. Centralized RBAC reduces the administrative overhead of maintaining user or group profiles across multiple platforms. RBAC also makes it easier for admins to meet compliance requirements and delegate administration of any Kubernetes cluster or namespace.

RBAC Controls in Rancher

2) One intuitive user interface for comprehensive control
DevOps teams can deploy and troubleshoot workloads consistently across any provider using Rancher’s intuitive web UI. If you’ve got team members new to Kubernetes, they can quickly learn to launch applications and wire them together at production level in EKS and elsewhere with Rancher. Your team members don’t need to know everything about a specific Kubernetes distribution or infrastructure provider to be productive.

Multi-cluster management with Rancher

3) Enhanced cluster security
Rancher admins and their security teams can centrally define how users should interact with Kubernetes and how containerized workloads should operate across all their infrastructures, including EKS. Once defined, these policies can be instantly assigned any Kubernetes cluster.

Adding customer pod security policies

4) Global application catalog & multi-cluster apps
Rancher provides access to a global catalog of applications that work across multiple Kubernetes clusters, whatever their location. For enterprises running in a multi-cloud Kubernetes environment, Rancher reduces the load on operations teams while increasing productivity and reliability.

Selecting multi-cluster apps from Rancher's catalog
Selecting multi-cluster apps from Rancher’s catalog

5) Streamlined day-2 operations for multi-cloud infrastructure
Using Rancher to provision your Kubernetes clusters in a multi-cloud environment means your day-2 operations are centralized in a single pane of glass. Benefits to centralizing your operations include one-touch deployment of service mesh (upstream Istio), logging (Fluentd), observability (Prometheus and Grafana) and highly available persistent storage (Longhorn).

What’s more, if you ever decide to stop using Rancher, we provide a clean uninstall process for imported EKS clusters so that you can manage them independently. You’ll never know Rancher was there.

Next Steps

See how Rancher can help you run containers in AWS and enhance your multi-cloud Kubernetes strategy. Download the free whitepaper, A Guide to Kubernetes with Rancher.

READ OUR FREE WHITE PAPER:
How to Build an Enterprise Kubernetes Strategy

Tags: Category: Uncategorized Comments closed

Webinar: Supercharge your SAP environment with AWS & SUSE

Thursday, 21 November, 2019

Maximizing SAP Operations with High Availability on AWS with SUSE

REGISTER NOW

Do you want to maximize your SAP environment’s availability and performance? This webinar will cover how AWS and SUSE have collaborated to provide solutions that help you supercharge your SAP environment.

Learn how Amazon Web Services (AWS) and SUSE can help you deploy your SAP workloads from NetWeaver to S/4 HANA on AWS cloud and are helping enterprise customers achieve new levels agility with unique deployment and procurement options.

Join subject matter experts Santosh Choudhary and Michael Bukva as they show you how to supercharge your SAP Operations with High Availability. The webinar will include a live Q&A session.

  • SAP on AWS overview
  • How SUSE works with SAP and AWS
  • SUSE Linux Enterprise Server for SAP Applications
  • SAP HANA on AWS Quick Start


Join us at 4pm PT 26th November / 11am AEDT 27th November, for this technical session. Register now to guarantee your spot!