A growing number of companies and individuals have become interested in deploying applications in containers. This article will walk those interested in Docker through the basic steps required to install the software and build containers. To make understanding the instructions a bit easier, we’re going to focus on just one of the many available Docker variants: Docker Community Edition (CE) on Ubuntu and CentOS Linux. We’ll also provide links to the installation page on the Docker website if you are running Windows, macOS, or other platforms.
The reasons for focusing on these versions are straightforward: first, they represent a large base of the systems used by those coming into the world of Docker.
Next, the community edition is designed for those who are getting started and experimenting with Docker. It doesn’t have many of the container management aspects of Docker Enterprise Edition (EE), but in losing those capabilities CE gains simplicity and a reduced set of opportunities for complication and confusion.
Finally, CentOS and Ubuntu are popular Linux distributions and the instructions for installation can be readily adapted to many of the other distributions you might be using.
By the end of the article, you should have the confidence to begin experimenting with Docker on your own.
Installing Docker
Installing on Windows, macOS, and Other Platforms
If you are running on Windows, macOS, or another operating system, you can follow the updated instructions associated with your platform on the Docker website. Clicking on the appropriate link will take you to a page where you can download and install the application, just as you would with any other piece of software.
On Linux platforms, the easiest way to install is to use one of Rancher’s Docker installation scripts, which are available for most recent versions of Docker.
For example, this command could be used to install Docker 20.10 on CentOS, openSUSE or Ubuntu:
curl https://releases.rancher.com/install-docker/20.10.sh | sh
To find out whether a script is available for installing a certain Docker version, refer to this GitHub repository, which contains all of Rancher’s Docker installation scripts.
Running Docker
For Windows and macOS, the Docker daemon should be automatically up and running.
On Linux, you can check whether the Docker daemon is started and configured to automatically run on boot by typing the following:
If either of the above two commands indicates that Docker is not running and configured to run, type:
sudo systemctl enable --now docker
This will enable the daemon to automatically start at boot. The --now flag also starts the daemon immediately if it isn’t already up and running.
You can run a quick test to make sure everything’s functioning correctly by typing:
sudo docker run hello-world
This will download an image and run a very simple container that displays a welcome message and version number. Congratulations — you’re now the proud administrator of a functioning Docker environment.
The Next Container
Once you’ve established the environment, what are you going to do with it? Assuming you want to do more than run “hello world” on an endless loop, how do you create images that will become containers and actually do useful things? Before we go any farther, it will be useful to understand two terms that you’ll see quite a lot when you live in the Docker world:
An image is a file that contains code for an application and its dependent files. It’s a static asset that you can search for, download, and place in a repository, ready for use.
A container is an isolated, running process that has been deployed from an image. A container is an executing application. In the context of this article, Docker is the system that deploys and manages containers from container images.
There are a number of things that you’ll need to do in order to begin using containers. You want to be able to start and stop container execution, look at and clean up local images and containers, interact with remote image registries, and inspect containers to find out more information.
One of the very useful things about Docker as a community is that you don’t always have to write your own images. If you want to start running containers but want to ease into developing them, you can go to an image repository like the official Docker Hub to find thousands of images that have been contributed and are ready for use. The docker command itself is configured to check for local images first and, if the image cannot be found, reach out to a remote registry to automatically pull down the image. As an example, the “hello-world” image that we downloaded and ran earlier was pulled from Docker Hub.
Start and Stop Containers
You can start containers by typing:
sudo docker run <container>
As mentioned before, the docker command will search the local environment for the image first and use that if found. If it cannot find the image, it will look for an image with the given namespace and name on a remote image registry, configured by default to be Docker Hub.
Depending on the container’s purpose and your own intentions for running it, you might need to provide some additional arguments to the docker run command. For example, to publish all of the container’s ports, allowing access to all listening services, you can include the -P flag. This will map all of the container’s ports with running services to random ports on the host to allow access.
Later, when you need more control over precisely how your container runs, you can do it through additional options given to the run command when you’re starting the container. For now, though, the simple command listed above will do the job.
When it’s time to stop the app, simply type the following for a graceful app shutdown:
sudo docker container stop <container>
If your app does not respond as expected, you can kill the container to put an end to its operation immediately:
sudo docker container kill <container>
Managing Docker Images
Once you have worked with a number of images, you’ll want to be able to see the images along with the basic information about them.
To list the images your instance has locally, type:
docker image ls
To get detailed information about any specific image you see, you can inspect it by typing:
docker image inspect <image>
This provides you with the image’s ID number, date of its creation, the path where it is stored, and other essential information.
To remove a local image, you can type:
docker image rm <image>
This is the command that will take an unwanted image and remove it from the system. If your image was pulled from a remote registry, you can easily pull it back down and use it for as long as it’s available. Keep in mind, however, that if the image was developed locally and wasn’t uploaded elsewhere, it will be gone forever.
The docker image subcommand is the basis for just about everything you do with Docker images. Almost all Docker commands related to images can be found by starting with these two words.
Managing Containers
We’ve seen how to look at the images you’ve stored. But what do you do when you want to manage running containers? There are commands that can help you do that, too.
To get a detailed overview of the state of your system, including how many containers are running, how many are paused, and how many have been stopped, the docker info command can be helpful:
docker info
The output from this command will show you the container information as well as a lot of other useful details about your system.
To view the currently running containers on your system, type:
docker ps
This will list each of your currently executing containers along with the image they were spawned from, their ID, and information about the command they’re running and their networking information.
Since the basic docker ps command only outputs information about currently running containers, we need to add an additional flag to get information about containers that are on the system but not currently running. These containers may have been stopped or exited on their own:
docker ps -a
This command can help you identify containers that you no longer need. To remove them, you can use the docker rm command, passing in either the container’s name or ID:
docker rm [<container-name-or-id>
To clean up the system more generally, you can instead use:
docker system prune
This will remove all containers, images, and cache items that are not related to currently running processes.
Working with a Remote Registry
The docker command has built in functionality for working with remote container image registries. By default, the tool is configured to target the registry at Docker Hub, which is free to use for public repositories.
To begin publishing your container images to a repository on Docker Hub, you’ll need to create an account. After signing up, can authenticate to Docker Hub from your computer by typing:
docker login
You will be prompted for the Docker ID and password you selected.
If you ever need to sign out again or switch accounts, you can type:
docker logout
Without signing in, you’ll be able to pull down and use any public image in your configured registry. That’s how we were able to pull down and run the hello-world image earlier. By signing in, you’ll also have access to any private registries associated with your account. You’ll also be able to upload new images to your repository.
To search for an image on in the image registry, you can use the following command:
docker search <term>
This will show you a list of relevant images that were found on the remote registry.
To pull down an image from a container image registry, type:
docker pull <image>
This will search for and download the image you request. It will also update the image if there have been any changes uploaded since you last used it. The docker pull command is automatically executed by the docker run command if a remote image is required.
To upload your own image to your Docker Hub registry, you first need to make sure it follows the expected naming convention. While image names on your local system can be fairly flexible, uploaded images need to follow a specific pattern, which looks like this:
<docker_id>/<image_name>:<tag_name>
The first component of the name must be your Docker ID. Afterwards, a forward slash is used to divide the ID from the image name. Finally, a colon is used followed by the name of a specific tag. Multiple images with the same name can be uploaded as long as they have unique tags.
To rename your local images to conform with the above naming convention, you can use the docker tag command:
docker tag <original-image> <new-name>
Once you have an image ready to upload with an appropriate name, you can push the image up to the registry by typing:
docker push <image>
This will upload your image to your account on Docker Hub, which you should be able to see in the web interface.
Conclusion
At this point, you should have an idea of what is required to begin using Docker, how to find and launch your first image and container, and where to go for more information. With the information in the article, you should have the confidence to take the next step and begin experimenting with Docker yourself.
Servers are expensive. And in single-application installations, most servers spend the majority of their time waiting. Making the most of these expensive assets led to virtualization, and making the most of virtualization has led to multiple options for virtualizing applications.
VMware and Docker offer competing methods for virtualizing applications. Both technologies work to make the most of limited hardware resources, but they do so in significantly different ways. This post will help you understand how they differ and how those differences affect which scenarios each is best suited for. In particular, we’ll take a brief look at how each works, what the differences mean for the application and the deploying team, and how those differences can have an impact on operations, security, and application performance.
This article on VMware vs Docker is aimed at both IT operations and application development leaders who want to expand the options in their deployment toolkit. The information will help those leaders make more informed decisions and explain those decisions to colleagues and executives.
The Limits of Virtualization
VMware is a company with a wide variety of products, from those that virtualize a single application to those that manage entire data centers or clouds. In this article, we use “VMware” to refer to VMware vSphere, used to virtualize entire operating systems; many different operating systems, from various Linux distributions to Windows Server can be virtualized on a single physical server.
VMware is a type-1 hypervisor, meaning it sits between the virtualized operating system and the server hardware; a number of different operating systems can run on a single VMware installation, with OS-specific applications running on each OS instance.
Docker is a system for orchestrating, or managing, application containers. An application container virtualizes an application and the software libraries, services, and operating system components required to run it. All of the Docker containers in a deployment will run on a single operating system because they’ll share commonly used resources from that operating system. Sharing the resources means that the application container is much smaller than the full virtualized operating system created in VMware. That smaller software image in a container can typically be created much more quickly than the VMware operating system image — on the scale of seconds rather than minutes.
The key question for the deployment team deciding on VMware vs Docker is why virtualization is being considered in the first place. If the point of the shift is at the operating system level — to provide each user or user population with its own operating environment while requiring as few physical servers as possible — then VMware is the logical choice. If the focus is on the application, with the operating system hidden or irrelevant to the user, then Docker containers become a realistic option for deployment.
The Scale of Reuse
How much of each application do you want to reuse? The methods and scales of resource sharing are different for VMware and Docker containers, as one reuses images of operating systems while the other shares functions and resources from a single image. Those differences can translate to huge storage and memory requirements for applications.
Each time VMware creates a instance of an operating system, it creates a full copy of that operating system. All of the components of the operating system, and any resources used by applications running within the instance, are used only within that particular instance — there is no sharing among running operating systems. This means that there can be incredible customization of the environment within each operating system and applications can be run without concern about effecting (or being effected by) applications running in other virtual operating systems.
When a Docker container is created, it is a unique instance of the application with all of the libraries and code the application depends on included. While the application code is bundled within the container image, the application relies on — and is managed by — the host system’s kernel. This reduces the resources required to run containers and allows them to start very quickly.
Docker’s speed at creating new instances of an application makes it a solution commonly used in the development environment, where quickly launching, testing, and deleting copies of an application can make for much greater efficiencies. VMware’s ability to author a single “golden copy” of a fully patched and updated operating system and then use that image to create every new instance makes it popular in enterprise production deployments.
In both VMware and Docker containers, a “master copy” of the original environment is created and used to deploy multiple copies. The question for the operations team is whether the resource efficiency of Docker matches the needs of the application and the user base, or whether those needs require a unique copy of the operating system to be launched and deployed for each instance.
Automation as a Principle
While the processes of creating and tearing down operating system images can be automated, automation is baked into the very heart of Docker. Orchestration, as part of the DevOps toolbox, is a major differentiator for Docker containers versus VMware.
Docker is itself the orchestration mechanism for creating new application instances on demand and then shutting them down when the requirement ends. There are API integrations that allow Docker to be controlled by a number of different automation systems. And for large computing environments that use Docker containers, additional layers of automation and management have been developed. One well-known platform is Kubernetes, which was developed to manage clusters of Docker containers that may be spread across many different servers.
VMware has a wide variety of automation tools as well, but those tools are, when discussing the vSphere family of products, responsible for creating new instances of operating systems, not applications. This means that the time to create an entirely new operating system image must be considered when planning rapid-response cloud and virtual system application environments. VMware can certainly work to support those environments; it’s used in many commercial operations to do just that. But it requires additional applications or frameworks to automate and orchestrate the process, adding complexity and expense to the solution.
It’s important to note that both Docker containers and VMware can operate quite successfully without automation. When it comes to a commercial installation, though, each becomes much more powerful when the tasks of creating and deleting new operating system and application instances are controlled by software rather than human hands. From rapid response to increased user demand, to large-scale automated application testing, system automation is important. Knowing what’s required for that automation is critical when deciding between technologies.
Separation — or Not
If speed of deployment and execution or limitations on resource usage aren’t critical differentiators for your deployments, then hard separation between applications and instances might be. Just as orchestration is baked into Docker, separation is baked into VMware.
Each instance of an operating system virtualized under VMware is a complete operating system image running on hardware resources that are not shared logically with any other instance of the operating system. VMware partitions the hardware resources in ways that make each operating system instance believe that it’s the only OS running on the server.
This means that, barring a critical hypervisor vulnerability, there is no realistic way for an application running on one virtual server to reach across into another virtual server for data or resources. It also means that things can go awfully, terribly wrong in one virtual server and it can be shut down without endangering the operation of any of the other virtual servers running under VMware.
While proponents of Docker have spoken of similar separation being part of the container system’s architecture, recent vulnerability reports (such as CVE-2019-5736) indicate that Docker’s separation might not be as complete as operational IT specialists would hope.
Separation is not as high of a priority for Docker containers as it is for VMware operating system instances. Application containers will share resources; and where there is sharing, there are limits on separation.
Conclusion
There are significant differences between the virtualization and deployment of VMware and Docker, each with its uses. Readers should now have a basic understanding of the basic nature and capability of each platform and of the factors that could make each preferable in a given situation.
Where speed of deployment and most effective use of limited resources are the highest priorities, Docker containers show a great deal of strength. In situations like development groups or the rapid iteration of a fully functioning DevOps environment, containers can be tremendously valuable.
If security and stability are critically important in your production environment, VMware offers both. For both Docker containers and VMware, multiple products are available to extend their functionality through automation, orchestration, and other functions.
You can find more information on deploying Docker in this blog post. The article presents both best practices and hands-on details for putting the platforms in the field, as well as information on how to include each within a DevOps methodology.
Sign up for online training
To go deeper and understand how you can manage complex container applications using Kubernetes, a container orchestration system, and Rancher, join our weekly online training sessions. These free online training classes cover essential container orchestration and management concepts through live discussion and demonstrations.
With the rise of containerization technology and increased attention from enterprises and technologists in general, more and more containerized applications have been deployed to the cloud. Moreover, research conducted by 451 Research predicts that the application container market will grow dramatically through 2020, which will continue to expand the number of containerized applications being deployed to the cloud.
When the scale and complexity of production-critical containers rises, container orchestration tools come into the picture and become an indispensable part of enterprises’ container management toolbox. Kubernetes and Docker Swarm are two famous, leading players in the container orchestration market and become the essential part of microservices of many enterprises. This article will give you an overview of each container orchestrator and offer a comparison of Kubernetes vs Docker Swarm based on:
Cluster Setup and Configuration
Administration
Auto-scaling
Load Balancing
Storage
Market Share
Overview of Kubernetes
Kubernetes is an open-source, community-driven Container Orchestration Engine (COE) inspired by a Google project called Borg. Kubernetes is used to orchestrate fleets of containers representing instances of applications that are decoupled from the machines they run on. As the number of containers in a cluster increases to hundreds or thousands of instances, with application components deployed as separate containers, Kubernetes comes to the rescue by providing a framework for deployment, management, auto-scaling, high availability, and related tasks.
Kubernetes allows you to handle various container orchestration related tasks such as scaling containers up or down, automatic failover, distributing workloads among containers hosted on different machines.
Kubernetes follows the traditional client-server type of architecture where the Master node has the global view of the cluster and is responsible for the decision making. Users can interact with the Master node through the REST API, the web UI, and the command line interface (CLI). The Master node interacts with the Worker nodes that host the containerized applications.
Some of the common terminology used within the Kubernetes ecosystem are:
Container: Containers are the units of packaging used to bundle application binaries together with their dependencies, configuration, framework, and libraries.
Pods: Pods are the deployment units in Kubernetes ecosystem which contains one or more containers together on the same node. Group of containers can work together and share the resources to achieve the same goal.
Node: A node is the representation of a single machine in the cluster running Kubernetes applications. A node can be a physical, bare metal machine or a virtual machine.
Cluster: Several Nodes are connected to each other to form a cluster to pool resources that are shared by the applications deployed onto the cluster.
Persistent Volume: Since the containers can join and leave the computing environment dynamically, local data storage can be volatile. Persistent volumes help store container data more permanently.
Overview of Docker Swarm
Docker Swarm is an alternative, Docker-native Container Orchestration Engine that coordinates container placement and management among multiple Docker Engine hosts. Docker Swarm allows you to communicate directly with swarm instead of communicating with each Docker Engine individually. Docker Swarm architecture comprises two types of nodes called Managers and Workers.
Below are the common terminology used in the Docker Swarm ecosystem:
Node: A node is a machine that runs an instance of Docker Engine
Swarm: A cluster of Docker Engine instances.
Manager Node: Manager nodes distribute and schedule incoming tasks onto the Worker nodes and maintains the cluster state. Manager Nodes can also optionally run services for Worker nodes.
Worker Node: Worker nodes are instances of Docker Engine responsible for running applications in containers.
Service: A service is an image of a microservice, such as web or database servers.
Task: A service scheduled to run on a Worker node.
Comparison of Kubernetes vs Docker Swarm Features
Both Kubernetes and Docker Swarm COEs have advantages and disadvantages, and the best fit will largely depend on your requirements. Below we compare a few features they share.
Feature
Kubernetes
Docker Swarm
Notes
Cluster Setup and Configuration
Challenging to install and setup a cluster manually. Several components such as networking, storage, ports, and IP ranges for Pods require proper configuration and fine-tuning. Each of these pieces require planning, effort, and careful attention to instructions.
Simple to install and setup a cluster with fewer complexities. A single set of tools is used to setup and configure the cluster.
Setting up and configuring a cluster with Kubernetes is more challenging and complicated as it requires more steps that must be carefully followed.
Setting up a cluster with Docker Swarm is quite simple, requiring only two commands once Docker Engine is installed.
Administration
Provides a CLI, REST API, and Dashboard to control and monitor a variety of services.
Provides a CLI to interact with the services.
Kubernetes has a large set of commands to manage a cluster, leading to a steep learning curve. However, these commands provide great flexibility and you also have access to the dashboard GUI to manage your clusters.
Docker Swarm is bound to Docker API commands and has a relatively small learning curve to start managing a cluster.
Auto-scaling
Supports auto-scaling policies by monitoring incoming server traffic and automatically scaling up or down based on the resource utilization.
Supports scaling up or down with commands.
From a technical perspective, it is not practical to manually scale containers up or down. Therefore, Kubernetes is clearly the winner.
Load-balancing
Load balancing must be configured manually unless Pods are exposed as services.
Uses ingress load balancing and also assigns ports to services automatically.
Manual configuration for load balancing in Kubernetes is an extra step, but not very complicated. Automatic load balancing in Docker Swarm is very flexible.
Storage
Allows sharing storage volumes between containers within the same Pod.
Allows sharing data volumes with any other container on other nodes.
Kubernetes deletes the storage volume if the Pod is killed. Docker Swarm deletes storage volume when the container is killed.
Market Share
According to Google Trends, as of February 2019, the popularity of the Kubernetes in worldwide web and YouTube searches are about 79% and 75% of peak values, respectively, for the past 12 months.
According to Google Trends, as of February 2019, the popularity of Docker Swarm in worldwide web and YouTube searches is at about 5% of peak values for the past 12 months.
As can be seen in the Google Trends report, Kubernetes leads the market share in the popularity of web and YouTube searches. Kubernetes dominates this category compared to the less popular Docker Swarm.
Conclusion
The Kubernetes vs Docker Swarm comparison shows that each container orchestrator has advantages and disadvantages:
If you require a quick setup and have simple configuration requirements, Docker Swarm may be a good option due to its simplicity and shallow learning curve.
If your application is complex and utilizes hundreds of thousands of containers in production, Kubernetes, with its auto scaling capabilities and high availability policies, is almost certainly the right choice. However, its steep learning curve and longer setup and configuration time can be a bad fit for some users. With additional tooling, like Rancher, some of these administration and maintenance pain points can be mitigated, making the platform more accessible.
More Resources
A good next step in learning about container orchestration and what Kubernetes can do is to book a spot in our weekly Intro to Rancher and Kubernetes Online Training. An engineer will walk you through Kubernetes architecture, components and setup, and then show you the value that Rancher adds on top of Kubernetes. Register for the online class now.
Expert Training in Kubernetes and Rancher
Join our free online training sessions to learn more about Kubernetes, containers, and Rancher.
Docker vs Kubernetes: The Journey from Docker to Kubernetes
The need to deploy applications from one computing environment to another quickly, easily, and reliably has become a critical part of enterprise’s business requirements and DevOps team’s daily workflow.
It’s unsurprising then, that container technologies, which make application deployment and management easier for teams of all sizes, have risen dramatically in recent years. At the same time, however, virtual machines (VM) as computing resources have reached their peak use in virtualized data centers. Since VMs existed long before containers, you may wonder what the need is for containers and why they have become so popular.
The Benefits and Limitations of Virtual Machines
Virtual machines allow you to run a full copy of an operating system on top of virtualized hardware as if it is a separate machine. In cloud computing, physical hardware on a bare metal server are virtualized and shared between virtual machines running on a host machine in a data center by the help of hypervisor (i.e. virtual machine manager).
Even though virtual machines bring us great deal of advantages such as running different operating systems or versions, VMs can consume a lot of system resources and also take longer boot time. On the other hand, containers share the same operating system kernel with collocated containers each one running as isolated processes. Containers are lightweight alternative by taking up less space (MBs) and can be provisioning rapidly (milliseconds) as opposed to VM’s slow boot time (minutes) and more storage space requirements (GBs). This allows containers to operate at an unprecedented scale and maximize the number of applications running on minimum number of servers. Therefore, containerization shined drastically in the recent years because of all these advantages for many software projects of enterprises.
Need for Docker Containers and Container Orchestration Tools
Since its initial release in 2013, Docker has become the most popular container technology worldwide, despite a host of other options, including RKT from CoreOS, LXC, LXD from Canonical, OpenVZ, and Windows Containers.
However, Docker technology alone is not enough to reduce the complexity of managing containerized applications, as software projects get more and more complex and require the use tens of thousands of Docker containers. To address these larger container challenges, substantial number of container orchestration systems, such as Kubernetes and Docker Swarm, have exploded onto the scene shortly after the release of Docker.
There has been some confusion surrounding Docker and Kubernetes for awhile: “what they are?”, “what they are not?”, “where are they used?”, and “why are both needed?”
This post aims to explain the role of each technology and how each technology helps companies ease their software development tasks. By the end of this article, you’ll understand that the choice is not Docker vs Kubernetes, but Kubernetes vs alternative container orchestrators.
Let’s use a made-up company, NetPly (sounds familiar?), as a case study to highlight the issues we are addressing.
NetPly is an online and on-demand entertainment movie streaming company with 30 million members in over 100 countries. NetPly delivers video streams to your favorite devices and provides personalized movie recommendations to their customers based on their previous activities, such as sharing or rating a movie. To run their application globally, at scale, and provide quality of service to their customers, NetPly runs 15,000 production servers worldwide and follow agile methodology to deploy new features and bug fixes to the production environment at a fast clip.
However, NetPly has been struggling with two fundamental issues in their software development lifecycle:
Issue 1- Code that runs perfectly in a development box, sometimes fails on test and/or production environments. Therefore, NetPly would like to keep code and configuration consistent across their development, test, and production environments to reduce the issues arising from application hosting environments.
Issue 2- Viewers experience a lot of lags as well as poor quality and degraded performance for video streams during weekends, nights, and holidays, when incoming requests spike. To resolve this potentially-devastating issue, NetPly would like to use load-balancing and auto scaling techniques and automatically adjust the resource capacity (e.g. increase or decrease number of computing resources) to maintain application availability, provide stable application performance, and optimize operational costs as computing demand increases or decreases. These requests also require NetPly to manage the complexity of computing resources and the connections between the flood of these resources in production.
Docker can be used to resolve Issue 1 by following a container-based approach; in other words, packaging application code along with all of its dependencies, such as libraries, files, and necessary configurations, together in a Docker image.
Docker is an open-source operating system level virtualized containerization platform with a light-weight application engine to run, build and distribute applications in Docker containers that run nearly anywhere. Docker containers, as part of Docker, are portable and light-weight alternative to virtual machines, and eliminate the waste of esources and longer boot times of the virtual-machine approach. Docker containers are created using Docker images, which consist of a prebuilt application stack required to launch the applications inside the container.
With that explanation of a Docker container in mind, let’s go back our successful company that is under duress: NetPly. As more users simultaneously request movies to watch on the site, NetPly needs to scale up more Docker containers at a reasonably fast rate and scale down when the traffic lowers. However, Docker alone is not capable of taking care of this job, and writing simple shell scripts to scale the number of Docker containers up or down by monitoring the network traffic or number of requests that hit to the server would not be a viable and practicable solution.
As the number of containers increases to tens of hundreds to thousands, and the NetPly IT team starts managing fleets of containers across multiple heterogeneous host machines, it becomes a nightmare to execute Docker commands like “docker run”, “docker kill”, and “docker network” manually.
Right at the point where the team starts launching containers, wiring them together, ensuring high availability even when a host goes down, and distributing the incoming traffic to the appropriate containers, the team wishes they had something that handled all these manual tasks with no or minimal intervention. Exit human, enter program.
To sum up: Docker by itself is not enough to handle these resources demands at scale. Simple shell commands alone are not sufficient to handle tasks for a tremendous number of containers on a cluster of bare metal or virtual servers. Therefore, another solution is needed to handle all these hurdles for the NetPly team.
This is where the magic starts with Kubernetes. Kubernetes is as container orchestration engine (COE), originally developed by Google and used to resolve NetPly’s Issue 2. Kubernetes allows you to handle fleets of containers. Kubernetes automatically manages the deployment, scaling and networking of containers, as well as container failovers by launching a new one with ease.
The following are some of the fundamental features of Kubernetes.
Load balancing
Configuration management
Automatic IP assignment
Container scheduling
Health checks and self healing
Storage management
Auto rollback and rollout
Auto scaling
Container Orchestration Alternatives
Although Kubernetes seems to solve the challenges our NetPly team faces, there are a good deal of container management tool alternatives for Kubernetes out there.
Docker Swarm, Marathon on Apache Mesos, and Nomad are all container orchestration engines that can also be used for managing your fleet of containers.
Why choose anything other than Kubernetes? Although Kubernetes has a lot of great qualities, it has challenges too. The most arresting issues people face with Kubernetes are:
the steep learning curve to its commands;
setting Kubernetes up for different operating systems.
As opposed to Kubernetes, Docker Swarm uses the Docker CLI to manage all container services. Docker Swarm is easy to set up, has less commands to learn to get started rapidly, and is cheaper to train employees. A drawback of Docker Swarm bounds you to the limitations of the Docker API.
Another option is the Marathon framework on Apache Mesos. It’s extremely fault-tolerant and scalable for thousands of servers. However, it may be too complicated to set up and manage small clusters with Marathon, making it impractical for many teams.
Each container management tool comes with its own set of advantages and disadvantages. However, Kubernetes with its heritage based in Google’s Borg system, has been greatly adopted and supported by the large community as well as industry for many years and become the most popular container management solution among other players. With the power of both Docker and Kubernetes, it seems like journey of the power and popularity of these technologies will continue to rise and being adopted by even larger communities.
In our next article in this series, we will compare in more depth Kubernetes and Docker Swarm.
Expert Training in Kubernetes and Rancher
Join our free online training sessions to learn more about Kubernetes, containers, and Rancher.
Container monitoring environments come in all shapes and sizes. Some are open source while others are commercial. Some are available in the Rancher Catalog while others require manual configuration. Some are general purpose while others are aimed specifically at container environments. Some are hosted in the cloud while others require installation on own cluster hosts.
In this post, we take an updated look at 10 container monitoring solutions. This effort builds on earlier work including Ismail Usman’s Comparing 7 Monitoring Options for Docker from 2015 and The Great Container Monitoring Bake Off Meetup in October of 2016. This article was originally written in 2017 and was last updated at the end of 2018.
The number of monitoring solutions is daunting. New solutions are coming on the scene continuously, and existing solutions evolve in functionality. Rather than looking at each solution in depth, we will take the approach of drawing high-level comparisons. With this approach, readers can hopefully “narrow the list” and do more serious evaluations of solutions best suited to their own needs.
In the following sections, we suggest a framework for comparing monitoring solutions, present a high-level comparison of each, and then discuss each solution in more detail by addressing how each solution works with Rancher. We also cover a few additional solutions you may have come across that did not make the top 10.
A Framework for Comparison
One challenge with objectively comparing Docker monitoring solutions is that architectures, capabilities, deployment models, and costs can vary widely. One solution may extract and graph Docker-related metrics from a single host while another aggregates data from many hosts, measures application response times, and sends automated alerts under particular conditions.
Having a framework is useful when comparing solutions. We’ve constructed the following tiers of functionality that most monitoring solutions have in common as a basis for this comparison. Like any self-respecting architectural stack, this one has seven layers:
Diagram of Kubernetes monitoring layers
Host agents: The host agent represents the appendages of the monitoring solution, extracting time-series data from various sources like APIs and log files. Agents are usually installed on each cluster host (either on-premises or cloud-resident) and are themselves often packaged as Docker containers for ease of deployment and management.
Data gathering framework: While single-host metrics are sometimes useful, administrators usually need a consolidated view of all hosts and applications. Monitoring solutions typically have some mechanism to gather data from each host and persist it in a shared data store.
Datastore: The datastore may be a traditional database, but is more commonly some form of scalable, distributed database optimized for time-series data comprised of key-value pairs. Some solutions have native datastores while others leverage pluggable open-source datastores.
Aggregation engine: The problem with storing raw metrics from dozens of hosts is that the amount of data can become overwhelming. Monitoring frameworks often provide data aggregation capabilities, periodically crunching raw data into consolidated metrics (like hourly or daily summaries), purging old data that is no longer needed, or re-factoring data in some fashion to support anticipated queries and analysis.
Filtering & analysis: A monitoring solution is only as good as the insights you can gain from the data. Filtering and analysis capabilities vary widely. Some solutions support a few pre-packaged queries presented as simple time-series graphs, while others have customizable dashboards, embedded query languages, and sophisticated analytic functions.
Visualization tier: Monitoring tools usually have a visualization tier where users can interact with a web interface to generate charts, formulate queries and, in some cases, define alerting conditions. Depending on the solution, the visualization tier may be tightly coupled with the filtering and analysis functionality, or it may be separate.
Alerting & notification: Few administrators have time to sit and monitor graphs all day. Another common feature of monitoring systems is an alerting subsystem that can provide notification if predefined thresholds are met or exceeded.
Beyond understanding how each monitoring solution implements the basic capabilities above, users will be interested in other aspects of the monitoring solution as well:
Completeness of the solution
Ease of installation and configuration
Details about the web UI
Ability to forward alerts to external services
Level of community support and engagement (for open-source projects)
Availability in a Rancher Catalog
Support for monitoring non-containerized environments and apps
Native Kubernetes support (pods, services, namespaces, etc.)
Extensibility (APIs, other interfaces)
Deployment model (self-hosted, cloud)
Cost, if applicable
Comparing Our 10 Monitoring Solutions
The diagram below shows a high-level view of how our 10 monitoring solutions map to our seven-layer model, which components implement the capabilities at each layer, and where the components reside. Each framework is complicated, and this is a simplification to be sure, but it provides a useful view of which component does what. Read on for additional detail.
Ten monitoring solutions at a glance
Additional attributes of each monitoring solution are presented in a summary fashion below. For some solutions, there are multiple deployment options, so the comparisons become a little more nuanced.
Additional comparison details
Looking at Each Solution in More Depth
Now that we that we’ve presented a general overview of the capabilities of the solutions we’re comparing, we will look at each technology in a bit more depth.
Docker Stats
At the most basic level, Docker provides built-in command monitoring for Docker hosts via the docker stats command. Administrators can query the Docker daemon and obtain detailed, real-time information about container resource consumption metrics, including CPU and memory usage, disk and network I/O, and the number of running processes.
docker stats leverages the Docker Engine API to retrieve this information. docker stats has no notion of history, and it can only monitor a single host, but clever administrators can write scripts to gather metrics from multiple hosts. docker stats is of limited use on its own, but the data it gathers can be combined with other data sources like Docker log files and docker events to feed higher level monitoring services.
Docker only knows about metrics reported by a single host, so docker stats is of limited use monitoring Kubernetes with multi-host application services. With no visualization interface, no aggregation, no datastore, and no ability to collect data from multiple hosts, docker stats does not fare well against our seven-layer model. Because Rancher runs on Docker, basic docker stats functionality is automatically available to Rancher users.
cAdvisor
cAdvisor (container advisor) is an open-source project that, like docker stats, provides users with resource usage information about running containers. cAdvisor was originally developed by Google to manage its own lmctfy containers, but it now supports Docker as well. It is implemented as a daemon process that collects, aggregates, processes, and exports information about running containers.
cAdvisor exposes a web interface and can generate multiple graphs but, like docker stats, it monitors only a single Docker host. It can be installed on a Docker machine either as a container or natively on the Docker host itself. cAdvisor itself only retains information for 60 seconds and needs to be configured to log data to an external datastore. Datastores commonly used with cAdvisor data include Prometheus and InfluxDB.
While cAdvisor itself is not a complete monitoring solution, it is often a component of other monitoring solutions. Administrators can easily deploy cAdvisor on Rancher, and it is part of several comprehensive monitoring stacks.
Scout
Scout provides a cloud-based application and database-monitoring service aimed mainly at Ruby and Elixir environments. One of many use cases it supports is monitoring Docker containers leveraging its existing monitoring and alerting framework. We mention Scout because it was covered in previous comparisons as a solution for monitoring Docker.
Scout provides comprehensive data gathering, filtering, and monitoring functionality with flexible alerts and integrations to third-party alerting services. The team at Scout provides guidance on how to write scripts using Ruby and StatsD to tap into the Docker Stats API (as mentioned above) and the Docker Event API, and relay metrics to Scout for monitoring. They’ve also packaged a docker-scout container, available on Docker Hub (scoutapp/docker-scout), that makes installing and configuring the scout agent simple. The ease of use will depend on whether users configure the StatsD agent themselves or leverage the packaged docker-scout container.
As a hosted cloud service, ScoutApp can save a lot of headaches when it comes to getting a container-monitoring solution up and running quickly. If you’re deploying Ruby apps or running the database environments supported by Scout, it probably makes good sense to consolidate your Docker, application, and database-level monitoring and use the Scout solution. Users might want to watch out for a few things, however.
At most service levels, the platform only allows for 30 days of data retention, and rather than being priced per month per monitored host, standard packages are priced per transaction ranging from $99 to $299 per month. The solution out-of-the-box is not Kubernetes-aware, and extracts and relays a limited set of metrics. Also, while docker-scout is available on Docker Hub, development is by Pingdom, and there have been only minor updates in the last two years to the agent component. Scout is not natively supported in Rancher but, because it is a cloud service, it is easy to deploy and use, particularly when the container-based agent is used. At present, the docker-scout agent is not in the Rancher Catalog.
Pingdom
Since we’ve mentioned Scout as a cloud-hosted app, we also need to mention a similar solution called Pingdom. Pingdom is a hosted-cloud service operated by SolarWinds, a company focused on monitoring IT infrastructure. While the main use case for Pingdom is website monitoring, as a part of its server monitor platform, Pingdom offers approximately 90 plug-ins. In fact, Pingdom maintains docker-scout, the same StatsD agent used by Scout.
Pingdom is worth a look because its pricing scheme appears better suited to monitoring Docker environments. Pricing is flexible, and users can choose between per-server based plans and plans based on the number of StatsD metrics collected ($1 per 10 metrics per month). Pingdom makes sense for users who need a full-stack monitoring solution that is easy to set up and manage, and who want to monitor additional services beyond the container management platform. Like Scout, Pingdom is a cloud service that can be easily used with Rancher.
Datadog
Datadog is another commercial hosted-cloud monitoring service similar to Scout and Pingdom. Datadog also provides a containerized agent for installation on each Docker host. However, rather than using generic StatsD like the cloud-monitoring solutions mentioned previously, Datadog has developed an enhanced StatsD called DogStatsD.
The Datadog agent collects and relays the full set of metrics available from the Docker API, providing more detailed, granular monitoring. While Datadog does not have native support for Rancher, a Datadog catalog entry in the Rancher UI makes the Datadog agent easy to install and configure on Rancher. Rancher tags can also be used so that reporting in Datadog reflects the labels you’ve used for hosts and applications in Rancher. Datadog provides better access to metrics and more granularity in defining alert conditions than the cloud services mentioned earlier. Like the other services, Datadog can be used to monitor other services and applications as well, and it boasts a library of over 200 integrations. Datadog also retains data at full resolution for 18 months, which is longer than the cloud services above.
An advantage of Datadog over some of other cloud services is that it has integrations beyond Docker and can collect metrics from Kubernetes, etcd, and other services that you may be running in your Rancher environment. This versatility is important because it monitors metrics for things like Kubernetes pods, services, namespaces, and kubelet health. The Datadog-Kubernetes monitoring solution uses DaemonSets in Kubernetes to automatically deploy the data collection agent to each cluster node. Pricing for Datadog starts at approximately $15 per host per month and goes up from there depending services required and the number of monitored containers per host.
Sysdig
Sysdig provides a cloud-based monitoring solution that focuses more narrowly on monitoring container environments including Docker, Swarm, Mesos, and Kubernetes. Sysdig also makes some of its functionality available in open-source projects, and they provide the option of either cloud or on-premises deployments of the Sysdig monitoring service. In these respects, Sysdig is different from the cloud-based solutions we’ve looked at so far.
Currently Sysdig is not available as a catalog app for Rancher 2, but it can be installed on Rancher outside of the catalog. The commercial Sysdig Monitor has Docker monitoring, alerting, and troubleshooting facilities and is also Kubernetes, Mesos, and Swarm-aware. Sysdig is automatically aware of Kubernetes pods and services, making it a good solution for Rancher. Sysdig is priced monthly per host like Datadog. While the entry price is slightly higher, Sysdig includes support for more containers per host, so actual pricing will likely be very similar depending on the user’s environment. Sysdig also provides a comprehensive CLI, csysdig, differentiating it from some of the offerings.
Prometheus
Prometheus is a popular, open-source monitoring and alerting toolkit originally built at SoundCloud. It is now a CNCF project, the foundation’s second hosted project after Kubernetes.
As a toolkit, it is substantially different from monitoring solutions described thus far. A first major difference is that, rather being offered as a cloud service, Prometheus is modular and self-hosted, meaning that users deploy Prometheus on their clusters whether on-premises or cloud-resident. Instead of pushing data to a cloud service, Prometheus installs on each Docker host and pulls or “scrapes” data from an extensive variety of exporters available to Prometheus via HTTP. Some exporters are officially maintained as a part of the Prometheus GitHub project, while others are external contributions. Some projects expose Prometheus metrics natively so that exporters are not needed.
Prometheus is highly extensible. Users need to manage the number of exporters and configure polling intervals appropriately depending on the amount of data they are collecting. The Prometheus server retrieves time-series data from various sources and stores data in its internal datastore. Prometheus provides features like service discovery, a separate push gateway for specific types of metrics, and has an embedded query language (PromQL) that excels at querying multidimensional data. It also has an embedded web UI and API. The web UI in Prometheus provides good functionality but relies on users knowing PromQL, so some organizations prefer to use Grafana as an interface for charting and viewing cluster-related metrics. Prometheus has a discrete Alert Manager with a distinct UI that can work with data stored in Prometheus. Like other alert managers, it works with a variety of external alerting services including email, Hipchat, Pagerduty, Slack, OpsGenie, VictorOps, and others.
Because Prometheus is comprised of many components, and exporters need to be selected and installed depending on the services monitored, it is slightly more difficult to install; but as a free offering, the price is right. While not quite as refined as tools like Datadog or Sysdig, Prometheus offers similar functionality, extensive third-party software integrations, and best-in-class cloud monitoring solutions.
Prometheus is aware of Kubernetes and other container management frameworks. An entry in the Rancher Catalog makes getting started with Prometheus easier. For administrators who don’t mind going to a little more effort, Prometheus is one of the most capable monitoring solutions and should be on your shortlist for consideration.
Heapster (deprecated)
Heapster was another solution that frequently came up when discussing monitoring-container environments. Since the time when this article was originally published, however, Heapster has been deprecated by the Kubernetes project. Kubernetes recommends a combination of the following tools as a replacement for Heapster:
We’re leaving following information intact for context and reference.
Heapster was a project under the Kubernetes umbrella that helped enable container-cluster monitoring and performance analysis. Heapster specifically supported Kubernetes and OpenShift. People often described Heapster as a monitoring solution, but it was more precisely a “cluster-wide aggregator of monitoring and event data.” Heapster was never deployed alone; rather, it was a part of a stack of open-source components. The Heapster monitoring stack was typically comprised of:
A data gathering tier: e.g., cAdvisor accessed with the kubelet on each cluster host
Pluggable storage backends: e.g., ElasticSearch, InfluxDB, Kafka, Graphite, or roughly a dozen others
A data visualization component: Grafana or Google Cloud Monitoring
A popular stack was comprised of Heapster, InfluxDB, and Grafana, and this combination was installed by default on Rancher for a time when users choose to deploy Kubernetes. These components were considered add-ons to Kubernetes, so they were not automatically deployed with all Kubernetes distributions. One of the reasons that InfluxDB was popular with Heapster was that it is one of the few data backends that supports both Kubernetes events and metrics, allowing for more comprehensive monitoring of Kubernetes. Heapster did not natively support alerting or services related to Application Performance Management (APM) found in commercial cloud-based solutions or Prometheus. Users that needed monitoring services could supplement their Heapster installation using Hawkular.
ELK Stack
Another open-source software stack available for monitoring container environments is ELK, comprised of three open-source projects contributed by Elastic. The ELK stack is versatile and is widely used for a variety of analytic applications, log file monitoring being a key one. ELK is named for its key components:
Elasticsearch: a distributed search engine based on Lucene
Logstash: a data-processing pipeline that ingests data and sends it to Elasticsearch (or other “stashes”)
Kibana: a visual search dashboard and analysis tool for Elasticsearch
An unsung member of the Elastic stack is Beats, described by the project developers as “lightweight data shippers.” There are a variety of off-the-shelf Beats including Filebeat (used for log files), Metricbeat (using for gathering data metrics from various sources), and Heartbeat for simple uptime monitoring among others. Metricbeat is Docker-aware, and the authors provide guidance on how to use it to extract host metrics and monitor services in Docker containers.
There are variations in how the ELK stack is deployed. Lorenzo Fontana of Kiratech explains in this article how to use cAdvisor to collect metrics for storage in ElasticSearch and analysis using Kibana. In another article, Aboullaite Mohammed describes a different use case focused on collecting Docker log files and analyzing various Linux and Nginx log files (error.log, access.log, and syslog). There are commercial ELK stack providers such as logz.io and Elastic themselves that offer “ELK as a service”, supplementing the stack’s capabilities with alerting functionality. Additional information about using ELK with Docker is available here.
For Rancher users, the related EFK stack (Elasticsearch, Fluentd, and Kibana) is available as a Rancher Catalog entry. While knowledgeable administrators can use Elastic-based stacks for container monitoring, this is a tougher solution to implement compared to Sysdig, Prometheus, or Datadog, all of which are more directly aimed at container monitoring.
Sensu
Sensu is a general-purpose, self-hosted monitoring solution that supports a variety of monitoring applications. A free Sensu Core edition is available under an MIT license, while an enterprise version with added functionality is available for for a price. Sensu uses the term client to refer to its monitoring agents, so depending on the number of hosts and application environments you are monitoring, the enterprise edition can get expensive.
Sensu has impressive capabilities outside of container management, but consistent with the other platforms we’ve looked at it from the perspective of monitoring the container environment and containerized applications. The number of Sensu plug-ins continues to grow, and there are dozens of Sensu and community supported plug-ins that allow metrics to be extracted from various sources.
In an earlier evaluation of Sensu on Rancher in 2015, it was necessary for the author to develop shell scripts to extract information from Docker, but an actively developed Docker plug-in is now available for this purpose making Sensu easier to use with Rancher. Plug-ins tend to be written in Ruby with gem-based installation scripts that need to run on the Docker host. Users can develop additional plug-ins in the languages they choose. Sensu plug-ins are not deployed in their own containers, as common with other monitoring solutions we’ve considered (this may be because Sensu does not come from a heritage of monitoring containers).
Different users will want to mix and match plug-ins depending on their monitoring requirements, so having separate containers for each plug-in might become unwieldy. Plug-ins are deployable using platforms like Chef, Puppet, and Ansible, however. For Docker alone, for example, there are six separate plug-ins that gather Docker-related data from various sources, including docker stats, container counts, container health, docker ps, and more. The number of plug-ins is impressive and includes many of the application stacks that users will likely be running in container environments (ElasticSearch, Solr, Redis, MongoDB, RabbitMQ, Graphite, and Logstash, to name a few). Plug-ins for management and orchestration frameworks like AWS services (EC2, RDS, ELB) are also provided with Sensi.
Sensu uses a message bus implemented using RabbitMQ to facilitate communication between the agents/clients and the Sensu server. Sensu uses Redis to store data, but it is designed to route data to external time-series databases. Among the databases supported are Graphite, Librato, and InfluxDB. Sensu as mentioned, do not offer a container friendly deployment model.
Sensu has a large number of features, but a drawback for container users is that the framework is harder to install, configure, and maintain because the components are not themselves Dockerized. Also, many of the alerting features like sending alerts to services like PagerDuty, Slack, or HipChat, for example, that are available in competing cloud-based solutions or open-source solutions like Prometheus require that purchase of the Sensu enterprise license.
The Monitoring Solutions We Missed
Graylog is another open-source solution that comes up when monitoring Docker. Like ELK, Graylog is suited to Docker log file analysis. It can accept and parse logs and event data from multiple data sources and supports third-party collectors like Beats, Fluentd, and NXLog.
Nagios is usually viewed as better suited for monitoring cluster hosts rather than containers but, for those of us who grew up monitoring clusters, Nagios is a crowd favorite.
Continue your education with Kubernetes Master Classes
Learn to navigate the modern development landscape with confidence and get started without leaving home.
I just came back from DockerCon EU. I have not met a more friendly and
helpful group of people than the users, vendors, and Docker employees at
DockerCon. It was a well-organized event and a fun
experience.
I went into the event with some questions[
about where Docker was headed. Solomon Hykes addressed these questions
in his keynote, which was the highlight of the entire show. Docker
embracing Kubernetes is clearly the single biggest piece of news coming
out of DockerCon.
If there’s one thing
Docker wanted the attendees to take away, it was the Modernize
Traditional Applications (MTA) program. The idea of MTA is simple:
package a traditional Windows or Linux app as a Docker container then
deploy the app on modern cloud infrastructure and achieve some savings.
By dedicating half of the day one keynote and the entire day two keynote
to this topic, Docker seems to have bet its entire business on this
single value proposition.
I am surprised, however, that MTA became the sole business case focus at DockerCon. The
DockerCon attendees I talked to expected Docker to outline a more
complete vision of business opportunities for Docker. MTA did not appeal
to majority of DockerCon attendees. Even enterprise customers I met had
much bigger plans than MTA. I wish Docker had spent some time
reinforcing the value containers can deliver in transforming application
development, which is a much bigger business
opportunity.
MTA builds on the most basic capabilities of Docker as an application packaging format, a practice
that has existed since the very beginning of Docker. But what specific
features of Docker EE makes MTA work better than before? Why is Docker
as a company uniquely positioned to offer a solution for MTA? What other
tools will customers need to complete the MTA journey? The MTA keynotes
left these and many other questions unanswered.
Beyond supporting Kubernetes, Docker made
no announcements that made Swarm more likely to stay relevant. As an
ecosystem partner, I find it increasingly difficult to innovate based on
Docker’s suite of technologies. I miss the days when Docker announced
great innovations like Docker Machine, Docker Swarm, Docker Compose,
Docker network and volume plugins, and all kinds of security-related
innovations. We all used to get busy working on these technologies the
very next day. There are still plenty of innovations in container
technologies today, but the innovations are happening in the Kubernetes
and CNCF ecosystem.
After integrating Kubernetes, I hope Docker can get back to producing more innovative
technologies. I have not seen many companies who possess as much
capacity to innovate and attention to usability as Docker. I look
forward to what Docker will announce at the next
DockerCon.
I am heading to Copenhagen this week to attend DockerCon Europe 2017
you can still register for the conferencehere.
Because we created Rancher to serve the market needs resulting from the
widespread adoption of Docker technology, we have maintained a strong
presence at every DockerCon conference over the last three years.
DockerCon is special—not only is it a
gathering place for major industry players, it is one of the few events
that brings together far more users than vendors. The opportunity to
meet so many users in one place makes attending and sponsoring the
conference a worthwhile investment. Talking to our users and hearing
their ideas motivates us to work harder and improve the Rancher
product.
The Docker technology evolution is
at a critical juncture, so I am particularly interested in what Docker,
Inc. will announce at this year’s DockerCon EU. We recently announced
the technical preview of Rancher
2.0,
where we transitioned Rancher from a product built on Docker to a
product built on Kubernetes. As much success as Docker has achieved as
an application packaging and runtime standard, Kubernetes has overtaken
Docker in terms of container infrastructure, orchestration, and
ecosystem.
Container infrastructure
Infrastructure goes beyond packaging and runtime; it includes storage,
networking, load balancing, and security. When we started Rancher three
years ago, we expected Docker to define industry standard plugin
interfaces for container networking and storage. Despite the excellent
work done by Docker and other early pioneers like SocketPlane (later
acquired by Docker), Weaveworks, and ClusterHQ as well as plenty of
support from industry leaders such as Cisco, EMC, and NetApp, Docker
interfaces like libnetwork, Container Network Model (CNM), and Docker
volume plugin failed to become viable standards. We tried very hard to
work with CNM and Docker volume plugins at Rancher, but we ran into
insurmountable challenges:
We never figured out how to make CNM work outside of Docker’s
built-in networking implementation. We were not able to, for
example, create our own implementation of CNM that worked without
Swarm mode.
We were unable to make the Rancher implementation of Docker volume
plugin work reliably with the Docker daemon. I remember a
particularly challenging issue,
#18504,
which caused the Docker daemon to lock up from time to time. We
were not able to get this issue fixed, nor were we able to find a
workaround.
We solved these problems in Rancher 1.2 (released December 2016) by
switching to Kubernetes Container Network Interface (CNI) and Kubernetes
Flexvolume storage framework. Since Rancher 2.0 builds on Kubernetes,
any networking, storage, load balancer, and security solutions that
integrate with Kubernetes now work with Rancher out of the
box.
Container orchestration
We developed a container orchestrator for Rancher, called Cattle, to
add a number of features missing from early Docker Swarm, including
service discovery, DNS, service upgrade, and a load balancer. We hoped
Cattle would eventually be superseded by Swarm as Swarm becomes more
full featured.
When Rancher 1.0 was released in March 2016, however, Swarm was still not quite ready. At the
time, Kubernetes was also still immature and the future of container
orchestration was uncertain. Therefore, we decided that Rancher 1.0
should provide support for multiple orchestrators: Cattle, Swarm,
Kubernetes, and Mesos. Our users loved the idea of being able to adopt
one product without having to commit to a particular container
orchestrator.
We were really excited in June 2016 when Docker announced Swarm Mode. Swarm Mode offered many
features missing from early Docker Swarm and was much closer to what
Cattle could do. We quickly added Swarm Mode support in
Rancher.
By early 2017, however, it became apparent that Swarm Mode was not gaining traction. Perhaps early Swarm
mode implementations had quality issues, or perhaps Kubernetes
development was already too far ahead. A vast majority of Rancher users
were selecting Cattle or Kubernetes.
Rancher 2.0 builds on the industry-standard Kubernetes orchestrator.
Cattle is not gone—we will continue to develop it as it is now part of
the integrated Rancher experience. With 2.0, we provide a simple Docker
and Docker Compose user experience that builds on Kubernetes. Anyone
with basic understanding of Docker can get started with Rancher quickly,
and move to the more advanced native Kubernetes experience when they are
ready to do so.
Container ecosystem
DockerCon Europe has an impressive list of sponsors, which are no doubt
attracted by the ever-growing number of Docker users. I always look for
the latest number of total pulls from DockerHub as a benchmark of Docker
growth. At DockerCon Austin in April 2017, that number was 12 billion,
and has no doubt grown since then.
The Kubernetes ecosystem consists of largely the same set of companies, but
the engagement model is quite different. Most ecosystem partners like us
view Docker as mature technology with a lot of users. The Kubernetes
ecosystem is far more vibrant because that’s where active development,
innovation, and integration is happening.
Where will Docker go?
I have no real insight on what Docker will announce this week. And
that’s why I find I am really looking forward to attending this
DockerCon. Will Docker announce something this week that motivates
ecosystem partners to increase development efforts on Docker? Are they
going to announce any new projects or
initiatives?
Looking at the original containerd
blog
Solomon Hykes published in December of 2016, I noticed one particular
figure:
In the new containerd world, Docker is positioned at the same level
as OpenShift (and Rancher 2.0), at a layer even higher than Kubernetes.
Perhaps there will be a new Docker built on Kubernetes? I can’t wait to
find out.
Rancher at DockerCon
Please stop by our booth (G16) to say hello, get a demo of Rancher 2.0
and pick-up a coveted Rancher t-shirt. It would also be great to see
you in one of our speaking sessions:
Kubernetes for Docker Users Speaker: Darren Shepherd When: Tuesday,
17 October from 16:35 – 16:55 Where: Ecosystem B – Auditorium 12
Using LinuxKit to Build Custom RancherOS Systems Speaker: Sven
Dowideit When: Thursday, 19 October Where: Moby Summit
Sheng is a co-founder and CEO of Rancher Labs. Prior to starting
Rancher, Sheng was CTO of the Cloud Platforms group at Citrix Systems
after their acquisition of Cloud.com, where he was co-founder and CEO.
Sheng has more than 15 years of experience building innovative
technology. He was a co-founder at Teros, which was acquired by Citrix
in 2005 and led large engineering teams at SEVEN Networks, and Openwave
Systems. Sheng started his career as a Staff Engineer in Java Software
at Sun Microsystems, where he designed the Java Native Interface (JNI)
and led the Java Virtual Machine (JVM) development for the Java 2
platform. Sheng has a B.S. from the University of Science and Technology
of China and a Ph.D. from Yale University.
We would like to quickly explain and address the recent metasploit
module, which was created
to exploit Rancher servers and Docker hosts. This is not a security
issue because it only works in the following two scenarios:
1. Your Rancher server does not have authentication enabled
While Rancher does not require you to enable authentication, you should
always enable it if you are deploying Rancher in an untrusted
environment (e.g., publicly exposed to the internet). Instructions can
be found here. Rancher
currently supports GitHub, SAML, LDAP/AD, Azure AD, OpenLDAP, and local
authentication using our database.
2. Your API keys have been compromised
This is no different from having your username and password compromised,
so please make sure you API keys are stored securely. Rancher provides
you an option to disable and recreate the API keys that have been
compromised. In Rancher 2.0, we will
be further enhancing security by requiring authentication to be enabled
by default. Access to host bind mounts (what is exploited here) will be
privileged, and require that users be granted access. Stay tuned for
more information!
RancherOS v1.1.0 is [now
available]!
It includes a number of key enhancements such as: VMWare ESXi support;
improved OS level logging, including boot-time logs; remote Syslog
logging; and built in Logrotate and Cron services. Syslinux support has
improved with the addition of a boot menu, allowing you to select debug,
autologin, and recovery consoles. The reboot command can kexec into the
latest and previous OS versions. With RancherOS v1.1.0 you still select
Docker engines between 1.12 and 17.06. However, support for Docker
v1.10 and v1.11 is no longer available. RancherOS v1.0.x, our Long Term
Support (LTS) version is now at v1.0.4, with bug fixes and stable
improvements continuing until April 2018.
VMWare ESXi support
RancherOS now officially supports VMWare ESXi 6.5, and if it detects
that its running in a VMWare hypervisor, automatically adds the VMWare
guestinfo cloud-init datasource and enables the open-vm-tools service
(requires internet access). This support has been paired with changes in
docker-machine v0.12.2 to allow you to set the cloud-init.config.url or
cloud-init.config.data guestinfo values using the
–vmwarevsphere-cloudinit argument.
The RancherOS boot and system services logging now allows admins to
examine the debug information output during boot-up and initialization.
The extra files can be found in the /var/log/boot folder of the console.
In addition, you can use the netconsole kernel boot parameters to log
both the kernel level and RancherOS debug logs to a remote syslog server
for later analysis. Logrotate and a Cron system container have been
added to run by default.
Syslinux boot menu
RancherOS now gives you an interactive boot menu from which you can
select common debug and development options such as auto login, debug
logging, and the recovery console as well as temporarily edit the kernel
boot parameters. You can also use the new sudo ros config syslinux command to edit the system’s global.cfg boot
config.
Direction for RancherOS v1.2.0
Some of the features we’re considering next are:
Rancher/Strato for 32bit and 64bit ARM
More work towards simplifying building customised RancherOS builds
(LinuxKit)
Rancher Compose and Containerd
Hyper-V support
adding more functionality to our cloud-init immutable OS
configuration.
As always, we appreciate your input on RancherOS. You can provide
feedback by [filing an
issue]
or sending me (@svendowideit) a message on the Rancher Users [Slack
channel].
You can download RancherOS 1.1.1
[here].
The [quick start
guide]
in the RancherOS docs provides guidance on how to get started.
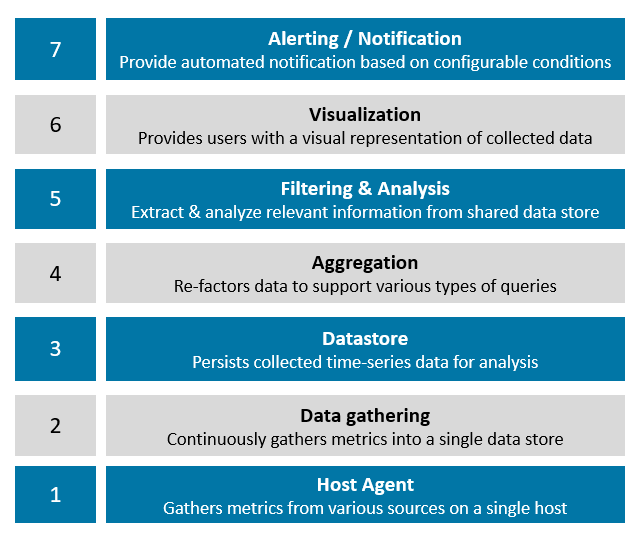
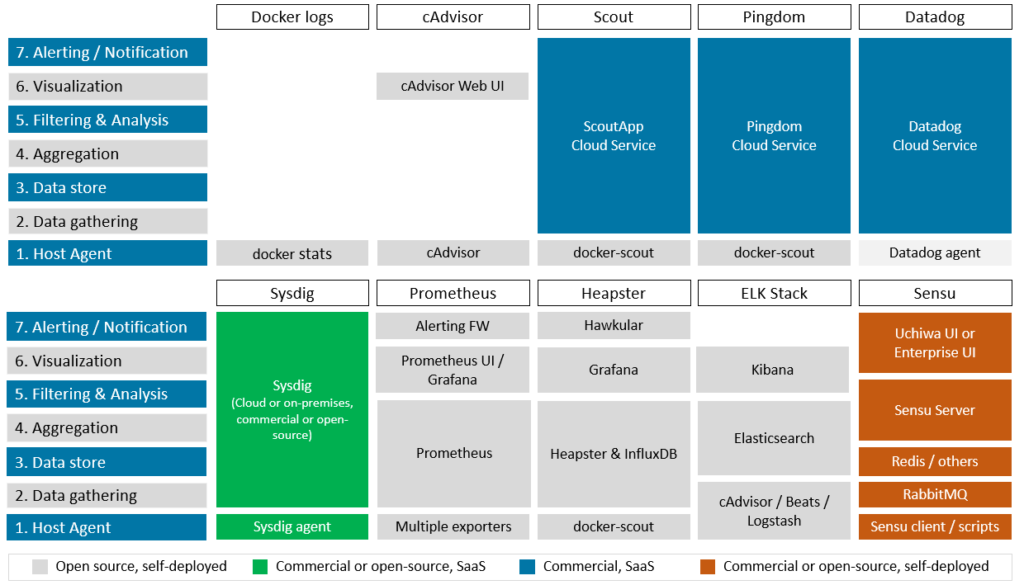
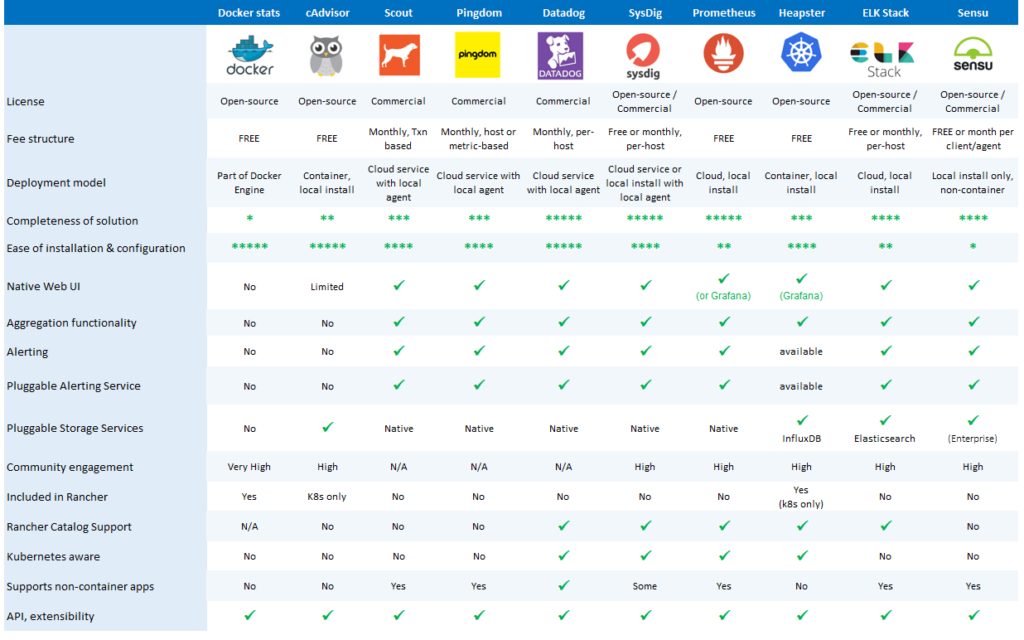
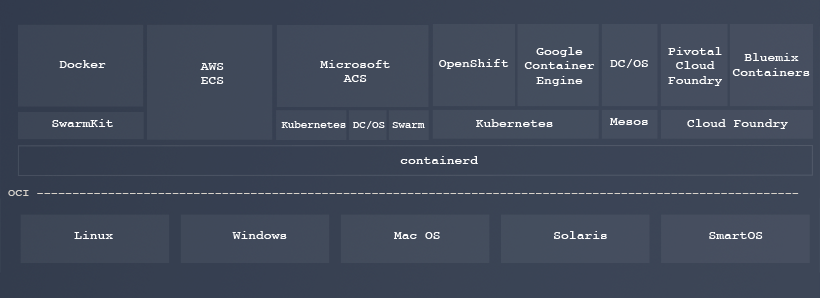 ](https://docs.google.com/document/d/1uRMajP8gKwG3Qkv1XUEXFOzZ663iPBcOi0d8QXpJc_o/edit#)