Step by Step instructions for building a Multiple Architecture openSUSE Leap PXE Server

Making life easier with PXE
Welcome to Part Two of our journey into setting up a network-based installation environment. Having already established our openSUSE Installation Server in Part One, we’re now ready to dive into the next exciting phase: Installing and Configuring PXE.
Preboot eXecution Environment (PXE) is our key to booting up an operating system over the network, without the need for a hard drive or an operating system already installed locally. This means we can kick off an installation without the hassle of finding a thumb drive – a real game-changer!
So, let’s roll up our sleeves and get started on setting up our PXE server. This will help us make our network more efficient and simplify the process of building machines
System Requirements
Software Requirements
openSUSE Leap 15.5 – Server Pattern (for smallest image)
Detailed instructions for this installation can be found at the following link:
openSUSE Leap: Step-by-Step Guide for installing it on your virtualized environment
Hardware Requirements
- Small Server or VM
- 1 or 2 Cores
- 2 GB of RAM
- 40 GB for OS + 10-15 Gigs for each OS
IP Addresses used in Example
- Server name: install
- IP address: 10.0.99.254
- Mask: 255.255.255.0
- DNS: 10.0.0.10
- Default Route: 10.0.99.1
- NTP: 10.0.0.1
Setup PXE server
Update openSUSE
To begin, ensure your server is updated with the latest patches.
zypper ref && zypper up -y
Setup TFTP Boot Server
1) Install TFTP Yast Plugin – yast2-tftp-server
Simplify your TFTP setup and configuration process with the TFTP Yast Plugin.
zypper in yast2-tftp-server
2) Launch TFTP Server Yast Plugin
Open Yast and navigate to Network Service->TFTP Server.
yastSelectNetwork Services->TFTP ServerSelect Install

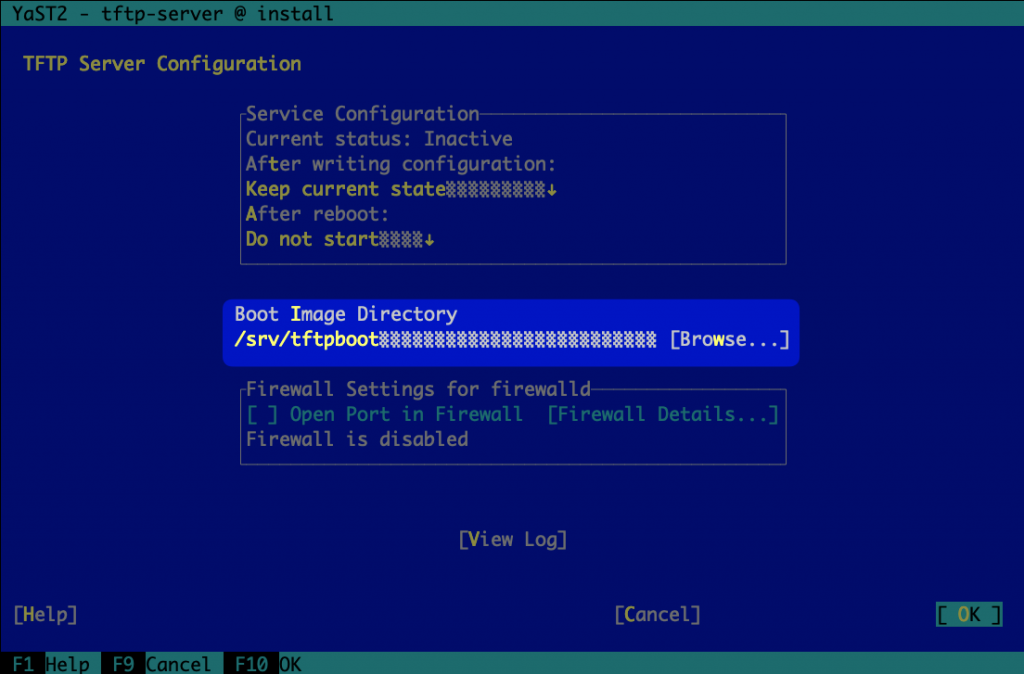
3) Specify the Boot Image Directory
The Boot Image Directory is where all the boot images will be stored. You can leave it at the default location.
Boot Image Directory
/srv/ftpboot
4) Copy x86 and Arm Boot images
With Yast, copying the boot image is straightforward. Just select the images you want to install via the UI and it does the rest
Select Software Management->Software ManagementInstall:
tftpboot-installation-openSUSE-Leap-15.5-x86tftpboot-installation-openSUSE-Leap-15.5-aarch64
5) Inspect x86 Boot Images
Yast automatically generates all necessary files for an x86 machine to boot via PXE.
Files are located in /usr/share/tftpboot-installation/.
Directory Structure of /usr/share/tftpboot-installation/openSUSE-Leap-15.5-x86_64/

Files in /usr/share/tftpboot-installation/openSUSE-Leap-15.5-x86_64/net
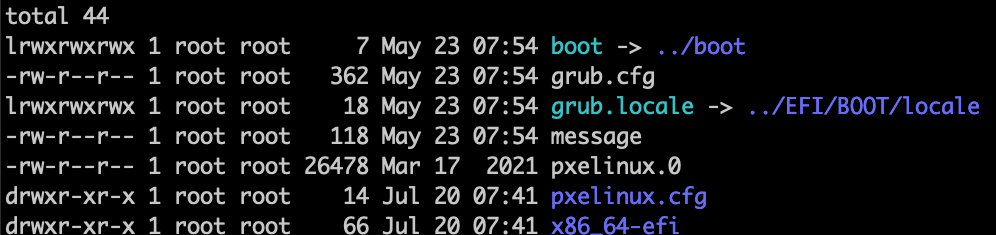
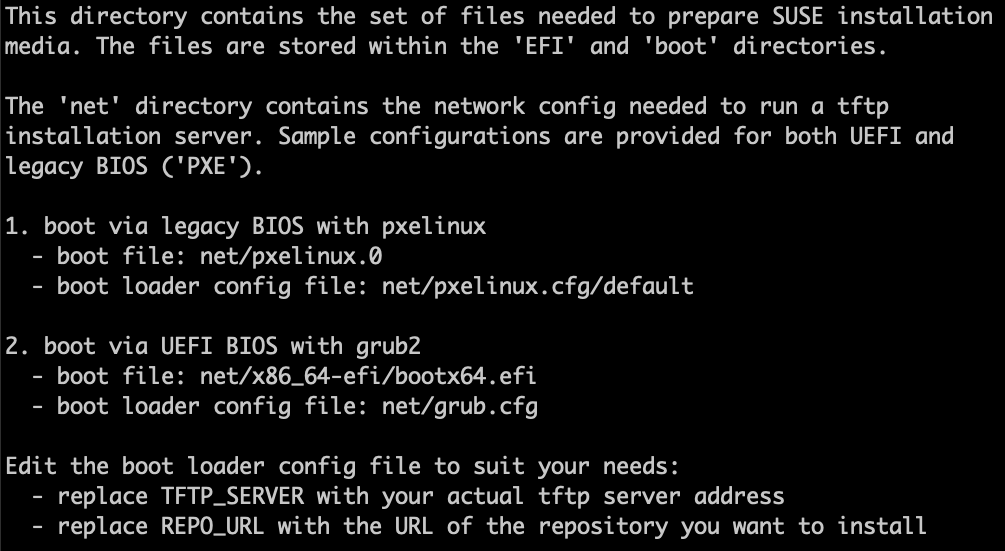
The README file provides all the information needed to boot a remote workstation via PXE.
6) Inspect ARM Boot Images
Similar to x86, Yast generates all necessary files for an ARM machine to boot via PXE.
Files are located in /usr/share/tftpboot-installation/.
Directory Structure of /usr/share/tftpboot-installation/openSUSE-Leap-15.5-aarch64/
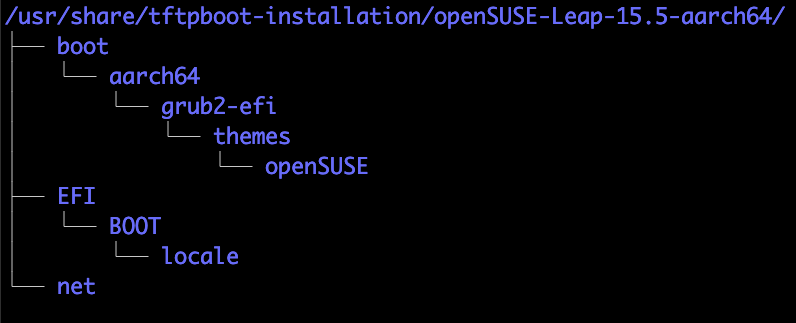
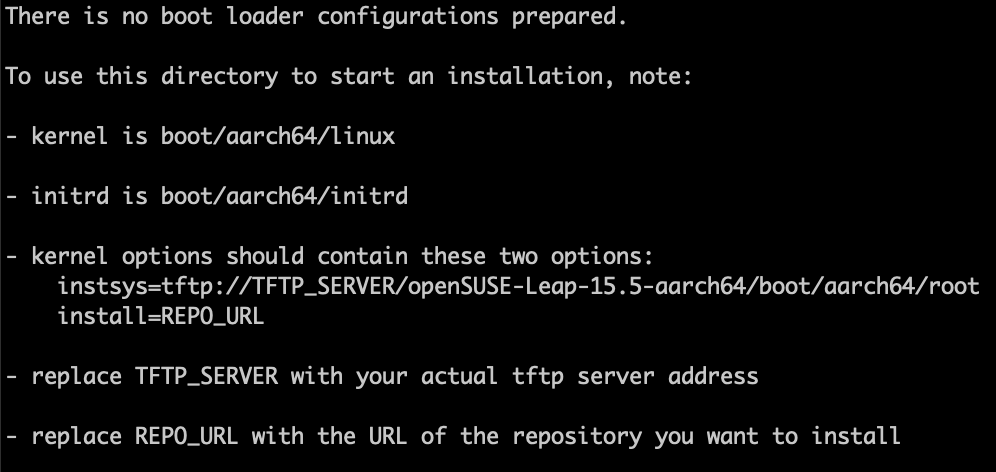
The README file provides all the information needed to boot a remote ARM workstation via PXE.
7) Copy boot images to /srv/tftpboot
Copy the files from /usr/share/tftpboot-installation/ to /srv/tftpboot.
cp -R /usr/share/tftpboot-installation/* /srv/tftpboot/8) Verify Folders were copped properly to /srv/tftpboot
Verify the files have been correctly copied to /srv/tftpboot.
ls /srv/tftpboot/
9) Enable and Verify tftp.socket
Start the tftp.socket and configure it to run at every system reboot. The tftp.socket will dynamically load tftp.service as needed.
systemctl enable --now tftp.socketConfirm the tftp.socket started properly.
systemctl status tftp.socket

Setup DHCP Server
Note: If you already have a DHCP Server, you can skip this section and go directly to “Configuring DHCP for PXE”.
1) Install TFTP Yast Plugin – yast2-dhcp-server
Simplify your DHCP setup and configuration process with the DHCP Yast Plugin.
zypper in yast2-dhcp-server
2) Launch DHCP Server Yast Plugin
Open Yast and navigate to Network Service->Installation Server.
yast
Select Network Services->DHCP Server
Select Install

3) Select the Network Card for DHCP Server
Choose the Network Card (for example, eth0)
eth0
4) Configure DHCP Global Settings
1)Domain Name – fill in your local domain if used (for example, xyz.net)
xyz.net2) Primary DNS – fill in your Primary DNS (for example, 10.0.0.10)
10.0.0.103) Default Route – fill in your default (for example, 10.0.99.1)
10.0.99.14) NTP – fill in your NTP Time Server (for example, 10.0.0.1)
10.0.0.1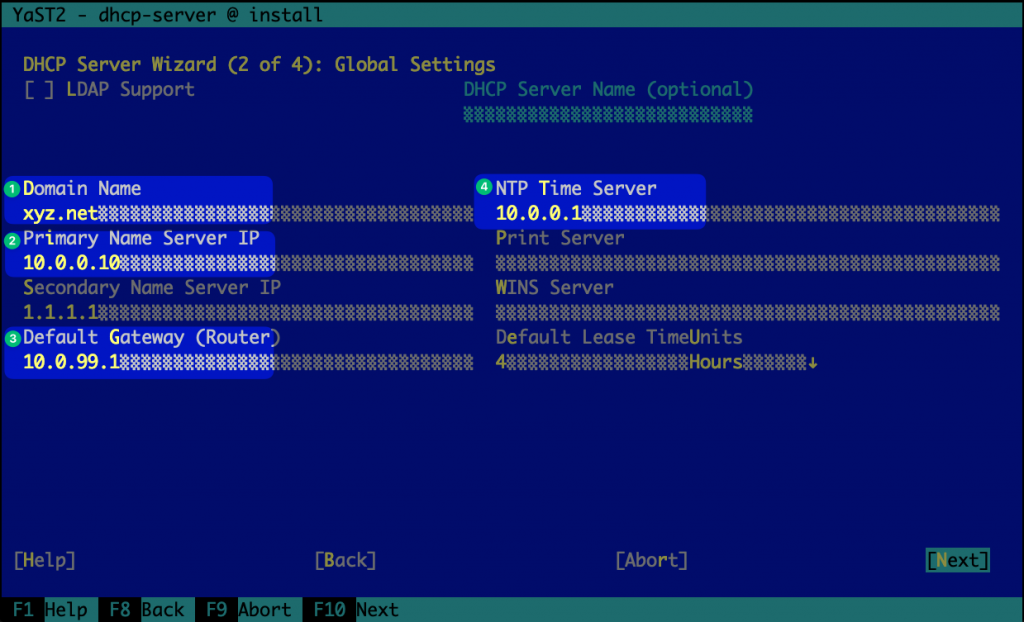
5) Set DHCP IP Range
1) First IP Address – fill in the first IP address you want in your range of IP addresses that will be handed out
10.0.99.1002) Last IP Address – fill in the last IP address you want in your range of IP addresses that will be handed out (for example, 10.0.99.200)
10.0.99.200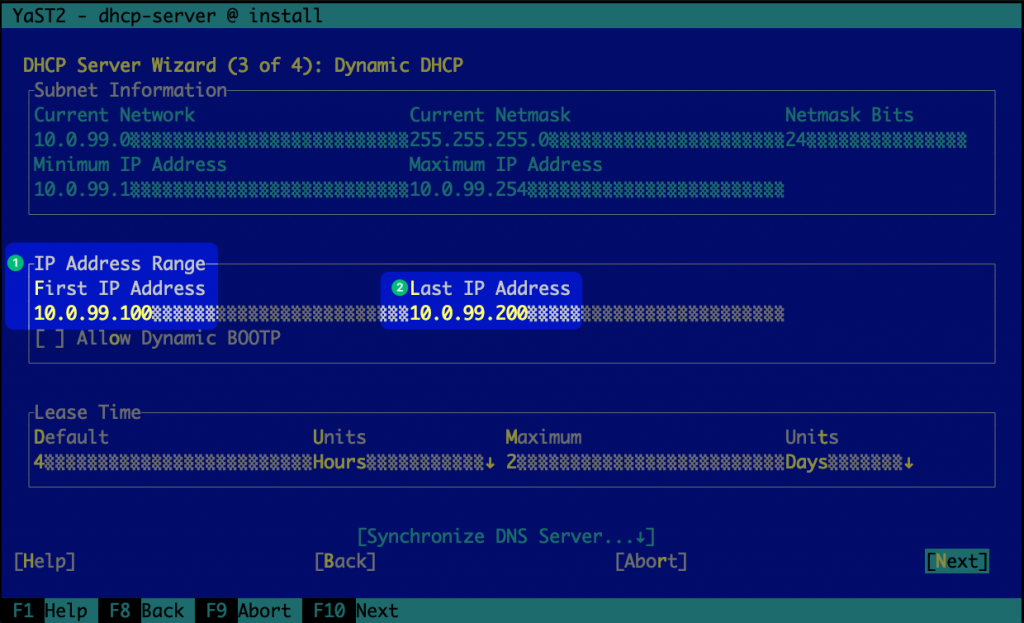
6) DHCP Startup Options
Take the default settings, we will manually start the dhcpd.service
7) Start the DHCP Server
systemctl enable --now dhcpd.serviceCheck that the service is running.
systemctl status dhcpd.service
Configuring DHCP for PXE
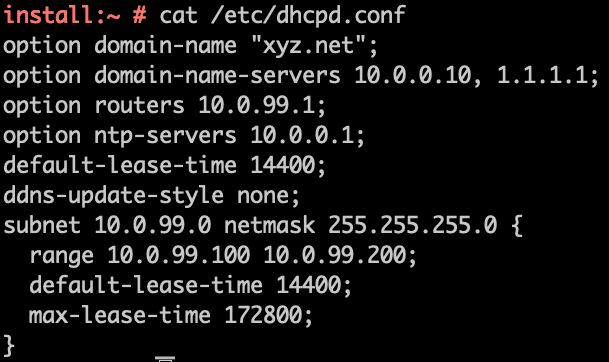
1) View the current /etc/dhcpd.conf
The DHCP Yast Plugin simplifies the setup and configuration of DHCP.
cat /etc/dhcpd.conf
2) Edit /etc/dhcpd.conf to support PXE
View the dhcpd.conf created by the DHCP Yast Plugin
nano /etc/dhcpd.conf
Enable PXE by adding the following lines to the upper section of the file:
# The following lines are required for PXE
option arch code 93 = unsigned integer 16; # RFC4578xyz
Add the following section after the max-lease-time
next-server 10.0.99.254;
if option arch = 00:07 or option arch = 00:09 {
  filename "/openSUSE-Leap-15.5-x86_64/net/x86_64-efi/bootx64.efi";
}
else if option arch = 00:0b {
  filename "/openSUSE-Leap-15.5-aarch64/EFI/BOOT/bootaa64.efi";
}
else {
  filename "/openSUSE-Leap-15.5-x86_64/net/pxelinux.0";
}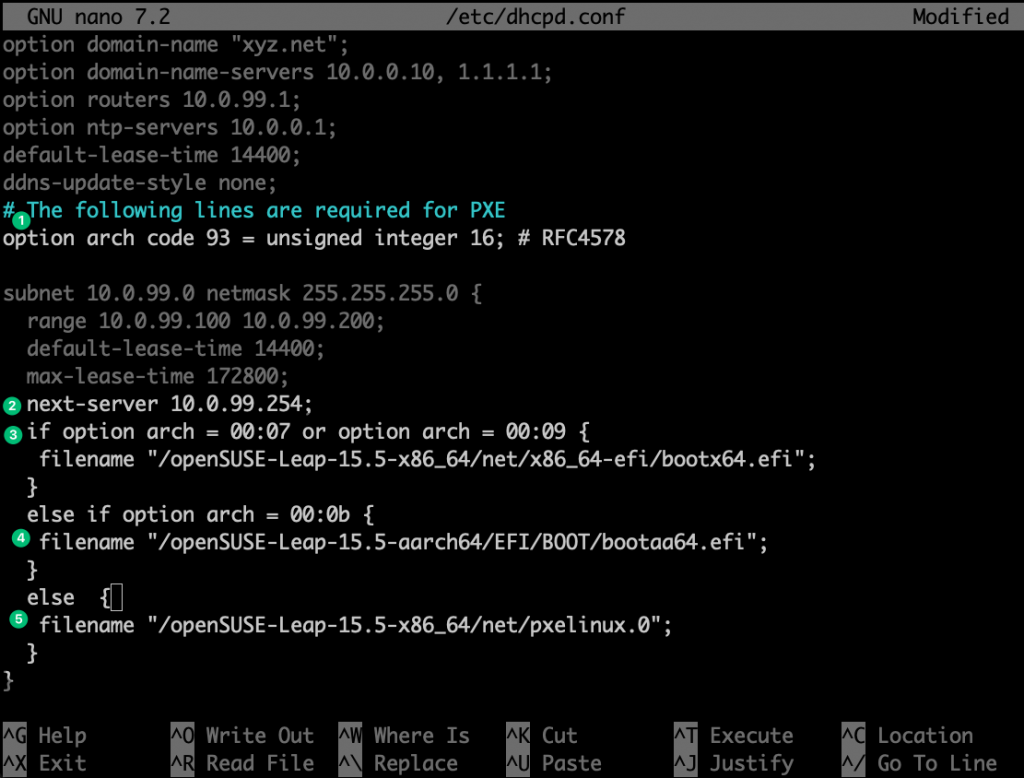
2) next-server specifies which server to grab the boot files from (can be different than the DHCP server).
3) What image to boot for an EFI-based x86 Machine
4) What image to boot for an ARM Machine
5) What image to boot for a BIOS-based x86 Machine
2) Edit /srv/tftpboot/openSUSE-Leap-15.5-x86_64/net/pxelinux.cfg/default
Update pxelinux.cfg/default
nano /srv/tftpboot/openSUSE-Leap-15.5-x86_64/net/pxelinux.cfg/default
1)replace the IP Address of the tftp server
10.0.99.2542) replace with the install URL
http://10.0.99.254/install/leap-15.5-x86-CD1/
2) Restart the dhcpd.service
Restart the services so that the changes we just made go into effect.
systemctl restart dhcpd.service
Conclusions
We hope this article helped you to understand how to install and configure PXE with OpenSUSE.
As a CentOS alternative, openSUSE brings numerous benefits, including stability, SUSE’s support to the community, powerful system management tools, advanced distro features, and access to a rich package repository. The active openSUSE community and easy migration tools further enhance the transition process. If you are seeking a robust and reliable Linux distribution for your workloads, you should consider openSUSE.
Looking for further insights into what you can achieve by migrating to openSUSE?, check out other blogs in this series:
- Step by Step instructions for building a Multiple Architecture OpenSUSE Leap installation server
- openSUSE, choosing your own destiny during the install
- From CentOS to openSUSE Leap: How to Feel at Home
- Step-by-Step Guide Installing openSUSE Leap on your virtualized environment
- 10 Reasons to Migrate from CentOS to openSUSE
Ready to experience the power and flexibility of openSUSE Leap?
Related Articles
Mar 25th, 2026
What are SAPHanaSR-angi configuration variants?
Jun 30th, 2025