Resilient Workloads with Docker and Rancher – Part 4

火曜日, 17 1月, 2017

Note: this is Part 4 in a series on building highly resilient
workloads. Parts
1, 2, and 3 are available already online.


In Part 4 of this series on running resilient workloads with Docker and Rancher, we take a look at service updates. Generally, service updates are where the risk of downtime is the highest. It doesn’t hurt to have a grasp of how deployments work in Rancher and the options available within. For this post, instead of focusing on how to setup a continuous deployment/integration pipeline, we’ll instead focus on experimenting and learning with upgrades using rancher-compose files, and reference the great chain of articles by the awesome bloggers. We will skim over the Rancher CI/CD ebook for now, and
sprinkle in enough theory to get us start using Rancher upgrades comfortably. Rancher Free Ebook 'Continuous Integration and Deployment with Docker and Rancher' Free eBook: Continuous Integration and Deployment with Docker and Rancher For those newer to CI/CD, a good reading order would bea great walk through by the guys at This End Out, before diving into the official CI/CD with Rancher ebook. A thorough reading is not required, as we will lay enough groundwork theory to run our experiments; but for those who want to dig a bit deeper, there will be links to specific sections of the articles.

The Simple Case

Say we want to launch a simple website using one WordPress container and
One database container (MySQL). Lets assume we have our database outside
of Docker on the same host.

docker run -d -p 80:80 -e WORDPRESS_DB_HOST='localhost' -e WORDPRESS_DB_USER='root' -e 0WORDPRESS_DB_PASSWORD='' wordpress

Single
Host
If you were to look at the process of updating Docker services in
production, we would SSH into the host, stop the container, pull the
new image down from a registry, then restart the container. Or, if we
were to list it out:

# Docker Container stop, Docker Container Pull, Replace Docker Container

$> docker stop
$> docker pull
$> docker start
$> docker rm <old-container>

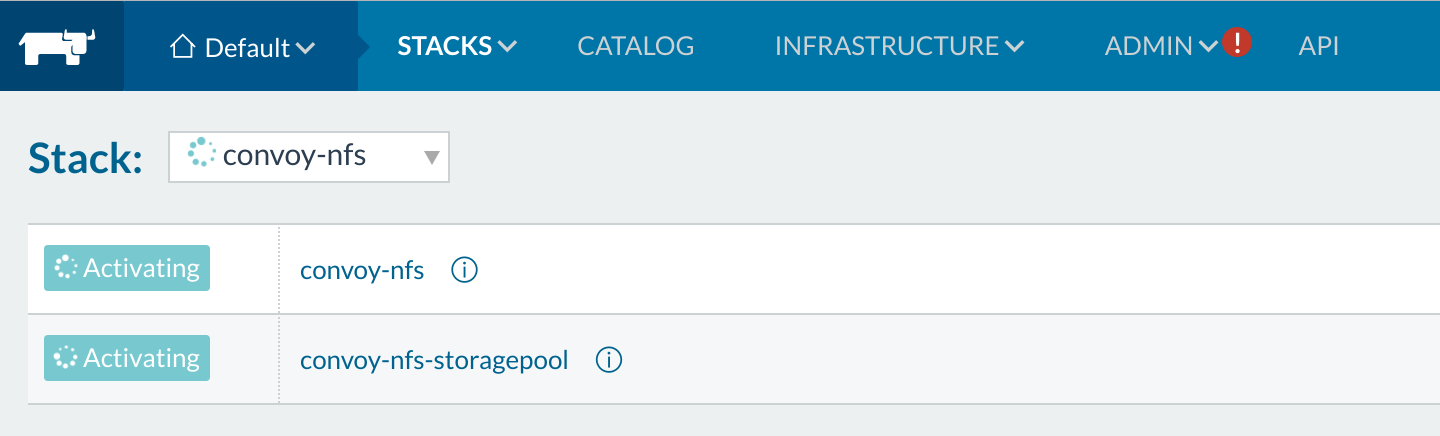
Since we are running our services on Rancher, these steps are automated
and managed on remote hosts by the Rancher agent. Resilient Docker
Workloads -
UpgradeClicking this Upgrade
button on our service will open a dropdown menu that allows various
configurations of the upgrade. Since we know that Rancher will be
re-creating the container, the various options to add links,
environments, and volumes are open again as if we are creating a new
service: Resilient Docker Workloads - Upgrade
Form
This is called an in-service or in-place update, and is the exact
mechanism provided by the Rancher upgrade. If we think of the Rancher
agent running these commands for us on one of the child nodes, we can
appreciate the convenience that Rancher provides. The chain of articles
from past blog posts provide a deeper illustration of the rationale
starting with wrapping manual docker deployment inside
scripts
,
followed with encoding the deployment metadata into
docker-compose
,
and each discovery in the blog chain leads us to a container
orchestration system like those within Rancher as our use cases advance.

Update Experiments

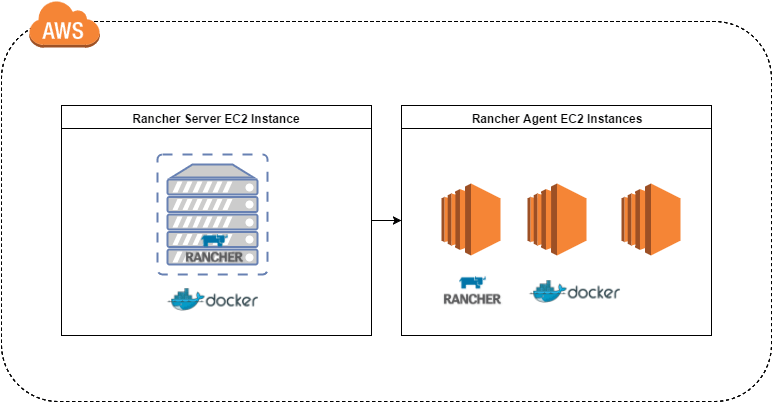
To experiment and learn more about Rancher upgrades, I’ve put together
a Vagrant rancher setup with three VMs, using Ansible for provisioning.
You can check out the repositories below and follow along on the
experimentation. Setup Checkout the repository for
rancher-vagrant); make
sure you have Vagrant, a
virtualization environment such as
Virtualbox, and the provisioning tool
Ansible installed. This will allow us to
setup a VM for our experimentation. The Vagrant setup will include
various nodes, but we can first start off provisioning Rancher server,
followed by a single node.

$> cd rancher-vagrant
$> vagrant up rancher
$> vagrant up node1

Note: if you suspend the computer or laptop on which the VMs run,
you may need to run vagrant reload on the VMs to get the static IPs
working again.

In Service (Place) Updates Once the provisioning of the Vagrant
server is complete, the next step is to play with service upgrades
inside Rancher. So we start using the following docker-compose.yml.
Lets wait for our localhost Vagrant setup to complete. Once we have our
host setup we should see the following on our Vagrant server node
on http://192.168.111.111:8080/: Resilient Docker Workloads -
Vagrant
Next up, let’s grab some API keys from Rancher; you can check how to do
this from the Rancher on how to setup
rancher-compose
.
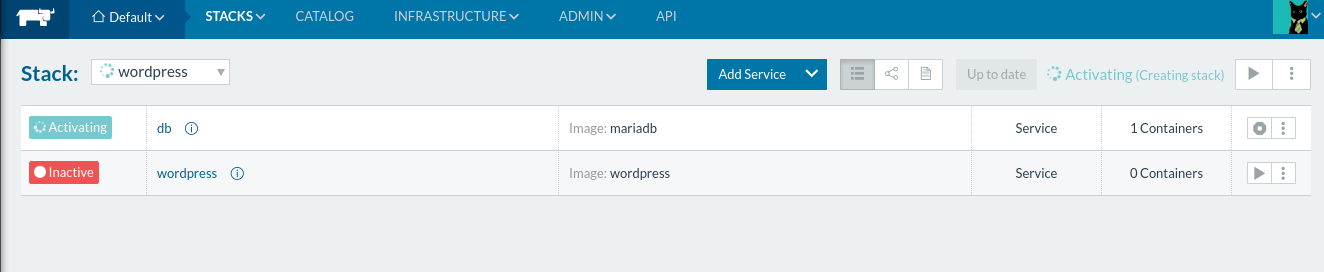
Once we can access our new Rancher environment, we can begin setting up
our first stack:

mywordpress:
 tty: true
 image: wordpress
 ports:
 - 80:80
 links:
 - database:mysql
 stdin_open: true
database:
 environment:
 MYSQL_ROOT_PASSWORD: pass1
 tty: true
 image: mysql
 volumes:
 - '/data:/var/lib/mysql'
 stdin_open: true

Lets start this stack up, and then upgrade it. We launch the stack
through rancher-compose command: Single Host The first case
is when we upgrade with a single host:

rancher-compose up --upgrade mywordpress

At first, this does nothing, due to the fact that our service compose
has not changed. The image is the same, and the docker-compose has
not had any changes. Checking the rancher-compose help, we take a
look at why this might happen:

rancher-compose up --help
Usage: rancher-compose up [OPTIONS]

Bring all services up

Options:
--pull, -p Before doing the upgrade do an image pull on all hosts that have the image already
-d Do not block and log
--upgrade, -u, --recreate Upgrade if service has changed
--force-upgrade, --force-recreate Upgrade regardless if service has changed
--confirm-upgrade, -c Confirm that the upgrade was success and delete old containers
--rollback, -r Rollback to the previous deployed version
--batch-size "2" Number of containers to upgrade at once
--interval "1000" Update interval in milliseconds

By default, Rancher Compose will not pull an image if the image already
exists on the host. So be sure to either label your container with
io.rancher.container.pull_image=always or specify --pull on the
upgrade command. Next, let’s try to force an upgrade, since nothing
about our service has actually changed – Rancher is being smart and
ignoring the no-op update.

rancher-compose up --force-upgrade mywordpress
INFO[0000] [0/2] [mywordpress]: Starting
INFO[0000] Updating mywordpress
INFO[0000] Upgrading mywordpress
...

Even if we CTRL-C the rancher-compose upgrade, once it starts it will
proceed until completion. You can see the UI react to the request:
Resilient Docker Workloads -
Upgrading
The containers will then enter into an intermediate state on the host
where one container down and a fresh one crops up: Resilient Docker
Workloads - Intermediate
State
We then clear this state with an explicit command from
rancher-compose, or tap it on the UI. At the end of the process, the
old container is removed, and the new one remains.

rancher-compose up --upgrade --confirm-upgrade mywordpress

Or if something is wrong with the new software, we can then rollback:

rancher-compose up --upgrade --rollback mywordpress

Once you have confirmed the upgrade, rolling back to the old version is
no longer possible, since the old container is purged from the host by
Rancher. If you have been testing the WordPress site, you will realize
that since this is the only container on port 80, we won’t be serving
any traffic during the update process. For test environment or
prototyping capacity, this is acceptable, but as we get closer to
production a more reliable upgrade process is desired. Luckily, Rancher
provides a way to start the new containers first before terminating the
old ones. We will just need to modify our rancher-compose with the
following flags.

mywordpress:
 scale: 1
 upgrade_strategy:
 start_first: true

A quick rancher-compose update will get us started on the upgrade
process, though if you pay attention what happens is that the new
container never actually starts up. Why is that? If we browse the
container that failed to start, Rancher will eventually propagate an
error.

 Error (500 Server Error: Internal Server Error ("driver failed programming external connectivity on endpoint 9315c003-ffc5-4e96-a299-3b9b962490f3 (1daf9cab9e7fd2eabf5aec4995bec015e4cb9373a256380f4d433eb7c54e8428): Bind for 0.0.0.0:80 failed: port is already allocated"))

Here we have a port conflict: if we take a look at our
docker-compose.yml we will see that the container is started on port
:80, since this is a single host we have clashes on port 80. The error
is not very obvious at first glance, but deployment issues usually
propagate from the lower level issues such as a host port name conflict.
In this case, the new containers will enter into a constant restart
loop. Resilient Docker Workloads -
Upgrading
Clearly, this method of hosting on a single container on port 80
doesn’t scale. Lets replace it with a loadbalancer on port 80, then
restart again!

mywordpress:
 tty: true
 image: wordpress
 links:
 - database:mysql
 stdin_open: true
database:
 environment:
 MYSQL_ROOT_PASSWORD: pass1
 tty: true
 image: mysql
 volumes:
 - '/data:/var/lib/mysql'
 stdin_open: true
wordpresslb:
 ports:
 - 80:80
 tty: true
 image: rancher/load-balancer-service
 links:
 - mywordpress:mywordpress
 stdin_open: true

If we SSH into our vagrant host, we can also run Docker to view the
containers running inside the VM:

$> vagrant ssh node1
$> vagrant@vagrant:$ sudo docker ps
CONTAINER ID IMAGE COMMAND CREATED STATUS PORTS NAMES
10ae46afa471 rancher/agent-instance:v0.8.3 "/etc/init.d/agent-in" 33 minutes ago Up 33 minutes 0.0.0.0:80->80/tcp 268c0107-78d2-4e77-8bd4-efef4a151881
b360e6c6e535 wordpress:latest "docker-entrypoint.sh" 33 minutes ago Up 33 minutes 80/tcp 87a7cdb0-2277-4469-8784-4e6adb76897e
f873ab956fc3 wordpress:latest "docker-entrypoint.sh" 33 minutes ago Up 33 minutes 80/tcp b3903acf-462c-4817-be9c-b749f9df5a57
298aa4a36ec2 mysql:latest "docker-entrypoint.sh" 33 minutes ago Up 33 minutes 3306/tcp 861d3664-0db7-4b15-a1a9-9fb5f27f0722
1c6c3f9562e2 rancher/agent-instance:v0.8.3 "/etc/init.d/agent-in" 58 minutes ago Up 58 minutes 0.0.0.0:500->500/udp, 0.0.0.0:4500->4500/udp 543a11ee-7285-44f8-8c7a-462c36fc5fbb
02b4efc61913 rancher/agent:v1.0.2 "/run.sh run" 42 hours ago Up About an hour rancher-agent

###

Rolling Upgrade

There is another type of upgrade that is not supported in the Rancher
UI: the rolling
upgrade
.
This method of upgrades allows one service to completely replace
another. We take a look at how it works in Rancher. > The recommended
in-service upgrade allows you to stop the old containers and start new
containers in the same service name. An in-service upgrade is the only
type of upgrade supported in the UI, and it is also supported in Rancher
Compose. The terminology for service is the single unit in the
docker-compose.yml file found in Rancher. In this case, it is for
the WordPress service. We first add the new mywordpressv2 that we
want to roll towards:

...
mywordpressv2:
 tty: true
 image: wordpress
 links:
 - database:mysql
 stdin_open: true
...

The command to perform a service replacement is rancher-compose
upgrade
. Taking a look at the help menu, we can get a brief idea of
the options presented to us:

Usage: rancher-compose upgrade [OPTIONS]

Perform rolling upgrade between services

Options:
 --batch-size "2" Number of containers to upgrade at once
 --scale "-1" Final number of running containers
 --interval "2000" Update interval in milliseconds
 --update-links Update inbound links on target service
 --wait, -w Wait for upgrade to complete
 --pull, -p Before doing the upgrade do an image pull on all hosts that have the image already
 --cleanup, -c Remove the original service definition once upgraded, implies --wait

Test the upgrade command with one command:

$> rancher-compose upgrade mywordpress mywordpressv2
INFO[0000] Upgrading mywordpress to mywordpressv2, scale=2

This returns our mywordpressv2 installation from zero containers to 2,
while our mywordpress containers went from 2 to zero. All the while the
links on the loadbalancer are being updated to point to the new service
by default through inbound link
updates
.
Resilient Docker Workloads - Rolling
upgrades
If we’d like, we also have the option to go back to the old services
with new scale:

$> rancher-compose upgrade mywordpressv2 mywordpress --scale 5

Our new service has now been started with five containers. With more
tinkering, we look at what happens when we try to upgrade back to the
new service.

$> rancher-compose upgrade mywordpress mywordpressv2 --scale 2
FATA[0000] Action [upgrade] not available on [...]

After a bit of digging, it looks like there are certain state
restrictions on services trying to perform an update. From the Rancher
code on Cattle, we can see the various states that a service can be in.
> Rancher-compose will not let you update a service that is awaiting
upgrade confirmation. There are restrictions on what state a service can
be in to perform upgrades. We had to go to the UI to confirm the update
on mywordpress from our first upgrade before we can revert back to the
old service. Lastly, we can automatically opt to clean up the
mywordpressv2 service with the following command. Otherwise the old
service will remain with a scale of 0. If we are sure that we need to
cleanup the services as we perform the rolling upgrade, we can attach
the –cleanup flag to remove the old service.

$> rancher-compose upgrade service1 service2 --cleanup

Multiple Hosts

Traditionally, with virtual machines (VMs) we deploy one application per
VM and some supporting software, but we sometimes wonder when using
containers makes sense in an organization. In a summary of an blog post
by Docker on VMs or
Containers
, there’s
three main use cases.

  • A new application that the team commits to writing in a microservice
    architecture. The team can share containers so other developers can
    test against the latest services on their development stations.
  • Wrap a monolith inside a docker container, then break off components
    into docker containers as the team works to break it up into
    microservices.
  • Using containers for their portability, once an application is made
    for containers. It is much easier to run a containers across various
    Cloud Providers than it would be to try to port VM images.

Containers can better utilize a few powerful hosts to run multiple
applications on the same host. From the linked blog:

“Though one can think of the analogy between a house (VM) with
apartments (Containers).

To me, the light bulb moment came when I realized that Docker is not a
virtualization technology, it’s an application delivery technology. In
a VM-centered world, the unit of abstraction is a monolithic VM that
stores not only application code, but often its stateful data. A VM
takes everything that used to sit on a physical server and just packs it
into a single binary so it can be moved around. With containers, the
abstraction is the application; or more accurately, a service that helps
to make up the application.”

To facilitate the concept that Docker is an application delivery
technology, container orchestration frameworks like those within Rancher
(including Mesos and Kubernetes) provide host clustering, scheduling and
network management to manage our containers in support of our
application. They abstract the mechanisms needed, so that multiple
smaller hosts look like one large environment. While containers can act
like VMs that can package an OS as its base layer, they’re generally a
problem to manage once they scales to large numbers; If we launch fifty
containers on a host, every container carries unnecessary bloat.
Containers should just run one process and be kept simple for the best
mileage. Once we have simple containers that run one specific process,
we can more easily know the constraints on its runtime, such as CPU
limit, memory limit, and enforce them as explained in the Docker Run
manual
.
This block of memory, CPU, and data bundle can then be scheduled into
any host in the cluster with available space. Ideally, the
infrastructure won’t need to know what is running in the container, and
the container’s code won’t worry about whether the host can support
it. The Rancher container scheduler will move containers around based on
metrics for CPU, available memory, and other parameters. If your
services are tied to specific ports and host IPs, upgrading requires
more flags on the scheduler. Let’s begin setting up our multiple node
environment by spinning up the second node on our Vagrant Rancher
cluster.

$> vagrant up node2

Updates with Multiple Hosts

Running our update script again, we can now see that that the scheduler
has started placing containers on the other host!

$> rancher-compose up --upgrade --force-upgrade -d mywordpress

Resilient Docker workloads - scheduler
experiment
Now since we have our stack hooked up to a load-balancer, Rancher routes
the traffic within Rancher’s overlay network. Our load-balancer on
node1 can then proxy request to containers on node2. However, when this
network connection is disrupted, in-place upgrades can display
inconsistent behavior. In our next installment, we’ll pick up next by
common problems encountered with updates. Stay tuned! Nick Ma is an
Infrastructure Engineer who blogs about Rancher and Open Source. You can
visit Nick’s blog, CodeSheppard.com, to
catch up on practical guides for keeping your services sane and reliable
with open-source solutions.

Tags: ,,,, Category: 未分類 Comments closed

5 Keys to Running Workloads Resiliently with Docker and Rancher – Part 3

木曜日, 17 11月, 2016

In the third section on data resiliency, we delve into various ways that
data can be managed on Rancher (you can catch up on Part
1

and Part
2

here). We left off last
time

after setting up loadbalancers, health checks and multi-container
applications for our WordPress setup. Our containers spin up and down in
response to health checks, and we are able to run the same code that
works on our desktops in production. Rancher Multi-container
Wordpress
Rancher Multi-container WordPress All of this is nicely
defined in a docker-compose.yml file along with the
rancher-compose.yml companion that extends compose’s functionality on
the Rancher cluster. The only issue is that when we terminated the MySQL
container all of the data was lost. Browsing through the Docker
documentation on layers, we can see the following diagram from the
docker documentation images and
containers
.
Container
layers
Container layers A container is composed of a read-only
bundle of layers that is built from the image, followed by a thin
read-write layer that is called the container layer. The Docker storage
driver is responsible for stacking these layers and providing a single
unified view.

When the container is deleted, the writable layer is also deleted. The
underlying image remains unchanged.

So after deleting the MySQL containers, we had to setup WordPress from
the beginning, and to make matters worse, all the posts that we wrote
had been lost. How do we prevent this? What options do I have to do
this?

Choices

In general, the top level choices are the following:

1. Offload the stateful MySql to a PaaS like RDS 2. Mount the MySQL data
volume onto a host

If you picked option 1, then that means you have decided to skip the
trouble of working with data management inside containers; this frees
your team to focus on building the stateless parts of your product. The
Rancher UI makes prototyping and working with a team on applications a
breeze, so you can just point the applications at a database URL and let
an external vendor handle it. Again, a big portion of having a reliable
system is operational knowledge, if there is minimal benefit to spending
man hours on it, then offloading the burden a trusted solution will let
you use Rancher in production effectively faster. (This is similar to
the first post, where we chose RDS to host our Rancher DB in HA mode).
Though if you are curious, or have the man hours to spare, option 2
becomes quite enticing. The benefits of this is total end user control
and potential cost savings, as we avoid paying the vendor’s markup.
Regardless of which choice we end up making, getting to know more about
Docker volumes is a benefit for either choice. From here on, we will dig
into container data management. At the end of the post, we hope you have
all the knowledge and resources to make the best choice for your Rancher
project. The most simple case is to modify the wordpress-multi
docker-compose.yml from our last post on health checks and
networking
,
we will mount a volume on the host’s filesystem. Adding these lines to
the volumes: - /my/own/datadir:/var/lib/mysql to our
docker-compose.yml:

version: '2'
services:
  mywordpress:
    tty: true
    image: wordpress
    links:
  - database:mysql
  stdin_open: true
  wordpresslb:
    ports:
    - 80:80
    tty: true
    image: rancher/load-balancer-service
    links:
    - mywordpress:mywordpress
    stdin_open: true
 database:
   environment:
     MYSQL_ROOT_PASSWORD: pass1
   tty: true
   image: mysql
   # New volumes mounted to the host drive!
   volumes:
     - /my/own/datadir:/var/lib/mysql
   stdin_open: true

Docker Solutions

The above is the simplest data management solution to use. If we read
through the documentation posted on the official MySQL
container
. It contains a detailed
documentation on managing data sectioned Where to Store Data. Most
official database containers have these steps detailed in Dockerfiles,
but in general there are 2 main types of Docker data management: 1. Data
volumes 2. Data volume containers A data volume is created by Docker
when we define it in the run command, create command, or in the
Dockerfile. For the case of the MySQL image, the anonymous volume is
defined in the MySQL container’s
Dockerfile as
the volume /var/lib/mysql.

# Mysql dockerfile snippet
...
VOLUME /var/lib/mysql

COPY docker-entrypoint.sh /usr/local/bin/
RUN ln -s usr/local/bin/docker-entrypoint.sh /entrypoint.sh # backwards compat
ENTRYPOINT ["docker-entrypoint.sh"]

EXPOSE 3306
CMD ["mysqld"]

So actually when we deleted our MySQL container, we didn’t lose the
data per-say. It is just that the new container created a new data
volume, and we lost reference to the old one.

The *Volume* flag in a Dockerfile, produces the same results as
running a container with the -v option. e.g. “docker run -v
/var/lib/mysql ubuntu bash”

docker inspect r-wordpress-multi_database_1
    ...
        "Mounts": [
            {
                "Name": "79f02c7ed4e7bd3b614f4f19d6b121125640a0ec5ebf873811b58a86c4faad62",
                "Source": "/var/lib/docker/volumes/79f02c7ed4e7bd3b614f4f19d6b121125640a0ec5ebf873811b58a86c4faad62/_data",
                "Destination": "/var/lib/mysql",
                "Driver": "local",
                "Mode": "",
                "RW": true,
                "Propagation": ""
            }
        ],

The folder is mounted on our system under the docker volumes at
“/var/lib/docker/volumes/79f02c7ed4e7bd3b614f4f19d6b121125640a0ec5ebf873811b58a86c4faad62/_data“.
This is the default and is easy and fairly transparent to the user. The
downside is that the files may be hard to locate for tools and
applications that run directly on the host system, i.e. outside
containers.

$>  ls -ltr /var/lib/docker/volumes/79f02c7ed4e7bd3b614f4f19d6b121125640a0ec5ebf873811b58a86c4faad62/_data
total 188448
-rw-r----- 1 999 docker 50331648 Sep  6 01:17 ib_logfile1
-rw-r----- 1 999 docker       56 Sep  6 01:17 auto.cnf
drwxr-x--- 2 999 docker     4096 Sep  6 01:17 performance_schema
drwxr-x--- 2 999 docker     4096 Sep  6 01:17 mysql
drwxr-x--- 2 999 docker    12288 Sep  6 01:17 sys
drwxr-x--- 2 999 docker     4096 Sep  6 01:17 wordpress
-rw-r----- 1 999 docker      426 Sep 25 14:38 ib_buffer_pool
-rw-r----- 1 999 docker 79691776 Oct 22 16:20 ibdata1
-rw-r----- 1 999 docker 50331648 Oct 22 16:20 ib_logfile0
-rw-r----- 1 999 docker 12582912 Oct 25 23:33 ibtmp1

The caveat of an anonymous volume is that Docker will not re-attach the
data volume when a new container is started; when the new MySQL
container restarted it creates a new Docker Volume instead of attaching
our previous volume.

You will also have dangling volumes that take up disk space when you
don’t perform cleanup regularly.

$> docker inspect --format '{{ range .Mounts}}{{ .Source }}{{ end }}' r-wordpress-multi_database_1
/var/lib/docker/volumes/79f02c7ed4e7bd3b614f4f19d6b121125640a0ec5ebf873811b58a86c4faad62/_data

$>  docker rm -f r-wordpress-multi_database_1

$>  # Rancher spins up a new database
$>  docker inspect --format '{{ range .Mounts}}{{ .Source }}{{ end }}' r-wordpress-multi_database_1
/var/lib/docker/volumes/bbb24f2878a01f068cdaaa66ad3461996c48582cbd65166db2e10f90c03c1918/_data

A way to ensure that the data volume follows the container is link it to
a folder on the host machine. In this case, all we need to do on a
docker command is to add a target on the host system.

$> docker run --name some-mysql -v
/my/own/datadir:/var/lib/mysql -d mysql

When we mount a host directory onto Docker’s union file system, it does
not copy any of the existing files from lower layers. The -v
/my/own/datadir:/var/lib/mysql
syntax will replace files in the layers
below it, Whereas an anonymous volume created with -v /somefolder will
container data from any files in /somefolder from the lower read-only
layers.

The previous docker command is represented in docker-compose below:

...
  database:
    environment:
      MYSQL_ROOT_PASSWORD: pass1
    tty: true
    image: mysql
    # New volumes mounted to the host drive!
    volumes:
      - /my/own/datadir:/var/lib/mysql
    stdin_open: true

Illustration of Docker
Datas
Since this data volume mount is named, we can terminate the database
container and start a new one with the same data volume mount and retain
our data. Of course, this is a simplification of the actual MySQL
container. The actual layer images would look more like the following
diagram: union file system with host
mount
union file system with host mount

Do note the read-write layer still takes up disk space in
/var/lib/docker, and be mindful of limited root disk sizes on public
clouds like AWS. Placing the Docker folders on a separately mounted
drive prevents Docker from eating up the host OS’s disk space.

The extension to this the data volume container. A data volume container
is just as it sounds, it is a container that is responsible for holding
a reference to data volumes.

Docker Data Volume Containers

In fact, this is exactly how upgrading Rancher versions works, in the
Rancher upgrade
documentation
.

docker create --volumes-from  
 --name rancher-data rancher/server:

Now you see that we have started the new container with
–volumes-from rancher-data. The –volumes-from command tells the
create command to just reference the volumes from the existing Rancher
server container instead of creating new volumes. This reference ensures
that the volumes of the old Rancher container are still around, even if
we kill the original container. The newly created data volume
container
is now holding a reference to the original MySQL volumes of
your old Rancher server. Rancher Server creates the following volumes:

VOLUME /var/lib/mysql /var/log/mysql /var/lib/cattle

Creating data volumes results in the following image on the host. Do
note that the drive paths are inside the Docker folder, so these are
anonymous volumes. host mount data
volume
host mount data volume Since Rancher server runs MySQL, this
approach can be applied to our own application. So this time we can
modify our docker-compose.yml to create a Docker data container for
managing the MySQL data.

...
  databaseData:
    image: mysql
    entrypoint: /bin/bash
  database:
    environment:
      MYSQL_ROOT_PASSWORD: pass1
    tty: true
    image:mysql
    # New volumes mounted to the host drive!
    volumes_from:
      - databaseData
    stdin_open: true

With a Docker data container, we can even share the volumes with
multiple other containers. So long as you don’t perform docker-compose
rm -v
, the databaseData container will not lose the data volume, and
you can cycle the database container as often as you would like. So now
we have a setup with data containers that persist our MySQL data. The
issue now is that we need to tie our MySQLs to a specific set of hosts
on our Rancher environment. This is fine for containers scheduled to run
on dedicated hardware, but it requires a degree of manual control. What
happens if we have multiple hosts, and the MySQL container gets
scheduled to a different host than the data container?

Rancher Extensions

A solution is to use Rancher
Sidekicks
.
It was specifically designed to allow the scheduling of secondary (data
container) services that must be deployed on the same host. You can read
more about sidekicks on the documentation, but the simple case is to add
the io.rancher.sidekicks: label to the primary container like so:

...
  databaseData:
    image: mysql
    entrypoint: /bin/bash
  database:
    environment:
      MYSQL_ROOT_PASSWORD: pass1
    tty: true
    image:mysql
    # New volumes mounted to the host drive!
    volumes_from:
      - databaseData
    stdin_open: true
    labels:
      io.rancher.sidekicks: databaseData

This will ensure that the data container will be scheduled along with
the parent container on the same host. With what we covered so far,
reading complicated catalogs like such as the ElasticSearch Rancher
Catalog
with
various sidekick containers and data volumes will now be a lot easier to
grok.

Convoy

Building off the concept of data volumes, Docker provides a feature
called volume drivers, specifically the Rancher Lab’s
Convoy. A volume driver is a Docker
plugin that extends the data volume functionality of the Docker engine.
Specifically, Docker Engine volume plugins enable Engine deployments to
be integrated with external storage systems, such as Amazon EBS, and
enable data volumes to persist beyond the lifetime of a single Engine
host. You can read more about that in the volume plugin
documentation
.
In essence, what the Docker Volume driver like Convoy does is add custom
behavior inside hooks during the volume creation process. For example,
we can create a volume based off of external storage, such as S3 or a
remote NFS. With a Convoy setup in place, we can have our MySQL
container data storage backed up to a remote location and then recreated
on another host if needed. All of this external integration is managed
through the Convoy API. Any volume designated to specific containers
created through convoy will be stored based on driver configurations.
For the next section, we reference an existing post about Convoy-NFS on
Rancher
.

NFS Setup

To setup Convoy, we can follow the instructions from the official
Convoy installation
guide
. Do note that
since Convoy is a Docker plugin, we will need to provision it on every
one of our Rancher hosts. The Rancher team has provided a nice
Convoy-NFS catalog item to do it for us, but here we will work through
the process of setting Convoy up manually just to learn how it operates.

wget https://github.com/rancher/convoy/releases/download/v0.5.0/convoy.tar.gz
tar xvf convoy.tar.gz
sudo cp convoy/convoy convoy/convoy-pdata_tools /usr/local/bin/

sudo mkdir -p /etc/docker/plugins/
sudo bash -c 'echo "unix:///var/run/convoy/convoy.sock" > /etc/docker/plugins/convoy.spec'

Next we then setup a NFS system and connect our Convoy system to it. We
use a prototype version of the NFS system and start it up.

There is a host kernel requirement to docker-nfs which requires some
extra setup time. You may need to install nfs-common and
nfs-kernel-server package on ubuntu or similar for your OS or VM.

$>   docker run -d --name nfs --privileged -v /convoy-data:/convoy-data codesheppard/nfs-server /convoy-data
$>   docker ps
CONTAINER ID        IMAGE                           COMMAND                  CREATED              STATUS              PORTS                                          NAMES
3b39b9313ed8        codesheppard/nfs-server            "/usr/local/bin/nfs_s"   About a minute ago   Up 56 seconds       111/udp, 2049/tcp                              nfs
...
$>   docker inspect --format '{{ .NetworkSettings.IPAddress }}' nfs
172.17.0.7

Then we now have a NFS server listening on 172.17.0.7, the next step is
to connect the Convoy daemon to it. We reference the mounting that is
done in the
rancher/convoy-agent project
(supports Rancher’s Convoy-NFS catalog) and setup documentation from
rancher/wiki.

sudo mkdir /nfs
sudo mount -t nfs -o nolock 172.17.0.7:/convoy-data /nfs

sudo convoy daemon --drivers vfs --driver-opts vfs.path=/nfs
... misc convoy driver logs ...

Convoy daemon allows multiple drivers to be run

–drivers [–drivers option –drivers option]Drivers to be
enabled, first driver in the list would be treated as default driver

–driver-opts [–driver-opts option –driver-opts option] options
for driver

Our host’s Docker engine now has a plugin to run Convoy. So lets assign
our MySQL data to convoy engine through docker-compose.yml.

...
  database:
    environment:
      MYSQL_ROOT_PASSWORD: pass1
    tty: true
    image:mysql
    # New volumes mounted to the host drive!
    stdin_open: true
    volume_driver: convoy
    volumes:
     - 'wordpress_mysql:/var/lib/mysql'

rancher-compose up --upgrade

Once we hit the upgrade button, we can then see the Convoy driver
setting up the new drive in the logs.

...
DEBU[0037] Volume: wordpress_mysql is mounted at  for docker  pkg=daemon
DEBU[0037] Response:  {}                                 pkg=daemon
DEBU[0037] Handle plugin mount volume: POST /VolumeDriver.Mount  pkg=daemon
DEBU[0037] Request from docker: &{wordpress_mysql map[]}  pkg=daemon
DEBU[0037] Mount volume: wordpress_mysql for docker      pkg=daemon
DEBU[0037]                                               event=mount object=volume opts=map[MountPoint:] pkg=daemon reason=prepare volume=wordpress_mysql
DEBU[0037]                                               event=list mountpoint=/nfs/wordpress_mysql object=volume pkg=daemon reason=complete volume=wordpress_mysql
DEBU[0037] Response:  {
  "Mountpoint": "/nfs/wordpress_mysql"
}  pkg=daemon
...

If you follow along on your NFS mounted drive, you can see that the
mounted NFS directory now has 2 folders, a config and
wordpress_mysql folder. There are now various functions that can now
be done, but we can now run experiments on Convoy with our simple setup!
Convoy supports various commands, but a quick dump of the CLI help
should be a great starting point to browse. For more information, the
offical Convoy
documentation
is the
best place to get started. Some of the following commands of interest
are:

# Create and Delete
sudo convoy create volume_name
sudo convoy delete

# Snapshot creation
sudo convoy snapshot create vol1 --name snap1vol1

# Backup snapshot
sudo convoy backup create snap1vol1 --dest s3://backup-bucket@us-west-2/
sudo convoy create res1 --backup

Experimenting with the Convoy driver, we can create volumes and delete
them. A most useful feature is a nice S3 backup. Conceptually, we are
still mounting a directory to the container, but now it is backed by a
network drive. We can now inspect the container and check the
differences.

$>  docker inspect
        "HostConfig": {
            "Binds": [
                "wordpress_mysql:/var/lib/mysql:rw"
            ],
            "VolumeDriver": "convoy",
...
        "Mounts": [
            {
                "Name": "wordpress_mysql",
                "Source": "/nfs/wordpress_mysql",
                "Destination": "/var/lib/mysql",
                "Driver": "convoy",
                "Mode": "rw",
                "RW": true,
                "Propagation": "rprivate"
            }
...

If you check the drive that we are sharing through our NFS setup, we can
see that the /var/lib/mysql data is mounted on our NFS drive!

$>  ls -ltr /nfs/wordpress_mysql
total 188448
-rw-r----- 1 999 docker 50331648 Sep  6 01:17 ib_logfile1
-rw-r----- 1 999 docker       56 Sep  6 01:17 auto.cnf
drwxr-x--- 2 999 docker     4096 Sep  6 01:17 performance_schema
drwxr-x--- 2 999 docker     4096 Sep  6 01:17 mysql
drwxr-x--- 2 999 docker    12288 Sep  6 01:17 sys
drwxr-x--- 2 999 docker     4096 Sep  6 01:17 wordpress
-rw-r----- 1 999 docker      426 Sep 25 14:38 ib_buffer_pool
-rw-r----- 1 999 docker 79691776 Oct 22 16:20 ibdata1
-rw-r----- 1 999 docker 50331648 Oct 22 16:20 ib_logfile0
-rw-r----- 1 999 docker 12582912 Oct 25 23:33 ibtmp1

Now after testing it out, a manual Convoy setup has lots of moving
parts. So from now, we can look towards the community and Rancher core
team to help expediate the process of using Convoy.

Convoy-NFS Catalog

With our toy NFS, the next step would be to drop the manual Convoy
setup, and connect the official Rancher Convoy-NFS catalog to it.
Screen Shot of the Convoy-NFS
Catalog
So with our simple setup and understanding of the NFS + Convoy system,
we can now take a look at our reference blog post Convoy-NFS on
Rancher
, and
apply our Convoy-nfs catalog to our Rancher setup!

The setup is pretty straightforward, but there are a few things to
note. First, the stack must be named “convoy-nfs“, which is the name
of the plugin. Next, the NFS server should match the hostname on which
you set up your NFS server; if you created the docker-nfs container
instead, use the IP of the container 172.17.0.7.

The last thing to be aware of are the mount options and mount point.
Match the port here with the port that the NFS server was configured
with (2049 for docker-nfs) and make sure to turn on nfsver=4. Also be
sure to use “/“? for the MountDirectory if using the nfsvers=4 option;
otherwise use “/exports“.

proto=tcp,port=2049,nfsvers=4

The final configuration should look similar to the following: NFS
configurations

You can add other options to tune the shares, but these are the
necessary components for a bare minimum setup.

For the time being I will continue to utilize the same locally hosted
NFS server. Though once you have a real NFS or EFS server, we only need
to mount it to a standardized drive, and all our Rancher nodes will have
access to a shared network drive with backup capabilities.

Also note, that there is a community supported Convoy-EFS Catalog that
supports an AWS EFS. There are some vendor specific differences, but in
essence EFS is a managed NFS setup. So now we watch our stack spin up on
Rancher here. Rancher
Convoy-EFS
Rancher Convoy-EFS You will now see that Rancher is starting
up its storage pool. This opens up the next section on the Rancher UI
that shows the storage volumes. Go to Infrastructure > Storage on the
menu, and you should see the following view for volumes managed through
Rancher. Rancher Storage
Pool
Rancher Storage Pool After we fill in the details on the
catalog convoy we modify our *docker-compose.yml* to match.

For this catalog to work the volume_driver must be called
convoy-nfs.

  ...
  database:
    environment:
      MYSQL_ROOT_PASSWORD: pass1
    tty: true
    image:mysql
    # New volumes mounted to the host drive!
    volume_driver: convoy-nfs
    volumes:
      - mysql1:/var/lib/mysql
    stdin_open: true

rancher-compose up --upgrade

You can browse through the logs from the UI on the convoy-nfs agent
service to follow along.

Then after the upgrade, you will see the same volumes on the mounted
volume on our NFS shared drive with Convoy agent managed through
Rancher. We now have a full setup with the certified Rancher NFS
catalog. Final
Setup
Final Setup With the final setup, we can now take a look at
the various features of Convoy. Lets look at the volumes that were
created on the UI. Seeing
volumes
Seeing volumes We can also see this with the command line
tool:

$> sudo convoy -s /var/run/convoy-convoy-nfs.sock list
{
  "mysql1": {
    "Name": "mysql1",
    "Driver": "vfs",
    "MountPoint": "/var/lib/rancher/convoy/convoy-nfs-f3f0877f-1d72-4902-b99b-a745646e1e37/mnt/mysql1",
    "CreatedTime": "Tue Nov 08 16:22:26 +0000 2016",
    "DriverInfo": {
      "Driver": "vfs",
      "MountPoint": "/var/lib/rancher/convoy/convoy-nfs-f3f0877f-1d72-4902-b99b-a745646e1e37/mnt/mysql1",
      "Path": "/var/lib/rancher/convoy/convoy-nfs-f3f0877f-1d72-4902-b99b-a745646e1e37/mnt/mysql1",
      "PrepareForVM": "false",
      "Size": "0",
      "VolumeCreatedAt": "Tue Nov 08 16:22:26 +0000 2016",
      "VolumeName": "mysql1"
    },
    "Snapshots": {}
  },
  "mysqltest": {
    "Name": "mysqltest",
    "Driver": "vfs",
    "MountPoint": "",
    "CreatedTime": "Wed Nov 09 06:35:21 +0000 2016",
    "DriverInfo": {
      "Driver": "vfs",
      "MountPoint": "",
      "Path": "/var/lib/rancher/convoy/convoy-nfs-f369e5a5-deb7-4a9c-9812-845bd70dbecd/mnt/mysqltest",
      "PrepareForVM": "false",
      "Size": "0",
      "VolumeCreatedAt": "Wed Nov 09 06:35:21 +0000 2016",
      "VolumeName": "mysqltest"
    },
    "Snapshots": {}
  }
}

Running some experimentations, we can test some backup functionalities
offered by Convoy. We first create a snapshot.

$> sudo convoy -s /var/run/convoy-convoy-nfs.sock snapshot create mysql1
snapshot-fec0417c7db1422d

Then we create a backup to S3:

$> sudo convoy -s /var/run/convoy-convoy-nfs.sock backup create snapshot-fec0417c7db1422d --dest s3://backup-bucket@us-west-2/

s3://backup-bucket@us-west-2/?backup=backup-a760a7f5338a4751u0026volume=mysql1

> You may need to put credentials to /root/.aws/credentials or setup
sudo environment variables in order to get S3 credential works. Or setup
the credentials on the convoy-agent service.

$> sudo convoy -s /var/run/convoy-convoy-nfs.sock create restoredMysql --backup s3://backup-bucket@us-west-2/?backup=backup-a760a7f5338a4751u0026volume=mysql1

Then we can now attach the data volume as *restoredMysql* to any
container on our stack.

Convoy EBS Setup

Now if you are on a cloud provider, we can use the networked block store
volumes on the cloud in place of or in addition to NFS. You can have the
hosts attach an EBS volume and ensure that the new EBS volumes are
available to the containers. A similar process can be done on Azure and
DigitalOcean. For AWS, I setup my Rancher Agent nodes with the following
userdata, this installs Convoy on my agent nodes on startup.

#!/bin/bash
yum install docker -y
service docker start
usermod -a -G docker ec2-user

# Download convoy onto our hosts
wget https://github.com/rancher/convoy/releases/download/v0.5.0/convoy.tar.gz
tar xvf convoy.tar.gz
cp convoy/convoy convoy/convoy-pdata_tools /usr/local/bin/

mkdir -p /etc/docker/plugins/
bash -c 'echo "unix:///var/run/convoy/convoy.sock" > /etc/docker/plugins/convoy.spec'

# Bootstrap for Rancher agent
docker run -e CATTLE_HOST_LABELS='foo=bar' -d --privileged 
-v /var/run/docker.sock:/var/run/docker.sock rancher/agent:v0.8.2 
http://:8080/v1/projects/1a5/scripts/

You can daemonize the Convoy process for more hands-off setup. Your
hosts must also be configured to run EBS volumes, so we can quickly do
that by setting up an IAM Instance Profile for our instances. An
Instance Profile is essentially a way to use the AWS API from within
your EC2 instances without having to manage the API key manually. You
can read more about it on the AWS
documentation
,
but essentially to use convoy with EBS you must provide and IAM Instance
Profile with the following list of permissions, as described on the
Convoy EBS
documentation
.
You can just use the EC2 PowerUser IAM policy for a quickstart. Specific
policy tunings will just require launching a new host.

"ec2:CreateSnapshot",
"ec2:CreateTags",
"ec2:CreateVolume",
"ec2:DeleteVolume",
"ec2:AttachVolume",
"ec2:DetachVolume",
"ec2:DescribeSnapshots",
"ec2:DescribeTags",
"ec2:DescribeVolumes"

VM EBS and Container Volume
Mount
When we save a volume backed by EBS, we are actually saving it as an EBS
image which can be mounted on another host. One caveat is that the
current host must be in the same region of backup to be restored. Once
our node is up, we will need to go in and start Convoy. Preferably, the
convoy daemon is started inside a process manager by supervisor or
upstart, otherwise it runs in the foreground by default.

sude convoy daemon --drivers ebs

With our daemon setup, we can now run some catalogs to test out how
Convoy functions. Lets use rancher-compose to launch the following
stack.

postgres:
  image: postgres
  ports:
    - 5432
  volumes:
    - db_vol:/var/lib/postgresql/data
  volume_driver: convoy

EBS volumes spinning
up
From here on out, you can test out the various Convoy commands from
within the instance to test out the various features that allow you to
dynamically attach and detach EBS volumes from within your instance. Say
for example, the EC2 instance was lost: the EBS volume will be marked as
available. Transferring this available EBS to another EC2 instance with
Docker and reschedulling the container is fairly easy. If we know the
volume id, we can use the following Docker command to remount the EBS
onto another EC2 host.

docker volume create --driver convoy --opt driver=ebs --opt id=vol-12345 --name myvolume

Lastly, if we want to destroy the EBS volumes so we don’t get charged
for unused volumes:

# remove stack and volumes
rancher-compose rm -v

Conclusion

We have now performed a brief walkthrough of the data resiliency
solutions offered by Rancher and Docker. This post is quite long and
involved, but since handling data in clustered environments is a pretty
complicated topic, this is actually considered too short. In this we
hope that the content here will serve as a basis to get started playing
around with the existing solutions to find what is the best fit for your
project. Thanks for reading! Nick Ma is an Infrastructure Engineer who
blogs about Rancher and Open Source. You can visit Nick’s blog,
CodeSheppard.com, to catch up on practical
guides for keeping your services sane and reliable with open-source
solutions.

Tags: ,, Category: 未分類 Comments closed

Using Rancher-Gen to Dynamically Update Docker Configuration Files

水曜日, 28 9月, 2016

pitrhoThis
is a guest post by Alejandro Mesa, Full-Stack Software Engineer and
Chief Architect at Pit Rho.
Introduction
Docker and Rancher have made it far
easier to deploy and manage microservice-based applications. A key
challenge, however, is managing the configuration of services that
depend on other dynamic services. Imagine the following scenario: you
have multiple backend containers that run your web application, and a
few nginx containers that proxy all requests to the backend containers.
Now, there’s a new release of the web application that must be deployed,
which means new backend containers need to be built and deployed. After
they are deployed, the nginx configuration needs to change to point to
the new backend containers. So, what do you do with nginx? Do you change
the its configuration, build a new container and deploy it? What if
there was a way for you to automatically detect the changes on the
backend service and dynamically update nginx? That’s where
Rancher-Gen comes into play.
Rancher-Gen is a Python utility that listens for service changes in
Rancher and renders a user-specified Jinja2
template. This allows a user to generate configuration files for
existing services based on those changes. In addition, it provides a
mechanism to run a notification command after the template has been
rendered. Below is a tutorial that describes how to automatically
generate an nginx configuration file for a backend service running the
ghost blogging platform.

Tutorial

All configuration files described below can be found under the
demo directory
in the Rancher-Gen repository.
Step 1 -  Deploying the ghost service For simplicity, we’re going
to use the official ghost image from Docker hub. So, create a
docker-compose.yml file and add the ghost service as follows:

ghost:
  image: ghost
  expose:
    - "2368"

Now, deploy the ghost service using Rancher Compose:

$ rancher-compose -p demo up -d ghost

Step 2  –  Create the nginx image with rancher-gen Here is the
Dockerfile used to build the nginx image:

FROM phusion/baseimage:0.9.17
MAINTAINER pitrho

# Step 1 - Install nginx and python
ENV DEBIAN_FRONTEND noninteractive
RUN 
 apt-add-repository -y ppa:nginx/stable && 
 apt-get update && 
 apt-get install -y python-software-properties 
   wget 
   nginx 
   python-dev 
   python-pip 
   libev4 
   libev-dev 
   expect-dev && 
 rm -rf /var/lib/apt/lists/* && 
 chown -R www-data:www-data /var/lib/nginx && 
apt-get clean

# Step 2 - Install rancher-gen
ENV RANCHER_GEN_VERSION 0.1.2
RUN pip install rancher-gen==$RANCHER_GEN_VERSION

# Step 3 - Define services
RUN mkdir /etc/service/nginx /etc/service/rancher_gen /nginxconf
COPY nginx_run /etc/service/nginx/run
COPY rancher-gen_run /etc/service/rancher_gen/run
COPY default.j2 /nginxconf

# Step 4 - Use baseimage-docker's init system.
CMD ["/sbin/my_init"]

# Step 5 - Expose ports.
EXPOSE 80
EXPOSE 443

Let’s break down the Dockerfile step by step. Steps 1 and 2 are
self-explanatory: simply install nginx, python and rancher-gen. Step 3
is where we setup the services that run when the image starts. The first
service is nginx, and it runs using the file at
/etc/servce/nginx/run. The contents of this file are:

#!/bin/bash
 rancher-gen --host $RANCHER_GEN_HOST 
 --port $RANCHER_GEN_PORT 
 --access-key $RANCHER_GEN_ACCESS_KEY 
 --secret-key $RANCHER_GEN_SECRET_KEY 
 --project-id $RANCHER_GEN_PROJECT_ID 
 $RANCHER_GEN_OPTIONS 
 --notify "service nginx reload" /nginxconf/default.j2 /etc/nginx/sites-available/default

Notice how, after the notify step, we pass two paths, namely
/nginxconf/default.j2 and /etc/nginx/sites-available/default.
The former is the Jinja2 template and the latter is the output location
of the rendered template. Below are the contents of the default.j2 file:

upstream ghost.backend {
{% for container in containers %}
  {% if container['state'] == "running" %}
    server {{container['primaryIpAddress']}}:2368;
  {% endif %}
  {% endfor %}
}

server {
  listen 80;
  server_name ghost_demo;
  location / {
    proxy_set_header X-Real-IP $remote_addr;
    proxy_set_header HOST $http_host;
    proxy_set_header X-NginX-Proxy true;
    proxy_pass http://ghost.backend;
    proxy_redirect off;
  }
}

Steps 4 and 5 of the Dockerfile set the run command
/sbin/my_init” in the
image and exposes ports 80 and 443. Now, it’s time to build the image:

$ docker build -t="pitrho/nginx-rancher-gen-demo" .

Step 3 — Create the nginx service and deploy it Now that we have
the nginx image, add the nginx service to the docker-compose.yml file
created in Step 1:

ghost:
 image: ghost
 expose:
 - "2368"

nginx:
 image: pitrho/nginx-rancher-gen-demo:latest
 ports:
 - 80:80
 links:
 - ghost
 environment:
 NGINX_RUN_TYPE: rancher-gen
 RANCHER_GEN_HOST: $RANCHER_HOST
 RANCHER_GEN_PORT: $RANCHER_PORT
 RANCHER_GEN_ACCESS_KEY: $RANCHER_ACCESS_KEY
 RANCHER_GEN_SECRET_KEY: $RANCHER_SECRET_KEY
 RANCHER_GEN_PROJECT_ID: $RANCHER_GEN_PROJECT_ID
 RANCHER_GEN_OPTIONS: --stack demo --service ghost

The RANCHER_GEN_OPTIONS environment variable above is used to pass
additional command-line options to rancher-gen. See the Rancher-Gen
documentation for an explanation of these options. Now run
rancher-compose to start the nginx service:

$ rancher-compose -p demo up -d nginx

At this point, both the ghost and nginx services should be up and
running. ghost nginx
check
and ghost can be accessed by pointing your browser to the IP address of
the host running the nginx container: ghost
screen
If you were to inspect the nginx container using the shell, and open the
rendered file /etc/nginx/sites-enabled/default, you will see the
following output:

upstream ghost.backend {
   server 10.42.136.216:2368;
 }

server {
     listen 80;
     server_name ghost_demo;

     location / {
         proxy_set_header X-Real-IP $remote_addr;
         proxy_set_header HOST $http_host;
         proxy_set_header X-NginX-Proxy true;
         proxy_pass http://ghost.backend;
         proxy_redirect off;
     }
  }

As expected, this is the rendered output based on the template specified
when running the rancher-gen command. At this point, if you were to
upgrade the ghost service, and again look at the rendered file, you
would notice that the IP address under the upstream section has changed.

Conclusion

To recap, Rancher-Gen is an automation utility that can be used to
generate files and run notification commands. With the expressiveness of
Jinja2 templates, and its clean command line interface, Rancher-Gen can
be used to generate most configuration files, and automate tasks that
otherwise would be tedious and repetitive for most sysadmins and
software engineers. If you have any questions or suggestion on how to
improve Rancher-Gen, feel free to reach us through the
github repository, or contact
us on Twitter @PitRho.

Category: 未分類 Comments closed

5 Keys to Running Workloads Resiliently with Rancher and Docker – Part 2

水曜日, 14 9月, 2016

In Part 1: Rancher Server
HA
,
we looked into setting up Rancher Server in HA mode to secure it against
failure. There now exists a degree of engineering in our system on top
of which we can iterate. So what now? In this installment, we’ll look
towards building better service resiliency with Rancher Health Checks
and Load Balancing. Since the Rancher documentation for Health Checks
and Load Balancing are extremely detailed, Part 2 will focus on
illustrating how they work, so we can become familiar with the nuances
of running services in Rancher. A person tasked with supporting the
system might have several questions. For example, how does Rancher know
a container is down? How is this scenario different from a Health Check?
What component is responsible for operating the health checks? How does
networking work with Health Checks?

Note: the experiments here are for illustration only. For
troubleshooting and support, we encourage you to check out the
various Rancher resources, including
the forumsand
Github.

Service Scale

First, we will walk through how container scale is maintained in
Rancher, and continue with the WordPress catalog installation from Part
1.
Codesheppard-2-2-2
Let’s check out the Rancher Server’s database on our Rancher
quickstart container:

$> docker ps | grep rancher/server
cc801bdb5330 rancher/server "/usr/bin/s6-svscan /" 5 days ago Up 5 days 3306/tcp, 0.0.0.0:9999->8080/tcp thirsty_hugle
$> docker inspect -f {{.NetworkSettings.IPAddress}} thirsty_hugle
172.17.0.4
$> mysql --host 172.17.0.4 --port 3306 --user cattle -p
# The password's cattle too!
mysql> show databases;
+--------------------+
| Database |
+--------------------+
| information_schema |
| cattle |
+--------------------+
2 rows in set (0.00 sec)

We can drop into the database shell and check out the database, or hook
up that IP address to a GUI such as MySQL Workbench. From there, we can
then see that our WordPress and DB service are registered in our Rancher
Server’s metadata along with other containers on the agent-managed
host.
Codesheppard-2-3
There are actually quite a lot of tables to browse manually, so I
instead used the Rancher terminal to execute a shell on my
rancher/server container to enable database logging.
Codesheppard-2-5

# relevant queries
root@cc801bdb5330:/# mysql -u root
mysql> SHOW VARIABLES LIKE "general_log%";
+------------------+---------------------------------+
| Variable_name | Value |
+------------------+---------------------------------+
| general_log | OFF |
| general_log_file | /var/lib/mysql/cc801bdb5330.log |
+------------------+---------------------------------+
2 rows in set (0.00 sec)
mysql> SET GLOBAL general_log = 'ON';

# Don't forget this, or your local Rancher will be extremely slow and fill up disk space.
# mysql> SET GLOBAL general_log = 'OFF';

Now with database event logging turned on, let’s see what happens when
we kill a WordPress container!

# on rancher agent host
$> docker ps
CONTAINER ID IMAGE COMMAND CREATED STATUS PORTS NAMES
cffb01a9ea15 wordpress:latest "/entrypoint.sh apach" 20 minutes ago Up 20 minutes 0.0.0.0:80->80/tcp r-wordpress_wordpress_1
98e5bcbdc6b3 mariadb:latest "docker-entrypoint.sh" 15 hours ago Up 15 hours 3306/tcp r-wordpress_db_1
c0ac56d7da38 rancher/agent-instance:v0.8.3 "/etc/init.d/agent-in" 15 hours ago Up 15 hours 0.0.0.0:500->500/udp, 0.0.0.0:4500->4500/udp cbbbed1b-8727-41d1-aa3b-9fb2c7598210
6784df26c8a7 rancher/agent:v1.0.2 "/run.sh run" 5 days ago Up 5 days rancher-agent
$> docker rm -f r-wordpress_wordpress_1
r-wordpress_wordpress_1

Checking the audit trail on the Rancher UI, we can see that Rancher
detects that a WordPress container failed and immediately spins up a new
container.
Codesheppard-2-8
The database logs we extracted show that these events and actions
triggered responses within the following Rancher database tables:

agent
container_event
process_instance
process_execution
service
config_item_status
instance

All the logging from the database are from interactions between
rancher/cattle and its agents.

$> head cattle_mysql.log
/usr/sbin/mysqld, Version: 5.5.49-0ubuntu0.14.04.1 ((Ubuntu)). started with:
Tcp port: 3306 Unix socket: /var/run/mysqld/mysqld.sock
Time Id Command Argument
160904 18:14:49 1597 Connect root@localhost on
160904 18:14:50 225 Query SELECT 1
 225 Prepare select `agent`.`id`, `agent`.`name`, `agent`.`account_id`, `agent`.`kind`, `agent`.`uuid`, `agent`.`description`, `agent`.`state`, `agent`.`created`, `agent`.`removed`, `agent`.`remove_time`, `
agent`.`data`, `agent`.`uri`, `agent`.`managed_config`, `agent`.`agent_group_id`, `agent`.`zone_id` from `agent` where (`agent`.`state` = ? and `agent`.`uri` not like ? and `agent`.`uri` not like ? and 1 = 1)
 225 Close stmt

My logging started at 18:14:49. From the logs, we can tell
that every so often Rancher checks up with its agents on the state of
the system through the cattle.agent table. When we killed the
WordPress container around 18:15:05, the server received a
cattle.container_event which signaled that WordPress was killed.

160904 18:15:05  225 Execute   insert into `container_event` (...omit colunms...) values (7, 'containerEvent', 'requested', '2016-09-04 18:15:05', '{...}', 'cffb01a9ea154f167b8c852fab1f2a444d8e846beefb6b15147109580e3bcf36', 'kill', 'wordpress:latest', 1473012905, '7442b981-b62a-4d29-80ee-e6077589fabc', 1)

Cattle then calculated that the desired instance count for wordpress was
insufficient based on the metadata stored in cattle.service. So it
emits a few cattle.process_instance to reconcile the load.
codesheppard-2-11
Following the update, Rancher emits a few commands in
cattle.process_instance. Agents then enact upon the events, updating
cattle.process_instance and cattle.process_execution within a few
loops:
Codesheppard-2-10
By 18:15:08, a new WordPress container is spun up to converge to the
desired instance count. In brief, the Cattle event engine will process
incoming host states from its agents; whenever an imbalance in service
scale is detected, new events are emitted by Cattle and the agents act
on them to achieve the desired state. This does not ensure that your
container is behaving correctly, only that it is up and running. To
ensure correct behavior, we move on to our next topic.

Health Checks

Health checks, on the other hand, are user defined and use HTTP
request/pings to report a status instead of checking
container_events in the Rancher database. We’ll get to take a look
at this once we setup a multi-container WordPress following the
instructions on Creating a Multiple Container
Application
in
the Rancher documentation.
Codesheppard-2-13
Let’s introduce a new error type. This time instead of killing the
container, we will make the software fail. I dropped a line in the
WordPress container to cause it to return 500, but the container is
still up serving 500s.

$> docker exec -it r-wordpress-multi_mywordpress_1 bash
$root@container> echo "failwhale" >> .htacess
# container now returns 500s.
# we want it to fail when the software fails!

What happened? Well, the issue is that the multiple container example
does not contain a Health Check. So I will go ahead and
modify *rancher-compose.yml *to include one. The rancher-compose.yml
only defines a Health Check for the LoadBalancer itself; we need to add
a service-level Health Check to our WordPress service.

mywordpress:
  scale: 2
  health_check:
    # Which port to perform the check against
    port: 80
    # For TCP, request_line needs to be '' or not shown
    # TCP Example:
    # request_line: ''
    request_line: GET / HTTP/1.0
    # Interval is measured in milliseconds
    interval: 2000
    initializing_timeout: 60000
    unhealthy_threshold: 3
    # Strategy for what to do when unhealthy
    # In this service, Rancher will recreate any unhealthy containers
    strategy: recreate
    healthy_threshold: 2
    # Response timeout is measured in milliseconds
   response_timeout: 200
...

$> cd wordpress-multi
$> rancher-compose up --upgrade mywordpress
... log lines
$> rancher-compose up --upgrade --confirm-upgrade

I defined my Health Check through rancher-compose.yml, but you can
also define it through the Rancher UI to browse through the options.

Note: You will only have access to this UI on new service creation.

Codesheppard-2-14
Creation of Simple TCP Ping
Codesheppard-2-15

The documentation covers the Health Check options in extreme detail.
So in this post, we’ll instead look at which components support the
Health Check feature.

With the addition of the Health Check, I repeated the above experiment.
The moment that the container started returning 500s, Rancher Health
Checks marked the container as unhealthy, then proceeded to recreate the
container.
Codesheppard-2-16
To get a deeper understanding of how Health Checking works we will take
a look into how the agent’s components faciliate Health Check on one
host. Entering into the agent instance, we check out the processes
running on it.
HealthCheckNetworkDiagram
At a high level, our hosts communicate with the outside world on the
physical eth0 interface. Docker by default creates a bridge called
docker0 and hands out container IP addresses known commonly as Docker
IPs
to the eth0 of containers through a virtual network (veth).
This is how we were able to connect to Rancher/server’s MySQL
previously on 172.17.0.4:3306. The network agent contains a DNS server
called rancher/rancher-dns;
every container managed by Rancher uses this DNS to route to the private
IPs, and every networking update is managed by the services found in the
network agent container.

If you have a networking background, there is a great post on the blog
called Life of a Packet in
Rancher
.

Breakdown of Processes Running on Network Agent Instance

root@agent-instance:/# ps ax
 PID TTY STAT TIME COMMAND
 1 ? Ss 0:00 init
 306 ? Sl 0:02 /var/lib/cattle/bin/rancher-metadata -log /var/log/rancher-metadata.log -answers /var/lib/cattle/etc/cattle/metadata/answers.yml -pid-file /var/run/rancher-metadata.pid
 376 ? Sl 1:29 /var/lib/cattle/bin/rancher-dns -log /var/log/rancher-dns.log -answers /var/lib/cattle/etc/cattle/dns/answers.json -pid-file /var/run/rancher-dns.pid -ttl 1
 692 ? Ssl 0:16 /usr/bin/monit -Ic /etc/monit/monitrc
 715 ? Sl 0:30 /usr/local/sbin/charon
 736 ? Sl 0:40 /var/lib/cattle/bin/rancher-net --log /var/log/rancher-net.log -f /var/lib/cattle/etc/cattle/ipsec/config.json -c /var/lib/cattle/etc/cattle/ipsec -i 172.17.0.2/16 --pid-file /var/run/rancher-net.pi
 837 ? Sl 0:29 /var/lib/cattle/bin/host-api -log /var/log/haproxy-monitor.log -haproxy-monitor -pid-file /var/run/haproxy-monitor.pid
16231 ? Ss 0:00 haproxy -p /var/run/haproxy.pid -f /etc/healthcheck/healthcheck.cfg -sf 16162

If we dig into the /etc/healthcheck/healthcheck.cfg, you can see our
health checks defined inside for HAProxy:

...

backend 359346ff-33cb-445e-b1e2-7ec06d95bb19_backend
 mode http
 balance roundrobin
 timeout check 2000
 option httpchk GET / HTTP/1.0
 server cattle-359346ff-33cb-445e-b1e2-7ec06d95bb19_1 10.42.188.31:80 check port 80 inter 2000 rise 2 fall 3

backend cbc329bc-c7ec-4581-941b-da6660b8ef00_backend
 mode http
 balance roundrobin
 timeout check 2000
 option httpchk GET / HTTP/1.0
 server cattle-cbc329bc-c7ec-4581-941b-da6660b8ef00_1 10.42.179.149:80 check port 80 inter 2000 rise 2 fall 3

# This one is the Rancher Internal Health Check defined for Load Balancers
backend 3f730419-9554-4bf6-baef-a7439ba4d16f_backend
 mode tcp
 balance roundrobin
 timeout check 2000

server cattle-3f730419-9554-4bf6-baef-a7439ba4d16f_1 10.42.218.145:42 check port 42 inter 2000 rise 2 fall 3

...

Health Check Summary

Rancher’s Network agent runs the Health Checks from
host-api,
which queries the configured Health Checks from HAProxy and reports
statuses back to Cattle. Paraphrasing the documentation:

In Cattle environments, Rancher implements a health monitoring system
by running managed network agents across its hosts to coordinate the
distributed health checking of containers and services.

You can see metadata for this being filled in
cattle.healthcheck_instance.

When health checks are enabled either on an individual container or a
service, each container is then monitored by up to three network
agents running on hosts separate to that container’s parent host.

Unless you are running one host like I am, the Health Check will be from
the same host. These Health Checks are all configured by the
rancher/host-api binary with HAProxy. HAProxy is a pretty popular and
battle-tested software, and can be found in popular service discovery
projects like AirBnB’s synapse.

The container is considered healthy if at least one HAProxy instance
reports a “passed” health check and it is considered unhealthy when
all HAProxy instances report a “unhealthy” health check.

Events are propagated by the Rancher Agent to Cattle, at which point the
Cattle server will decide if a Health Check’s unhealthy strategy (if
any) needs to be applied. In our experiment, Cattle terminated the
container returning 500s and recreated it. With the network services, we
can connect the dots of how health checks are setup. This way, we now
have a point of reference into the components supporting Health Checks
in Rancher.

Load Balancers

So now we know Cattle keeps our individual services are to the scale we
set, and that for more resiliency, we can also setup HAProxy Health
Checks to ensure the software is running. Now let’s build up another
layer of resiliency by introducing Load Balancers. The Rancher Load
Balancer is a containerized HAProxy application service that is managed
like any other service in Rancher by Service Scale, though it is tagged
by Cattle as a System Service, and default hidden by default in the UI.
(Marked blue when we toggle system services)
Codesheppard-2-17
When a WordPress container behind a Load Balancer fails, the Load
Balancer will automatically divert traffic to the next available host.
This is by no means unique to Rancher, and is a common way to balance
traffic on most applications. Though usually you will pay an hourly rate
for such service or maintain it yourself, Rancher allows you to quickly
and automatically set up an HAProxy loadbalancer, so we can get onto
building software instead of infrastructure. If we dig into the
container r-wordpress-multi_wordpresslb_1 to check its HAProxy
configs, we can see that the config is periodically updated with the
containers in the Rancher-managed network:

$> docker exec -it r-wordpress-multi_wordpresslb_1 bash
 $root@wordpresslb_1> cat /etc/haproxy/haproxy.cfg
 ...
 frontend 6cd2e4b8-ea4c-4300-87f2-2a8f1fc96fec_80_frontend
 bind *:80
 mode http

default_backend 6cd2e4b8-ea4c-4300-87f2-2a8f1fc96fec_80_0_backend

backend 6cd2e4b8-ea4c-4300-87f2-2a8f1fc96fec_80_0_backend
 mode http
 timeout check 2000
 option httpchk GET / HTTP/1.0
 server cee0dd09-4307-4a5c-812e-df234b035694 10.42.188.31:80 check port 80 inter 2000 rise 2 fall 3
 server a7f20d4a-58fd-419e-8df2-f77e991fec3f 10.42.179.149:80 check port 80 inter 2000 rise 2 fall 3
 http-request set-header X-Forwarded-Port %[dst_port]

listen default
 bind *:42
 ...

You can also use achieve a similar result with DNS like we did for
Rancher HA in part 1, though Load Balancers offer additional features in
Rancher such as SSL certificates, advanced load balancing other than
round robin and etc.
Codesheppard-2-18
For more details on all of the features, I highly recommend checking out
the detailed Rancher documentation on Load Balancers
here.

Final Experiment, Killing the Database

Now for the final experiment: what happens when we kill the Database
Container? Well, the container comes back up and WordPress connects to
it. Though…oh no, WordPress is back in setup mode, and even worse,
all my posts are gone! What happened?

Since the database depends on the data to be migrated, when we kill
the container, it actually removes the volumes that contain our
Wordpress data.

This is a major problem. Even if we can use a Load Balancer to scale all
these containers, it doesn’t matter if we can’t properly protect data
running on them! So in the next section, we will discuss data resiliency
on Rancher with Convoy and how to launch a replicated MySQL cluster to
make our WordPress setup more resilient inside Rancher. Stay tuned for
part 3, where we will dive into data resiliency in Rancher. Nick Ma is
an Infrastructure Engineer who blogs about Rancher and Open Source. You
can visit Nick’s blog, CodeSheppard.com, to
catch up on practical guides for keeping your services sane and reliable
with open-source solutions.

Tags: , Category: 未分類 Comments closed

Deploying Service Stacks from a Docker Registry and Rancher

金曜日, 2 9月, 2016

Note: you can read the Part
1

and Part
2

of this series, which describes how to deploy service stacks from a
private docker registry with Rancher.
This is my third and final blog post,
and follows part
2
,
where I stepped through the creation of a private, password-protected
Docker registry. and integrated this private registry with Rancher. In
this post, we will be putting this registry to work (although for speed,
I will use public images). We will go through how to make stacks that
reference public containers and then use them in Rancher to deploy your
product. So let’s get started! First, we should understand the anatomy
of a Rancher stack. It isn’t that difficult if you are familiar with
Docker Compose YAML files. A Rancher stack needs a docker-compose.yml
file, which is a standard Docker Compose formatted file, but you can add
in Rancher-specific items, like targeting servers via
labels. The
rancher-compose.yml
file is specific to Rancher. If it doesn’t exist, then Rancher will
assume that each container that is specified in the docker-compose.yml
file will have a scaling factor of 1. It is good practice to detail a
rancher-compose.yml file. So we will attempt to do the following, and
make extensive use of Rancher labels. (1) Create a stack that deploys
out a simple haproxy + 2 nginx servers (2) Create an ELK stack to
collect logs (3) Deploy a Logspout container to collate and send all
Docker logs to our ELK stack. Here are the characteristics of each of
our containers, and the Rancher-specific labels that help us achieve our
goals:


Containers **Host Label ** Rancher Labels
ElasticSearch + Logstash + Kibana Deploy only onto a specific host with label “type=elk” io.rancher.container.pull_image: always io.rancher.scheduler.affinity:host_label: type=elk
Logspout Deploy onto all hosts unless labeled “type=elk” io.rancher.container.pull_image: always io.rancher.scheduler.global: true io.rancher.scheduler.affinity:host_label_ne: type=elk
HAProxy + 2 nginx containers Deploy onto any host NOT labeled “type=elk” or “type=web1” or “type=web2” io.rancher.container.pull_image: always io.rancher.scheduler.affinity:host_label_ne: type=elk,type=web1,type=web2
nginx 1 Deploy onto the host labeled “type=web1” io.rancher.container.pull_image: always io.rancher.scheduler.affinity:host_label: type=web1
nginx 2 Deploy onto the host labeled “type=web2” io.rancher.container.pull_image: always io.rancher.scheduler.affinity:host_label: type=web2


We will need 4 hosts in total for this and will deploy 2 stacks.

Stack 1: ELK + Logspout

ELK will be running without persistence. For me, that isn’t important
as any logs that are older than a day are not very useful; if needed I
can get the logs direct via the ‘docker logs’ command. The Logspout
container will be required for every host, so we will use the Rancher
label ‘io.rancher.scheduler.global: true’ to perform this. The
‘global: true’ should be pretty straightforward – it instructs Rancher
to deploy this container to every available host in the environment.
Below is the logspout definition. Alter the logspout command to the IP
of your ELK host. Also provide the labels in the below screen to each of
the hosts. Stack name: ELK Stack Description: My elk stack that will
collect logs from logspout Docker-Compose.yml

elasticsearch:
  image: elasticsearch
  ports:
    - '9200:9200'
  labels:
    io.rancher.container.pull_image: always
    io.rancher.scheduler.affinity:host_label: type=elk
  container_name: elasticsearch
logstash:
  image: logstash
  ports
    - 25826:25826
    - 25826:25826/udp
  command: logstash agent --debug -e 'input {syslog {type => syslog port => 25826 } gelf {} } filter {if "docker/" in [program] {mutate {add_field => {"container_id" => "%{program}"} } mutate {gsub => ["container_id", "docker/", ""] } mutate {update => ["program", "docker"] } } } output { elasticsearch { hosts => ["elasticsearch"] } stdout {} }'
  links:
    - elasticsearch:elasticsearch
  labels:
    io.rancher.container.pull_image: always
    io.rancher.scheduler.affinity:host_label: type=elk
  container_name: logstash
kibana:
   image: kibana
   ports:
     - 5601:5601
   environment:
     - ELASTICSEARCH_URL=http://elasticsearch:9200
   links:
     - elasticsearch:elasticsearch
   labels:
     io.rancher.container.pull_image: always
     io.rancher.scheduler.affinity:host_label: type=elk
   container_name: kibana
logspout:
  labels:
    io.rancher.container.pull_image: always
    io.rancher.scheduler.global: true
    io.rancher.scheduler.affinity:host_label_ne: type=elk
  image: gliderlabs/logspout
  volumes:
    - /var/run/docker.sock:/tmp/docker.sock
  container_name: logspout
  command: "syslog://111.222.333.444:25826"

Now click ‘Create’ and after a few seconds you will see the containers
being created. After a few minutes, all containers will have been
downloaded to the correct hosts as defined in the docker-compose YAML.
At the end of this process, we should see that all hosts have been
activated:
stacks3
Now we can verify that the containers are distributed to the correct
hosts and that the logspout contianer is on all hosts apart from the elk
host.
hosts-2
So everything looks good. Let’s visit our kibana frontend to ELK @
144.172.71.84:5601
kibana
All looks good. Now let’s get our next stack set up:

Stack 2: HAproxy + 2 Nginx containers

Stack name: Web Stack Description: HAProxy and 2 nginx containers, all
logging to Elasticsearch Docker-Compose.yml

web1:
 image: tutum/hello-world
 container_name: web1
 labels:
 io.rancher.container.pull_image: always
 io.rancher.scheduler.affinity:host_label: type=web1
web2:
 image: tutum/hello-world
 container_name: web2
 labels:
 io.rancher.container.pull_image: always
 io.rancher.scheduler.affinity:host_label: type=web2
ha:
 image: tutum/haproxy
 ports:
 - 80:80
 - 443:443
 container_name: ha
 labels:
 io.rancher.container.pull_image: always
 io.rancher.scheduler.affinity:host_label_ne: type=elk,type=web1,type=web2
 links:
 - web1:web1
 - web2:web2

Now hit ‘Create’, and after a few minutes you should see the hello
world nginx containers behind an HAProxy.
ha2
If we look at our stacks page, we will see both stacks with green
lights:
ha3
And if we hit the ha IP on port 80 or 443, we will see the hello world
screen.
ha4
We can then hit refresh a few times and the second hostname will
appear. You can then validate the hostnames by opening up the container
name and executing the shell.
web1
We should do a final check of our hosts to see if we have distributed
all of our containers as intended. Has our Elasticsearch instance
received any logs from our Logspout containers? (You might have to
create an index in Kibana first)
kibana2
Yay! Looks like we have been successful. To recap, we have deployed 2
stacks, and 9 containers across 4 hosts in a configuration that suits
our requirements. The result is a service that ships all the logs of any
new container automatically back to the ELK stack. You should now have
enough know-how in Rancher to be able to deploy your own service stacks
from your private registry. Good luck!

Tags: ,, Category: 未分類 Comments closed

5 Keys to Running Workloads Resiliently with Rancher and Docker – Part 1

木曜日, 4 8月, 2016
Build a CI/CD Pipeline with Kubernetes and Rancher
Recorded Online Meetup of best practices and tools for building pipelines with containers and kubernetes.

Containers and orchestration frameworks like Rancher will soon allow
every organization to have access to efficient cluster management. This
brave new world frees operations from managing application configuration
and allows development to focus on writing code; containers abstract
complex dependency requirements, which enables ops to deploy immutable
containerized applications and allows devs a consistent runtime for
their code. If the benefits are so clear, then why do companies with
existing infrastructure practices not switch? One of the key issues is
risk. The risk of new unknowns brought by an untested technology, the
risk of inexperience operating a new stack, and the risk of downtime
impacting the brand. Planning for risks and demonstrating that the ops
team can maintain a resilient workload whilst moving into a
containerized world is the key social aspect of a container migration
project. Especially since, when done correctly, Docker and Rancher
provide a solid framework for quickly iterating on infrastructure
improvements, such as [Rancher

catalogs](https://docs.rancher.com/rancher/latest/en/catalog/) for

quickly spinning up popular distributed applications like
ElasticSearch.
In regard to risk management, we will look into identifying the five
keys to running a resilient workload on Rancher and Docker. The topics
that will be covered are as follows:

  • Running Rancher in HA Mode (covered in this post)
  • Using Service Load Balancers in Rancher
  • Setting up Rancher service health checks and monitoring
  • Providing developers with their own Rancher setup
  • Discussing Convoy for data resiliency

I had originally hoped to perform experiments on a Rancher cluster
built on a laptop using Docker Machine with a Rancher
Server
and various
Rancher Agents on Raspberry Pis. Setup instructions
here.
The problem is that most Docker images are made for Intel based CPUs, so
nothing works properly on Pi’s ARM processors. Instead I will directly
use AWS for our experiments with resilient Rancher clusters. With our
initial setup, we have 1 Rancher Server and 1 Agent. Let’s deploy a
simple multiple container application. Rancher HA Experiment Diagram
The above diagram illustrates the setup I am going to use to experiment
with Rancher. I chose AWS because I am familiar with the service, but
you can choose any other provider for setting up Rancher according to
the Quick Start
Guide
.
Rancher Machine Creation
Let’s test our stack with the WordPress
compose

described in the Rancher Quick Start instructions. Rancher HA
So now our application is up and running, the one scenario is what
happens if the Rancher Server malfunctions? Or a network issue occurs?
What happens to our application? Will it still continue serving
requests? WordPress up
For this experiment, I will perform the following and document the
results.

  • Cutting the Internet from Rancher Agent to Rancher Server
  • Stopping the Rancher Server Container
  • Peeking under the hood of the Rancher Server Container

Afterwards we will address each of these issues, and then look at
Rancher HA as a means of addressing these risks.

Cutting the Internet from Rancher Agent to Rancher Server

So let’s go onto AWS and block all access to the Rancher Server from my
Rancher Agents.

  • Block access from Rancher Server to Rancher Agent
  • Note down what happens
  • Kill a few WordPress containers
  • Re-instantiate the connection

Observations:

Firstly, after a few seconds our Rancher hosts end up in a reconnecting
state. Turn off Rancher Server
Browsing to my WordPress URL I can still access all my sites properly.
There is no service outage as the containers are still running on the
remote hosts. The IPSec tunnel between my two agents is still
established, thus allowing my lone WordPress container to still connect
to the DB. Now let’s kill a WordPress container and see what happens.
Since I can’t access my Rancher Agents from the UI, I will be SSHing
into the agent hosts to run Docker commands. (Instructions for SSHing
into Rancher-created hosts can be found
here)
Turning off Rancher Server
The WordPress container does not get restarted. This is troublesome, we
will need our Rancher Server back online. Let’s re-establish the network
connection and see if the Rancher Server notices that one of our
WordPress services is down. After a few moments, our Rancher Server
re-establishes connection with the agents and restarts the WordPress
container. Excellent. So the takeaway here is that Rancher Server can
handle intermittent connection issues and reconnect to the agents and
continue on as usual. Although, for reliable uptime of our containers we
would need multiple instances of Rancher Server on different hosts for
resiliency against networking issues in the data center. Now, what would
happen if the Rancher Server dies? Would we lose all of our ability to
manage our hosts after it comes back? Let’s find out!

Killing the Rancher Server

In this second experiment I will go into the Rancher Server host and
manually terminate the process. Generally a failure will result in the
Docker process restarting due to –restart=always being set. Though
let’s assume that either your host ran out of disk space or otherwise
borked itself.

Observations:

Let’s simulate catastrophic failure, and nuke our Rancher container.
sudo docker stop rancher-server As with the network experiment our
WordPress applications still run on the agents and serve traffic
normally. The Rancher UI and any semblance of control is now gone. We
don’t like this world, so we will start the rancher-server back up.
sudo docker start rancher-server After starting up again, the Rancher
server picks up where it left off. Wow, that is cool, how does this
magic work?

Peeking under the hood of the Rancher Server Container

So how does the Rancher Server operate? Let’s take a brief tour into the
inner working of the Rancher server container to get a sense of what
makes it tick. Taking a look at the Rancher Server Docker build file
found here.
Rancher Server Components

# Dockerfile contents
FROM ...
...
...
CMD ["/usr/bin/s6-svscan", "/service"]

What is s6-svscan? It is a supervisor process that keeps a process
running based on commands found in files in a folder; these key files
are named as Run, Down, and Finish. If we look inside the service
directory we can see that the container will install dependencies and
use s6-svscan to start up 2 services. Rancher Server Components - Service
The Cattle service, which is the core Rancher scheduler, and a MySQL
instance. Inside our container the following services are being run.

PID TTY      STAT   TIME COMMAND
    1 ?        Ss     0:00 /usr/bin/s6-svscan /service
    7 ?        S      0:00 s6-supervise cattle
    8 ?        S      0:00 s6-supervise mysql
    9 ?        Ssl    0:57 java -Xms128m -Xmx1g -XX:+HeapDumpOnOutOfMemoryError -XX:HeapDumpPath=/var/lib/cattle/logs -Dlogback.bootstrap.level=WARN -cp /usr/share/cattle/1792f92ccdd6495127a28e16a685da7
  135 ?        Sl     0:01 websocket-proxy
  141 ?        Sl     0:00 rancher-catalog-service -catalogUrl library=https://github.com/rancher/rancher-catalog.git,community=https://github.com/rancher/community-catalog.git -refreshInterval 300
  142 ?        Sl     0:00 rancher-compose-executor
  143 ?        Sl     0:00 go-machine-service
 1517 ?        Ss     0:00 bash
 1537 ?        R+     0:00 ps x

We see that our Rancher brain is a Java application named Cattle, which
uses a MySQL database embedded within its container to store state. This
is quite convenient, but it would seem that we found the single point of
failure on our quick-start setup. All the state for our cluster lives in
one MySQL instance which no one knows existed. What happens if I nuke
some data files?

Corrupting the MySQL Store

Inside my Rancher server container I executed MySQL commands. There is a
certain rush of adrenaline as you execute commands you know will break
everything.
docker exec -it rancher-server bash $ > mysql mysql> use cattle; mysql> SET FOREIGN_KEY_CHECKS = 0; mysql> truncate service; mysql> truncate network;
Lo and behold, my Rancher service tracking is broken, even when I kill
my WordPress containers they do not come back up, because Rancher no
longer remembers them. Loss of data - 1
Since I also truncated the network setup tables, my WordPress
application no longer knows how to route to its DB. Loss of data - 2
Clearly, to have confidence in running Rancher in production, we need a
way to protect our Rancher Server’s data integrity. This is where
Rancher HA comes in.

Rancher HA Setup Process

The first order of business is we need to secure the cluster data. I
chose AWS RDS for this because it is what I am familiar with — you can
manage your own MySQL or choose another managed provider. We will
proceed assuming we have a trusted MySQL management system with backups
and monitoring. Following the HA setup steps documented in Rancher:
Rancher HA Setup
As per the setup guide, we create an AWS RDS instance to be our data
store. Once we have our database’s public endpoint, the next step is to
dump your current Rancher installation’s data, and export it to the new
database. High Availability Setup
For this I created an RDS instance with a public IP address. For your
first Rancher HA setup I recommend just making the database public, then
secure it later with VPC rules. Since Rancher provides an easy way to
dump the state, you can move it around to a secured database at a later
time. Next we will set up our Rancher Server to use the new database.
Rancher HA Setup - Database
After Rancher detects that it is using an external database, it will
open up 2 more options as part of setting up HA mode. (At this point, we
have already solved our point of failure, but for larger scale
deployments, we need to go bigger to lower risk of failure.) Rancher HA Setup - Config
Oh no, decision! — but no worries, let’s go through each of these
options and their implications. Cluster size, notice how everything
is odd? Behind the scenes, Rancher HA sets up a ZooKeeper Quorum to keep
locks in sync (More on this in the appendix). ZooKeeper
recommends odd numbers because an even number of servers does not
provide additional fault tolerance. Let’s pick 3 hosts to test out the
feature, as it is a middle ground between usefulness and ease of setup.
Host registration URL, well this section is asking us to provide the
Fully Qualified Domain Name (FQDN) of our Rancher HA cluster. The
instructions recommend an external loadbalancer or a DNS record that
round robins between the 3 hosts. Rancher HA Setup - DNS
The examples would be to use a SRV
Record
on your DNS provider
to balance between the 3 hosts; or an ELB on AWS with the 3 Rancher EC2
instances attached; or just a plain old DNS record pointing to 3 hosts.
I choose the DNS record for my HA setup as it is the simplest to setup
and debug. Now anytime I hit https://rancher.example.com my DNS
hosting provider will round robin requests between the 3 Rancher hosts
that I defined above. SSL Certificate is the last item on the list.
If you have your own SSL certificate on your domain then you can use it
here. Otherwise Rancher will provide a self-signed certificate instead.
Once all options are filled, Rancher will update fields in its database
to prepare for HA setup. You will then be prompted to download a
rancher-ha.sh script.

WARNING Be sure to kill the Rancher container you used to generate the
rancher-ha.sh script. It will be using ports that are needed by the
Rancher-HA container that will be spun up by the script.

Next up, copy the rancher-ha.sh script onto each of the participating
instances in the cluster and then execute them on the nodes to setup HA.

Caveat! Docker v1.10.3 is required at the time of writing. Newer
version of Docker is currently unsupported for the rancher-ha.sh
script.

You can provision the correct Docker version on your hosts with the
following commands:

#!/bin/bash
apt-get install -y -q apt-transport-https ca-certificates
apt-key adv --keyserver hkp://p80.pool.sks-keyservers.net:80 --recv-keys 58118E89F3A912897C070ADBF76221572C52609D
echo "deb https://apt.dockerproject.org/repo ubuntu-trusty main" > /etc/apt/sources.list.d/docker.list
apt-get update
apt-get install -y -q docker-engine=1.10.3-0~trusty

# run the command below to show all available versions
# apt-cache showpkg docker-engine

After Docker, we need to make sure that our instances can talk to each
other so make sure the ports listed on the Rancher multi-node requirements
page are open.

Advice! For your first test setup, I recommend opening all ports to
avoid networking-related blockers.

Once you have the correct prerequisites, you can run the rancher-ha.sh
script on each participating host. You will see the following output.

...
ed5d8e75b7be: Pull complete
7ebc9fcbf163: Pull complete
ffe47ea37862: Pull complete
b320962f9dbe: Pull complete
Digest: sha256:aff7c52e52a80188729c860736332ef8c00d028a88ee0eac24c85015cb0e26a7
Status: Downloaded newer image for rancher/server:latest
Started container rancher-ha c41f0fb7c356a242c7fbdd61d196095c358e7ca84b19a66ea33416ef77d98511
Run the below to see the logs

docker logs -f rancher-ha

This is where the rancher-ha.sh script creates additional images that
support the HA feature. Due to the addition of components to the Rancher
Server, it is recommended to run a host with at least 4 GB of memory. A
docker ps of what is running after running the rancher-ha.sh script is
shown here. Rancher HA Setup - Enabled

Common Problems and Solutions

You may see some connection errors, so try to run the script on all 3
hosts first. You should see logs showing members being added to the
Rancher HA Cluster.

time="2016-07-22T04:13:22Z" level=info msg="Cluster changed, index=0, members=[172.30.0.209, 172.30.0.111, ]" component=service
...
time="2016-07-22T04:13:34Z" level=info msg="Cluster changed, index=3, members=[172.30.0.209, 172.30.0.111, 172.30.0.69]" component=service

Sometimes you will see a stream of the following error lines.

time="2016-07-23T14:37:02Z" level=info msg="Waiting for server to be available" component=cert
time="2016-07-23T14:37:02Z" level=info msg="Can not launch agent right now: Server not available at http://172.17.0.1:18080/ping:" component=service

This is the top level symptom of many issues. Here are some other issues
I have identified by going through the GitHub issues list and various
forum posts: Security Group Network issues Sometimes your nodes are
binding on the wrong
IP

so you would want to coerce Rancher to broadcast the correct
IP
.
ZooKeeper not being up It is possible that the ZooKeeper Docker
container is not able to communicate with the other nodes, so you would
want to verify
ZooKeeper

and you should expect to see this sample
output
.
Leftover files in the /var/lib/rancher/state directory from previous
HA attempt
If you ran the rancher-ha.sh multiple times then you may
need to clean up old state
files
.
Broken Rancher HA setup state from multiple reattempts Drop
Database

and try again. There is a previous issue with detailed
steps

to try to surface the issue. Insufficient Resources on the machine
Since Rancher HA runs multiple Java processes on the machine, you will
want to have at least 4 GB of memory. While testing with a t2.micro
instance with 1 GB the instance became inaccessible due to being memory
constrained. Another issue is that your database host needs to support
50 connections per HA node. You will see these messages when you attempt
to spin up additional nodes.

time="2016-07-25T11:01:02Z" level=fatal msg="Failed to create manager" err="Error 1040: Too many connections"

Mismatched rancher/server:version By default the rancher-ha.sh
script pulls in rancher/server:latest, but this kicked me in the back
because during my setup, Rancher pushed out rancher/server:1.1.2 so I
had two hosts running rancher/server:1.1.1, and my third host was
rancher/server:1.1.2. This caused quite a headache, but a good takeaway
is to always specify the version of rancher/server when running the
rancher-ha.sh script on subsequent hosts.
./rancher-ha.sh rancher/server: Docker virtual network bridge was
returning wrong IP
This was the issue I ran into – my HA setup was
trying to check agent health on the wrong Docker interface.
curl localhost:18080/ping > pong curl http://172.17.0.1:18080/ping > curl: (7) Failed to connect to 172.17.0.1 port 18080: Connection refused
The error line is found on
rancher/cluster-manager/service
And the offending error call is found here in
rancher/cluster-manager/docker
What the code is doing is to locate the Docker Bridge and attempt to
ping the :18080 port on the exposed Docker port. Since my Docker bridge
is actually set up on 172.17.42.1 this will always fail. To resolve it I
re-instantiated the host because the multiple Docker installation seemed
to have caused the wrong bridge IP to be fetched. After restarting the
instance and setting the correct Docker bridge, I now see the expected
log lines for HA.

After Setting Up HA

time="2016-07-24T19:51:53Z" level=info msg="Waiting for 3 host(s) to be active" component=cert

Excellent. With one node up and ready, repeat the procedure for the rest
of the hosts. After 3 hosts are up, you should be able to access the
Rancher UI on the URL you specified for step 3 of the setup.

time="2016-07-24T20:00:11Z" level=info msg="[0/10] [zookeeper]: Starting "
time="2016-07-24T20:00:12Z" level=info msg="[1/10] [zookeeper]: Started "
time="2016-07-24T20:00:12Z" level=info msg="[1/10] [tunnel]: Starting "
time="2016-07-24T20:00:13Z" level=info msg="[2/10] [tunnel]: Started "
time="2016-07-24T20:00:13Z" level=info msg="[2/10] [redis]: Starting "
time="2016-07-24T20:00:14Z" level=info msg="[3/10] [redis]: Started "
time="2016-07-24T20:00:14Z" level=info msg="[3/10] [cattle]: Starting "
time="2016-07-24T20:00:15Z" level=info msg="[4/10] [cattle]: Started "
time="2016-07-24T20:00:15Z" level=info msg="[4/10] [go-machine-service]: Starting "
time="2016-07-24T20:00:15Z" level=info msg="[4/10] [websocket-proxy]: Starting "
time="2016-07-24T20:00:15Z" level=info msg="[4/10] [rancher-compose-executor]: Starting "
time="2016-07-24T20:00:15Z" level=info msg="[4/10] [websocket-proxy-ssl]: Starting "
time="2016-07-24T20:00:16Z" level=info msg="[5/10] [websocket-proxy]: Started "
time="2016-07-24T20:00:16Z" level=info msg="[5/10] [load-balancer]: Starting "
time="2016-07-24T20:00:16Z" level=info msg="[6/10] [rancher-compose-executor]: Started "
time="2016-07-24T20:00:16Z" level=info msg="[7/10] [go-machine-service]: Started "
time="2016-07-24T20:00:16Z" level=info msg="[8/10] [websocket-proxy-ssl]: Started "
time="2016-07-24T20:00:16Z" level=info msg="[8/10] [load-balancer-swarm]: Starting "
time="2016-07-24T20:00:17Z" level=info msg="[9/10] [load-balancer-swarm]: Started "
time="2016-07-24T20:00:18Z" level=info msg="[10/10] [load-balancer]: Started "
time="2016-07-24T20:00:18Z" level=info msg="Done launching management stack" component=service
time="2016-07-24T20:00:18Z" level=info msg="You can access the site at https://" component=service

Rancher HA Setup - Enabled
To get around issues regarding the self-signed HTTPS certificate, you
will need to add it to your trusted certificates. After waiting and
fixing up resource constraints on the DB, I then see all 3 hosts up and
running. Rancher HA Setup - Done

Conclusion

Wow, that was a lot more involved than originally thought. This is why
scalable distributed systems is a realm of PhD study. After resolving
all the failure points, I think setting up and getting to know Rancher
HA is a great starting point to touching state-of-the-art distributed
systems. I will eventually script this out into Ansible provisioning to
make provisioning Rancher HA a trivial task. Stay tuned!

Appendix

For any distributed system, there is an explicit way to manage state and
changes. Multiple servers need a process to coordinate between updates.
Rancher’s management process works by keeping state and desired state
in the database; then emitting events to be handled by processing
entities to realize the desired state. When an event is being processed,
there is a lock on it, and it is up to the processing entity to update
the state in the database. In the single server setup, all of the
coordination happens in memory on the host. Once you go to a multi
server setup, the additional components like ZooKeeper and Redis are
needed. Nick Ma is an Infrastructure Engineer who blogs about Rancher
and Open Source. You can visit Nick’s blog,
CodeSheppard.com, to catch up on practical
guides for keeping your services sane and reliable with open-source
solutions.

Build a CI/CD Pipeline with Kubernetes and Rancher
Recorded Online Meetup of best practices and tools for building pipelines with containers and kubernetes.
Tags: ,,,, Category: 未分類 Comments closed

Building Rancher Docker Container Catalog Templates from Scratch : Part 1

月曜日, 11 7月, 2016

A Detailed Overview of Rancher’s Architecture
This newly-updated, in-depth guidebook provides a detailed overview of the features and functionality of the new Rancher: an open-source enterprise Kubernetes platform.

Catalog
IconsRancher ships
with a number of reusable, pre-built application stack templates.
Extending these templates or creating and sharing completely new ones
are great ways to participate in the Rancher user community and to help
your organization effectively leverage container-based
technologies. Although the Rancher documentation is
fairly exhaustive, so far documentation on how to get started as a new
Catalog template author has consisted of only a single high-level blog
post
. This
article is the first in a series aimed at helping the new Catalog
template author ramp-up quickly, with the best available tooling and
techniques. For the first article in this series, we are going to
construct a very simple (and not terribly useful) Cattle Catalog
template. In an upcoming article, we will flesh out this template with
more detail until we have a working multi-container NGINX-based static
website utilizing all of the basics of Rancher Compose, Docker Compose,
and Rancher Cattle.

[Overview and Terminology]

Before we dive into creating a new Rancher Catalog template, let’s
first get some common terminology out of the way. If you are an
experienced Rancher user, you may be able to scan through this section.
If you are new to the world of Linux
containers
, cluster
managers
, and container
orchestration
, now is
a good time to do some Googling. For our purposes, Rancher is Open
Source software enabling deployment and lifecycle management of
container-based application stacks, using most of the commonly available
Open Source container orchestration frameworks. As of this writing,
Rancher has excellent support for Docker containers and the following
orchestration frameworks:

  • Kubernetes
    (1,
    2)
  • Mesos (1,
    2)
  • Docker Swarm (1,
    2)
  • Rancher’s own Docker Compose-based Cattle

If your favorite framework isn’t listed rest assured, that support is
probably on the way. Within the context of each of the previously
mentioned orchestration frameworks, Rancher includes a catalog of
pre-built and reusable application templates. These templates may be
composed of a single container image, but many times they stitch
together multiple images. Templates can be fed environment-specific
configuration parameters and instantiated into running application
stacks via the Rancher admin console. The screenshot below shows several
applications stacks as viewed via the Rancher admin console. Note that
the WordPress and
Prometheus stacks are expanded to show the
multiple containers comprising each stack. Screenshot of the
available application Templates in the Rancher Cattle
Catalog
In this article, we are going to focus on Rancher’s own Cattle
orchestrator. See the image below for examples of some of the many
pre-built Catalog templates which ship for Cattle. Screenshot of the
Rancher admin Console with running application
Stacks

###

Creating your first Rancher Cattle Catalog template

Many times these pre-built Rancher Catalog templates can be used as
shipped, but sometimes you’ll need to modify a template (and please
then submit your pull request to the upstream!), or even create a new
template from scratch when your desired application stack does not
already have one.

Doing it manually

For the purposes of this exercise, I’ll assume you have:

(1) a container host running the rancher/server container (2) at least
one compute node running rancher/agent (for the purposes of the demo,
(1) and (2) can be the same host) (3) a configured Rancher Cattle
environment (available by default with a running rancher/server
instance)

If that is not the case, please check out the one of the Rancher
Overview videos on the Rancher Labs YouTube
channel
.

Adding a custom Cattle Catalog template

By default, the Catalog templates listed in the Rancher admin console
are sourced from the Rancher Community Catalog
repository
. We’ll create
our own git repo as a source for our new ‘demo app’ Cattle Catalog
template. First, we’ll set up our working directory on our local
workstation: Screenshot of local workstation setup for 'demo'
Template
Although there’s no deep magic, let’s step through the above:

  1. Create a project working directory named ‘rancher-cattle-demo’
    under ~/workspace. These names and paths are fairly arbitrary
    though you may find it useful to name the working directory and git
    repo according to the following convention: rancher-<orchestration
    framework>-<app name>.
  2. Create the git repo locally with ‘git init’ and on
    GitHub via the
    hub’ utility.
  3. Populate the repo with a minimal set of files necessary for a
    Rancher Cattle Catalog template. We’ll cover this in detail in a
    second.

Now let’s do our initial commit and ‘git push’ of the demo template:
Screenshot of initial git commit & push of our demo
Template
For sanity’s sake, you might want to check that your push to GitHub was
successful. Here’s my account after the above push: Screenshot of
initial push to
GitHub
It’s worth noting that in the above screenshot I’m using the
Octotree
Chrome extension to get a full filesystem view of the repo. Now let’s
configure Rancher to pull in our new Catalog template. This is done via
the Rancher admin console under Admin/Settings: Screenshot of
Admin/Settings in Rancher admin
console
Click the “+” next to “Add Catalog” near the middle of the page.
Text boxes will appear where you can enter a name and URI for the new
Catalog repo. In this case, I’ve chosen the name ‘demo app’ for our
new Catalog repo. Note the other custom Catalog settings from previous
custom work. Screenshot of adding a new Catalog
repo
Now we can go to Catalog/demo app in the Rancher admin console and pull
see the listing of container templates. In this case, just our ‘demo
app’ template. But wait there’s something wrong… Screenshot of
'demo app' Catalog with incomplete
Template
We’ve successfully created the scaffolding for a Rancher Cattle
template, but we’ve not populated any of the metadata for our template,
nor the definition or configuration of our container-based app. The
definition of our application via docker-compose.yml and
rancher-compose.yml is worthy or its own blog post (or two!), but for
now we’ll focus on just basic metadata for the template. In other words,
we’ll look at just the contents of config.yml

Minimal config.yml

The Rancher documentation contains detailed
information about config.yml. We’re going to do just enough to get
things working, but a thorough read of the docs is highly recommended.

config.yml

The config.yml file is the primary source of metadata associated with
the template. Let’s look at a minimal example:

---
name: Demo App
description: >
  A Demo App which does almost nothing of any practical value.
version: 0.0.1-rancher1
category: Toy Apps
maintainer: Nathan Valentine <nathan@rancher.com|nrvale0@gmail.com>
license: Apache2
projectURL: https://github.com/nrvale0/rancher-cattle-demo

In case it wasn’t evident from the filename, the metadata is specified
as YAML. Given the above YAML and the Icon file present in this git
commit
,
let’s look at the new state of our template: Screenshot of improved
demo
Template
That’s starting to look a lot better, but our Catalog template still
doesn’t do anything useful. In our next post in this series, we’ll cover
how to define our application stack (Hint: it involves populating the
docker-compose.yml and rancher-compose.yml files.)

A better way to create templates

Before we move on to definition of our application, I need to tell you a
secret… When creating new Catalog templates manually doesn’t require
any deep magic, it’s easy to make a small and silly mistake which
results in an error. It would be excellent to have tooling that allowed
us to create new Catalog templates in a fast, repeatable,
low-probability-of-error way…and in fact there is. The Rancher
community has submitted a Rancher Catalog Template
‘generator’

to The Yeoman Project. Assuming you have a working
Node.js environment, generating a new Cattle Catalog Template with
default scaffolding is as simple as the process shown below: Animated
GIF of creating a new Cattle Catalog Template with
Yeoman

A Detailed Overview of Rancher’s Architecture
This newly-updated, in-depth guidebook provides a detailed overview of the features and functionality of the new Rancher: an open-source enterprise Kubernetes platform.

Tags: Category: 未分類 Comments closed

DockerCon 2016: Where Docker-Native Orchestration Grows Up

火曜日, 21 6月, 2016

[We just came back from DockerCon 2016, the biggest and most exciting
DockerCon yet. Rancher had a large and well-trafficked presence there –
our developers even skipped attending breakout sessions in favor
of staffing the booth, just to talk with all the people who were
interested in Rancher. In only two days, over a thousand people stopped
by to talk to us!] Rancher Labs at
DockerCon
2016

[Docker-Native Orchestration]

[Without a doubt, the biggest news out of DockerCon this year is the new
built-in container orchestration capabilities in the upcoming Docker
1.12 release. With this capability, developers can now create a Swarm
cluster with a simple command and will be able to deploy, manage, and
scale services from application templates. ]
Docker Swarm
Orchestration

Docker 1.12 Built-in Container Orchestration (Source: Docker
Blog
)

[Multi-Framework Support]

[At Rancher Labs, we are committed to supporting multiple container
orchestration frameworks. Modern DevOps practices encourage individual
teams to have their choice of tools and frameworks, and as a result,
large enterprise organizations often find it necessary to support
multiple container orchestration engines. Goldman Sachs, for example,
][plans to use both Swarm and Kubernetes in
their quest to migrate 90% of computing to
containers]
[.]
[Rancher is the only container management platform on the market today
capable of supporting all leading container orchestration frameworks:
Swarm, Kubernetes, and Mesos. ]
Orchestration frameworks in
rancher
[With the new built-in orchestration support coming in Docker 1.12,
Swarm will continue to be an attractive choice for DevOps
teams.]

[Docker-Native Orchestration Support Coming Soon in Rancher]

[We are very excited about the latest Docker-native container
orchestration capabilities built into Docker 1.12 and the engineering
team has already begun work to integrate these capabilities into
Rancher. We expect a preview version of this integration in early July
and can’t wait to show you what we’re doing to bring these amazing new
capabilities to Rancher users. Stay tuned!]

Tags: ,, Category: 未分類 Comments closed

Create a Private Docker Registry to Integrate with Rancher

火曜日, 7 6月, 2016

A Detailed Overview of Rancher’s Architecture
This newly-updated, in-depth guidebook provides a detailed overview of the features and functionality of the new Rancher: an open-source enterprise Kubernetes platform.

In my last blog
post
,
I detailed how we can quickly and easily get the Rancher Server up and
running with Github authentication and persistent storage to facilitate
easy upgrades. In this post, I will step through the creation of a
private Docker registry that is password protected and how to integrate
this private registry into Rancher. We will then tag and push an image
to this registry. Finally, we will use the Rancher Server to deploy this
image onto a server. The Docker image that we will be using is
registry:2 and although I would recommend that you use a storage
driver like AWS S3 for this purpose, I will be storing everything we
need as host level persistence. Some things that we need to use with
this image are:

  • A certificate for your domain. I will be using regv2.piel.io
  • A .htaccess compatible password

To create the first item, I am going to use
letsencrypt.org and a handy Docker script by
fatk to quickly get your certificates.

  • Clone
    git@github.com:fatk/docker-letsencrypt-nginx-proxy-companion-examples.git
  • Modify
    docker-letsencrypt-nginx-proxy-companion-examples/dockerdocker-run/simple-site/docker-run.sh
    and replace “site.example.com” with a public accessible domain
    pointing to the server you will run this on.
  • Run the script
$ git clone git@github.com:fatk/docker-letsencrypt-nginx-proxy-companion-examples.git
$ cd docker-letsencrypt-nginx-proxy-companion-examples
# Modify the script and replace site.example.com
$ vi dockerdocker-run/simple-site/docker-run.sh
$ ./docker-run.sh

While the script is running, the nginx instance, docker-gen
instance, letsencrypt-nginx-proxy-companion instance, and finally the
nginx instance. Let’s see what containers started after the script has
finished! nginx, docker-gen, and letsencrypt-nginx-proxy-companion
instances. Click to
enlarge.
So that seemed to have worked…but where are our freshly created
certificates?

$ ls volumes/proxy/certs
dhparam.pem  regv2.piel.io  regv2.piel.io.crt  regv2.piel.io.dhparam.pem  regv2.piel.io.key

and

$ ls volumes/proxy/certs/regv2.piel.io
account_key.json  cert.pem  fullchain.pem  key.pem

Yay! So we can use the regv2.piel.io.key and the fullchain.pem for
docker registry:2. Let’s create some directories and place the certs
where the registry can access them.

$ mkdir -p /data/docker-registry-certs
$ cp volumes/proxy/certs/regv2.piel.io.key /data/docker-registry-certs/
$ cp volumes/proxy/certs/regv2.piel.io/fullchain.pem /data/docker-registry-certs/
$ mkdir /data/docker-registry-auth
$ mkdir /data/docker-registry

The last step before we can get this registry up and running is to
create our username and password. This will result in minimum security
that is recommended by docker registry:2.

$ docker run --entrypoint htpasswd registry:2 -Bbn pieltestuser 
"mkakogalb47" > /data/docker-registry-auth/htpasswd

This command requires the registry:2 image to exist on the server and
therefore it has to pull it before running the htpasswd command.
Following this, the new container will exit. Check to see if we have the
htpasswd in the file.

$ cat /data/docker-registry-auth/htpasswd
pieltestuser:$2y$05$w3IqOzTdsDbot9ls1JpeTeHYr/2vv.PTx3dObRvT.JkfGaygfTkJy

Finally, we can run our registry:2.

$ docker run -d -p 5000:5000 --restart=always --name docker-registry 
  -v /data/docker-registry:/var/lib/registry 
  -v /data/docker-registry-auth:/auth 
  -e "REGISTRY_AUTH=htpasswd" 
  -e "REGISTRY_AUTH_HTPASSWD_REALM=Registry Realm" 
  -e "REGISTRY_AUTH_HTPASSWD_PATH=/auth/htpasswd" 
  -v /data/docker-registry-certs:/certs 
  -e "REGISTRY_HTTP_TLS_CERTIFICATE=/certs/fullchain.pem" 
  -e "REGISTRY_HTTP_TLS_KEY=/certs/regv2.piel.io.key" 
  registry:2

$ docker run -d -p 5000:5000 --restart=always --name docker-registry 
  -v /data/docker-registry:/var/lib/registry 
  -v /data/docker-registry-auth:/auth 
  -e "REGISTRY_AUTH=htpasswd" 
  -e "REGISTRY_AUTH_HTPASSWD_REALM=Registry Realm" 
  -e "REGISTRY_AUTH_HTPASSWD_PATH=/auth/htpasswd" 
  -v /data/docker-registry-certs:/certs 
  -e "REGISTRY_HTTP_TLS_CERTIFICATE=/certs/fullchain.pem" 
  -e "REGISTRY_HTTP_TLS_KEY=/certs/regv2.piel.io.key" registry:2

Now let’s see if we can log in.

$ docker login -u pieltestuser -p "mkakogalb47" -e wayne@wayneconnolly.com regv2.piel.io:5000
WARNING: login credentials saved in /root/.docker/config.json
Login Succeeded

So now let’s see if we can pull, tag and then push a docker image to our
new repo. Jenkins is useful for us so I will pull this
https://hub.docker.com/_/jenkins/

$ docker pull jenkins
$ docker tag jenkins:latest regv2.piel.io:5000/piel-jenkins:latest

Validate that it worked Validating the Jenkins
pull
Now, let’s push it to our registry.

$ docker push regv2.piel.io:5000/piel-jenkins:latest

There is no easy way to see what images are in the repo at the time of
writing this except for using curl:

$ curl -u pieltestuser:mkakogalb47 https://regv2.piel.io:5000/v2/_catalog
{"repositories":["piel-jenkins"]}

We can see our new Jenkins image in our private registry in the JSON
result. Now we can apply our registry to our rancher-test.piel.io
environment. Log into rancher and navigate to INFRASTRUCTURE > HOSTS
and click “Add Host”. You will have to populate the rancher servers IP
then you should have an auto-generated command like below. Run this on
the Rancher host.

$ sudo docker run -e CATTLE_AGENT_IP='45.32.190.15'  
  -d --privileged 
  -v /var/run/docker.sock:/var/run/docker.sock 
  -v /var/lib/rancher:/var/lib/rancher 
  rancher/agent:v1.0.1 http://rancher-test.piel.io/v1/scripts/FF42DCE27F7C88BD7733:1461042000000:ryU0BaXJFo6c9zuHgeULdAtbCE

$ sudo docker run -d --privileged 
  -v /var/run/docker.sock:/var/run/docker.sock 
  -v /var/lib/rancher:/var/lib/rancher 
  rancher/agent:v0.11.0http://rancher.piel.io/v1/scripts/BE455B92EA48EA1C1F12:1461042000000:mi433ChYRN9nfQSwB2FIlBnpPk

Give it a minute and the host will appear. Due to my not yet configuring
the host name of the server, it will show up as “vultr.guest“. Let’s
change this by clicking the vertical ellipsis (3 vertical dots) menu
button on the host and clicking the Edit item. Enter your custom name
and add a Label. I always add a server location label as the bare
minimum.


Next, let’s add our private registry so we can deploy our piel-jenkins
image to this host. Navigate to INFRASTRUCTURE > REGISTRIES and click
“Add Registry” then “Click “Custom” and add your details. This
takes a couple of minutes, but the end result should be your own
registered private registry available to your Rancher server.


Let’s deploy our Jenkins container to this host. Navigate to
INFRASTRUCTURE > HOSTS and click “+ Add Container“. Complete the
fields and put the custom Jenkins image in the select image field as
“regv2.piel.io:5000/piel-jenkins: latest” and set the port map to
redirect the Jenkins default port 8080 to the host port 8080.


This process will take a couple of minutes to pull the image to the host
if it’s not already there. We can see that the host now has the new
container in it called “my-jenkins“.


Let’s navigate to the Jenkins URL, http://regv2.piel.io:8080, and see
if it worked.


Now for a docker ps double confirmation.


SUCCESS!!! We have now:

  • created and secured our own private docker registry
  • tagged and added an image to it
  • added a host to our Rancher Server
  • assigned the private registry to our Rancher Server
  • deployed our Jenkins container to our host
  • confirmed that the container is deployed

Note: The servers used in this tutorial have been decommissions. Next
will be Part 3 where I will discuss creation and usage of stacks to
provide you with a usable platform to describe, deploy and manage your
product offering.

A Detailed Overview of Rancher’s Architecture
This newly-updated, in-depth guidebook provides a detailed overview of the features and functionality of the new Rancher: an open-source enterprise Kubernetes platform.

Tags: Category: 未分類 Comments closed