Announcing the Harvester v1.3.0 release

Monday, 25 March, 2024

Last week – on the 15th of March 2024 – the Harvester team excitingly shared their latest release, version 1.3.0.

The 1.3.0 release has a focus on some frequently requested features, such as vGPU support and support for two-node clusters with a witness node for high availability. As well as a technical preview of ARM enablement for Harvester and cluster management using Fleet.

Let’s dive into the 1.3.0 release and the standout features…

Please note that at this time Harvester does not support upgrades from stable version 1.2.1 to the latest version 1.3.0. Harvester will eventually support upgrading from v1.2.2 to v1.3.0. Once that version is released, you must first upgrade a Harvester cluster to v1.2.2 before upgrading to v1.3.0.

vGPU Support

Starting with Harvester v1.3.0, you now have the capability to share NVIDIA GPU’s supporting SRIOV based virtualisation as vGPU (virtual GPU) devices. In Kubernetes, a vGPU is a type of mediated device that allows multiple VMs to share the compute capability of a physical GPU. You can assign a vGPU to one or more VMs created by Harvester. See the documentation for more information.

Two-Node Clusters with a Witness node for High Availability

Harvester v1.3.0 supports two-node clusters (with a witness node) for implementations that require high availability but without the footprint and resources associated with larger deployments. You can assign the witness role to a node to create a high-availability cluster with two management nodes and one witness node. See the documentation for more information.

new storageclass replica 2

Optimization for Frequent Device Power-Off/Power-On

Harvester v1.3.0 is optimized for environments wherein devices are frequently powered off and on, possibly because of intermittent power outages, recurring device relocation, and other reasons. In such environments, clusters or individual nodes are abruptly stopped and restarted, causing VMs to fail to start and become unresponsive. This release addresses the general issue and reduces the burden on cluster operators who may not possess the necessary troubleshooting skills.

Managed DHCP (Experimental Add-on)

Harvester v1.3.0 allows you to configure IP pool information and serve IP addresses to VMs running on Harvester clusters using the embedded Managed DHCP feature. Managed DHCP, which is an alternative to the standalone DHCP server, leverages the vm-dhcp-controller add-on to simplify cluster deployment. The vm-dhcp-controller add-on reconciles CRD objects and syncs the IP pool objects that serve DHCP requests. See the documentation for more information.

ARM Support (Technical Preview)

You can install Harvester v1.3.0 on servers using ARM architecture. This is made possible by recent updates to KubeVirt and RKE2, key components of Harvester that now both support ARM64.

Fleet Management (Technical Preview)

Starting with v1.3.0, you can use Fleet to deploy and manage objects (such as VM images and node settings) in Harvester clusters. Support for Fleet is enabled by default and does not require Rancher integration, but you can use Fleet to explore Harvester clusters imported into Rancher.

Big thanks to the Harvester development team who worked tirelessly on this release – an incredible effort by all!

We now invite you to start exploring and using Harvester v1.3.0. We have appreciated all the feedback we’ve received so far; thanks for being involved and interested in the Harvester project – keep it coming! You can share your feedback with us through our Slack channel or GitHub.

Keep an eye out for the next minor version release, 1.4.0, due in Spring this year. A sneak peak of the roadmap is available here.

Announcing the Harvester v1.2.0 Release

Tuesday, 19 September, 2023

Ten months have elapsed since we launched Harvester v1.1 back in October of last year. Harvester has since become an integral part of the Rancher platform, experiencing substantial growth within the community while gathering valuable user feedback along the way.

Our dedicated team has been hard at work incorporating this feedback into our development process, and today, I am thrilled to introduce Harvester v1.2.0!

With this latest release, Harvester v1.2.0 expands its capabilities, providing a comprehensive infrastructure solution for your on-premises workloads. Whether you are managing virtual machines (VMs), cloud-native workloads, or anything in between, Harvester offers a unified interface that delivers unmatched flexibility in the market.

Let’s dive into some of the standout features accompanying the Harvester v1.2.0 release:

BareMetal Cloud Native Workload Support (Experimental)

From the outset, our vision centred on supporting users in their on-premises Kubernetes deployments. Although Harvester initially focused on virtualization technology, we swiftly recognized the evolving landscape where Kubernetes and its ecosystem were driving the commoditization of virtualization.

This realization prompted us to pivot our mission toward developing HCI software that both streamlines traditional virtual machine management whilst empowers users to accelerate their journey towards a modern cloud-native infrastructure. To achieve this, we enhanced Harvester’s capabilities, ensuring robust support for Kubernetes clusters running on VMs created by Harvester, complete with built-in CSI and Cloud Provider integration.

Our community embraced this direction, as it effectively addressed critical Kubernetes challenges like resource isolation and multi-tenancy. However, as Harvester’s popularity soared, we began receiving requests to support Kubernetes operations in edge locations. In these scenarios, small teams often manage local clusters, emphasizing minimal overhead and the seamless coexistence of container workloads alongside virtual machines. Many environments hosting specialized VM workloads sought the possibility of running container workloads directly on the Harvester host or bare-metal cluster.

After careful consideration, we realized this concept deviated slightly from our original target. Nevertheless, thanks to Kubernetes’ foundational role in Harvester, we found a way to extend our scope and accommodate these demands.

With the introduction of Harvester v1.2.0, we proudly unveil the BareMetal Cloud-Native Workload Support feature. Initially launched as an experimental offering, this feature empowers Harvester v1.2.0 to collaborate seamlessly with Rancher v2.7.6 and later versions, enabling direct container workload operations on the Harvester host (bare metal) cluster. You can learn more about activating this feature in our Harvester documentation.

Once enabled, users can effortlessly integrate Harvester host clusters with other Kubernetes clusters, facilitating seamless interaction between deployed container workloads and Harvester’s virtual machine workloads. Please be aware that there are currently some limitations which we’ve detailed here.

Image 1: Feature flag enabled in Rancher UI

Rancher Manager vcluster Add-On (Experimental)

Since the inception of Harvester the need to integrate with Rancher Manager for users was evident. There was no need to duplicate features like authentication, authorization, or CI/CD, as Rancher Manager already excelled in these areas. Additionally, Rancher Manager’s expertise in multi-cluster management could efficiently oversee multiple Harvester clusters.

However, a new challenge arose: we needed to accomodate users who didn’t require a centrally managed Rancher server. Some users managed operations across different sites and teams and had no interest in a unified Rancher server overseeing all Harvester clusters, while others still needed Rancher Manager’s functionalities.

The current Harvester iteration includes an embedded Rancher Manager for internal cluster management, prompting the Harvester engineering team to explore how to maximize its use. After collaborative consultations with the Rancher engineering team, it became evident that deploying workloads on the local cluster would not be feasible due to the Harvester BareMetal cluster’s role as the local cluster for the embedded Rancher.

As a solution, we turned to a relatively new open-source initiative called vcluster to facilitate Rancher Manager’s deployment on top of the Harvester host cluster. There are two advantages created for users with this solution. Firstly there is the reduced overhead and improvement in operational efficiency when compared to traditional booting the workload as a virtual machine, and secondly the deployment experience mirrors that of a Helm chart commonly aligned with cloud-native container workloads.

The Rancher Manager add-on operates on top of the Harvester cluster and has the potential to govern it. It grants full access within the Rancher Manager add-on essentially gives administrative rights over both the Harvester cluster and Rancher Manager. Operators can now take this utility consolidation into consideration when defining roles and permissions within Rancher Manager.

You can enable the Rancher Manager cluster add-on here.


Image 2: Rancher vcluster add on in Harvester


Image 3: Rancher Manager integrated with Harvester clusters

Third-Party Storage for Non-Root Disks in Harvester

Harvester, as HCI software, prioritizes storage as a core element. However, we’ve noticed that many customers already have central storage appliances in their data centers. They appreciate Harvester but find it challenging to retrofit their existing servers with SSD/NVMe drives without fully utilizing their storage appliances. This has been a significant concern for our customers.

The good news is that Harvester’s Kubernetes foundation allows us to support alternative storage solutions, provided they are Kubernetes-compatible through the Container Storage Interface (CSI).

With Harvester 1.2.0, users can now seamlessly integrate their own CSI drivers with their storage appliances, as detailed here. We are actively collaborating with multiple storage vendors for certification, so stay tuned for upcoming announcements!

It’s important to note that, currently, third-party storage support is limited to non-root disks, typically those not originating from images. This limitation exists because Harvester still relies on Longhorn for VM image management, which enables essential features like image uploads and quick VM creation from existing images, enhancing the overall Harvester user experience. Our future steps involve exploring ways to integrate Longhorn with storage appliances for image management.

Enhanced Cloud Provider and Load Balancer Support

From the outset, we recognized the importance of load balancing in Harvester. Many virtualization providers lacked the ability to seamlessly integrate load balancing within the Kubernetes Cloud Provider driver. We believed that this feature would greatly benefit users, even in on-premises deployments. Consequently, we integrated a Cloud Provider driver into Harvester’s guest clusters from the beginning.

Over the past year, we’ve received substantial feedback on our initial Cloud Provider implementation. Two primary requirements stood out: users wanted load balancing services customized for each guest cluster, rather than a Harvester-wide IP pool, and they also desired load balancing services for their VMs.

Harvester 1.2.0 introduces our new load balancing service, offering users the ability to:

  • Designate IP pools for each guest cluster network (pending confirmation for those using VLAN networks).
  • Configure Load Balancer-as-a-Service for their VMs, enabling integration with multiple LB providers.

To delve into the details of this service and learn how to deploy it, visit this link. Additionally, please review the backward compatibility notice before proceeding with the upgrade of your Kubernetes cluster.

Hardware Management – Out of Band IPMI Integration and Error Detection

As Harvester operates directly on bare metal servers, comprehensive server management is crucial. Operators require real-time insights into hardware functionality, immediate alerts for potential hardware errors, and advanced notification if a disk replacement is needed in the near future.

In version 1.2.0, we’re introducing an enhanced bare metal hardware management feature. We’ve integrated out-of-band connection for Harvester to IPMI endpoint servers, enabling Harvester to directly retrieve hardware error information and promptly notify administrators. Additionally, in this release, Harvester gains node lifecycle management capabilities.

To enable this feature, please refer to the instructions provided here.

Furthermore, Harvester v1.2.0 brings several highly requested features:

  • New Installation Method: We’ve introduced a streamlined installation process for users working with bare metal cloud providers, detailed here.
  • SRIOV VF Support: Enhance network performance with SRIOV VF support, described here.
  • Footprint Reduction Options: Users can now choose to enable or disable logging and monitoring components to customize their Harvester installation, as outlined here.
  • Increased Pod Limitation: We’ve increased the pod limitation for Harvester nodes to 200, allowing better utilization of computing resources provided by bare metal servers.
  • Emulated TPM 2.0: Improved support for Windows virtual machines with added Emulated TPM 2.0 support.

We invite you to start exploring and using Harvester v1.2.0. You can share your feedback with us through our Slack channel or GitHub.

Note: If you’re using USB for installation, please follow the instructions here and use the USB-specific ISO for Harvester v1.2.0 installation.

Harvester 1.1.0: The Latest Hyperconverged Infrastructure Solution

Wednesday, 26 October, 2022

The Harvester team is pleased to announce the next release of our open source hyperconverged infrastructure product. For those unfamiliar with how Harvester works, I invite you to check out this blog from our 1.0 launch that explains it further. This next version of Harvester adds several new and important features to help our users get more value out of Harvester. It reflects the efforts of many people, both at SUSE and in the open source community, who have contributed to the product thus far. Let’s dive into some of the key features.  

GPU and PCI device pass-through 

The GPU and PCI device pass-through experimental features are some of the most requested features this year and are officially live. These features enable Harvester users to run applications in VMs that need to take advantage of PCI devices on the physical host. Most notably, GPUs are an ever-increasing use case to support the growing demand for Machine Learning, Artificial Intelligence and analytics workloads. Our users have learned that both container and VM workloads need to access GPUs to power their businesses. This feature also can support a variety of other use cases that need PCI; for instance, SR-IOV-enabled Network Interface Cards can expose virtual functions as PCI devices, which Harvester can then attach to VMs. In the future, we plan to extend this function to support advanced forms of device passthrough, such as vGPU technologies.  

VM Import Operator  

Many Harvester users maintain other HCI solutions with a various array of VM workloads. And for some of these use cases, they want to migrate these VMs to Harvester. To make this process easier, we created the VM Import Operator, which automates the migration of VMs from existing HCI to Harvester. It currently supports two popular flavors: OpenStack and VMware vSphere. The operator will connect to either of those systems and copy the virtual disk data for each VM to Harvester’s datastore. Then it will translate the metadata that configures the VM to the comparable settings in Harvester.   

Storage network 

Harvester runs on various hardware profiles, some clusters being more compute-optimized and others optimized for storage performance. In the case of workloads needing high-performance storage, one way to increase efficiency is to dedicate a network to storage replication. For this reason, we created the Storage Network feature. A dedicated storage network removes I/O contention between workload traffic (pod-to-pod communication, VM-to-VM, etc.) and the storage traffic, which is latency sensitive. Additionally, higher capacity network interfaces can be procured for storage, such as 40 or 100 GB Ethernet.  

Storage tiering  

When supporting workloads requiring different types of storage, it is important to be able to define classes or tiers of storage that a user can choose from when provisioning a VM. Tiers can be labeled with convenient terms such as “fast” or “archival” to make them user-friendly. In turn, the administrator can then map those storage tiers to specific disks on the bare metal system. Both node and disk label selectors define the mapping, so a user can specify a unique combination of nodes and disks on those nodes that should be used to back a storage tier. Some of our Harvester users want to use this feature to utilize slower magnetic storage technologies for parts of the application where IOPS is not a concern and low-cost storage is preferred.

In summary, the past year has been an important chapter in the evolution of Harvester. As we look to the future, we expect to see more features and enhancements in store. Harvester plans to have two feature releases next year, allowing for a more rapid iteration of the ideas in our roadmap. You can download the latest version of Harvester on Github. Please continue to share your feedback with us through our community slack or your SUSE account representative.  

Learn more

Download our FREE eBook6 Reasons Why Harvester Accelerates IT Modernization Initiatives. This eBook identifies the top drivers of IT modernization, outlines an IT modernization framework and introduces Harvester, an open, interoperable hyperconverged infrastructure (HCI) solution.

Managing Harvester with Terraform 

Thursday, 22 September, 2022

Today, automation and configuration management tools are critical for operation teams in IT. Infrastructure as Code (IaC) is the way to go for both Kubernetes and more traditional infrastructure. IaC mixes the great capabilities of these tools with the excellent control and flexibility that git offers to developers. In such a landscape, tools like Ansible, Salt, or Terraform become a facilitator for operations teams since they can manage cloud native infrastructure and traditional infrastructure using the IaC paradigm. 

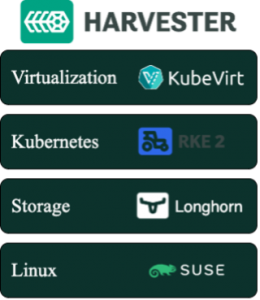
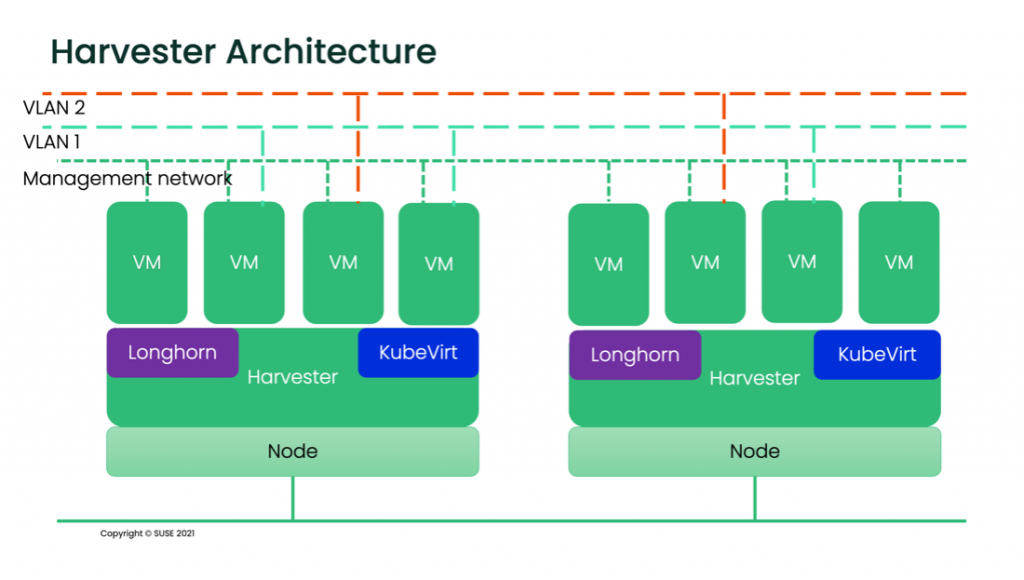
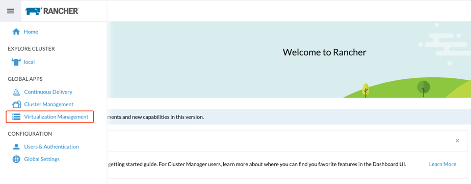
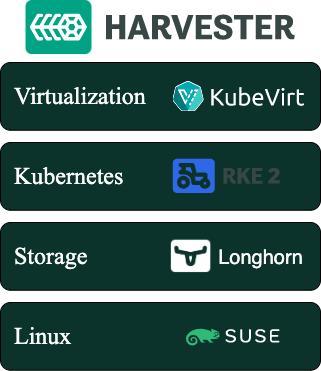
Harvester is an HCI solution based on Linux, KubeVirt, Kubernetes and Longhorn. It mixes the cloud native and traditional infrastructure worlds, providing virtualization inside Kubernetes, which eases the integration of containerized workloads and VMs. Harvester can benefit from IaC using tools like Terraform or, since it is based in Kubernetes, using methodologies such as GitOps with solutions like Fleet or ArgoCD. In this post, we will focus on the Terraform provider for Harvester and how to manage Harvester with Terraform.  

If you are unfamiliar with Harvester and want to know the basics of setting up a lab, read this blog post: Getting Hands-on with Harvester HCI. 

Environment setup 

To help you follow this post, I built a code repository on GitHub where you can find all that is needed to start using the Harvester Terraform provider. Let’s start with what’s required: a Harvester cluster and a KubeConfig file, along with a Terraform CLI installed on your computer, and finally, a git CLI. In the git repo, you can find all the links and information needed to install all the software and the steps to start using it. 

Code repository structure and contents 

When your environment is ready, it is time to review the repository structure and its contents and review why we created it that way and how to use it. 


Fig. 1 – Directory structure 

The first file you should check is versions.tf. It contains the Harvester provider definition, which version we want to use and the required parameters. It also describes the Terraform version needed for the provider to work correctly. 


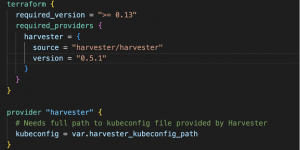
Fig. 2 – versions.tf 

The versions.tf file is also where you should provide the local path to the KubeConfig file you use to access Harvester. Please note that the release of the Harvester module might have changed over time; check the module documentation first and update it accordingly. In case you don’t know how to obtain the KubeConfig, you can download it easily from the UI in Harvester.  


Fig. 3 – Download Harvester KubeConfig 

At this point, I suggest checking the Harvester Terraform git repo and reviewing the example files before continuing. Part of the code you are going to find below comes from there.  

The rest of the .tf files we are using could be merged into one single file since Terraform will parse them together. However, having separate files, or even folders, for all the different actions or components to be created is a good practice. It makes it easier to understand what Terraform will create. 

The files variables.tf and terraform.tfvars are present in git as an example in case you want to develop or create your own repo and keep working with Terraform and Harvester. Most of the variables defined contain default values, so feel free to stick to them or provide your own in the tfvars file. 

The following image shows all the files in my local repo and the ones Terraform created. I suggest rechecking the .gitignore file now that you understand better what to exclude. 


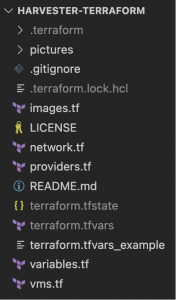
Fig. 4 – Terraform repo files 

The Terraform code 

We first need an image or an ISO to provision a VM, which the VM will use as a base. In images.tf, we will set up the code to download an image for the VM and in variables.tf we’ll define the parameter values; in this case, an openSUSE cloud-init ready image in qcow2 format. 


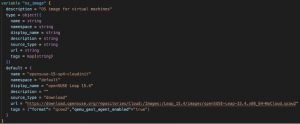
Fig. 5 – images.tf and variables.tf 

Now it’s time to check networks.tf, which defines a standard Harvester network without further configuration. As I already had networks created in my Harvester lab, I’ll use a data block to reference the existing network; if a new network is needed, a resource block can be used instead. 


Fig. 6 – network.tf and variables.tf 

This is starting to look like something, isn’t it? But the most important part is still missing… Let’s analyze the vms.tf file 

There we define the VM that we want to create on Harvester and all that is needed to use the VM. In this case, we will also use cloud-init to perform the initial OS configuration, setting up some users and modifying the default user password. 

Let’s review vms.tf file content. The first code block we find starts calling the harvester_virtualmachine function from the Terraform module. Using this function, we assign a name to this concrete instantiation as openSUSE-dev and define the name and tags for the VM we want to provision. 


Fig. 7 – VM name 

Note the depends_on block at the beginning of the virtual machine resource definition. As we have defined our image to be downloaded, that process may take some time. With that block, we instruct Terraform to put the VM creation on hold until the OS Image is downloaded and added to the Images Catalog within Harvester. 

Right after this block, you can find the basic definition for the VM, like CPU, memory and hostname. Following it, we can see the definition of the network interface inside the VM and the network it should connect to. 


Fig. 8 –CPU, memory, network definition and network variables 

In the network_name parameter, we see how we call the module and the network defined in the networks.tf file. Please, remember that Harvester is based in KubeVirt and runs in Kubernetes, so all the standard namespace isolation rules apply here and that’s why a namespace attribute is needed for all the objects we’ll be creating (images, VMs, networks, etc.)

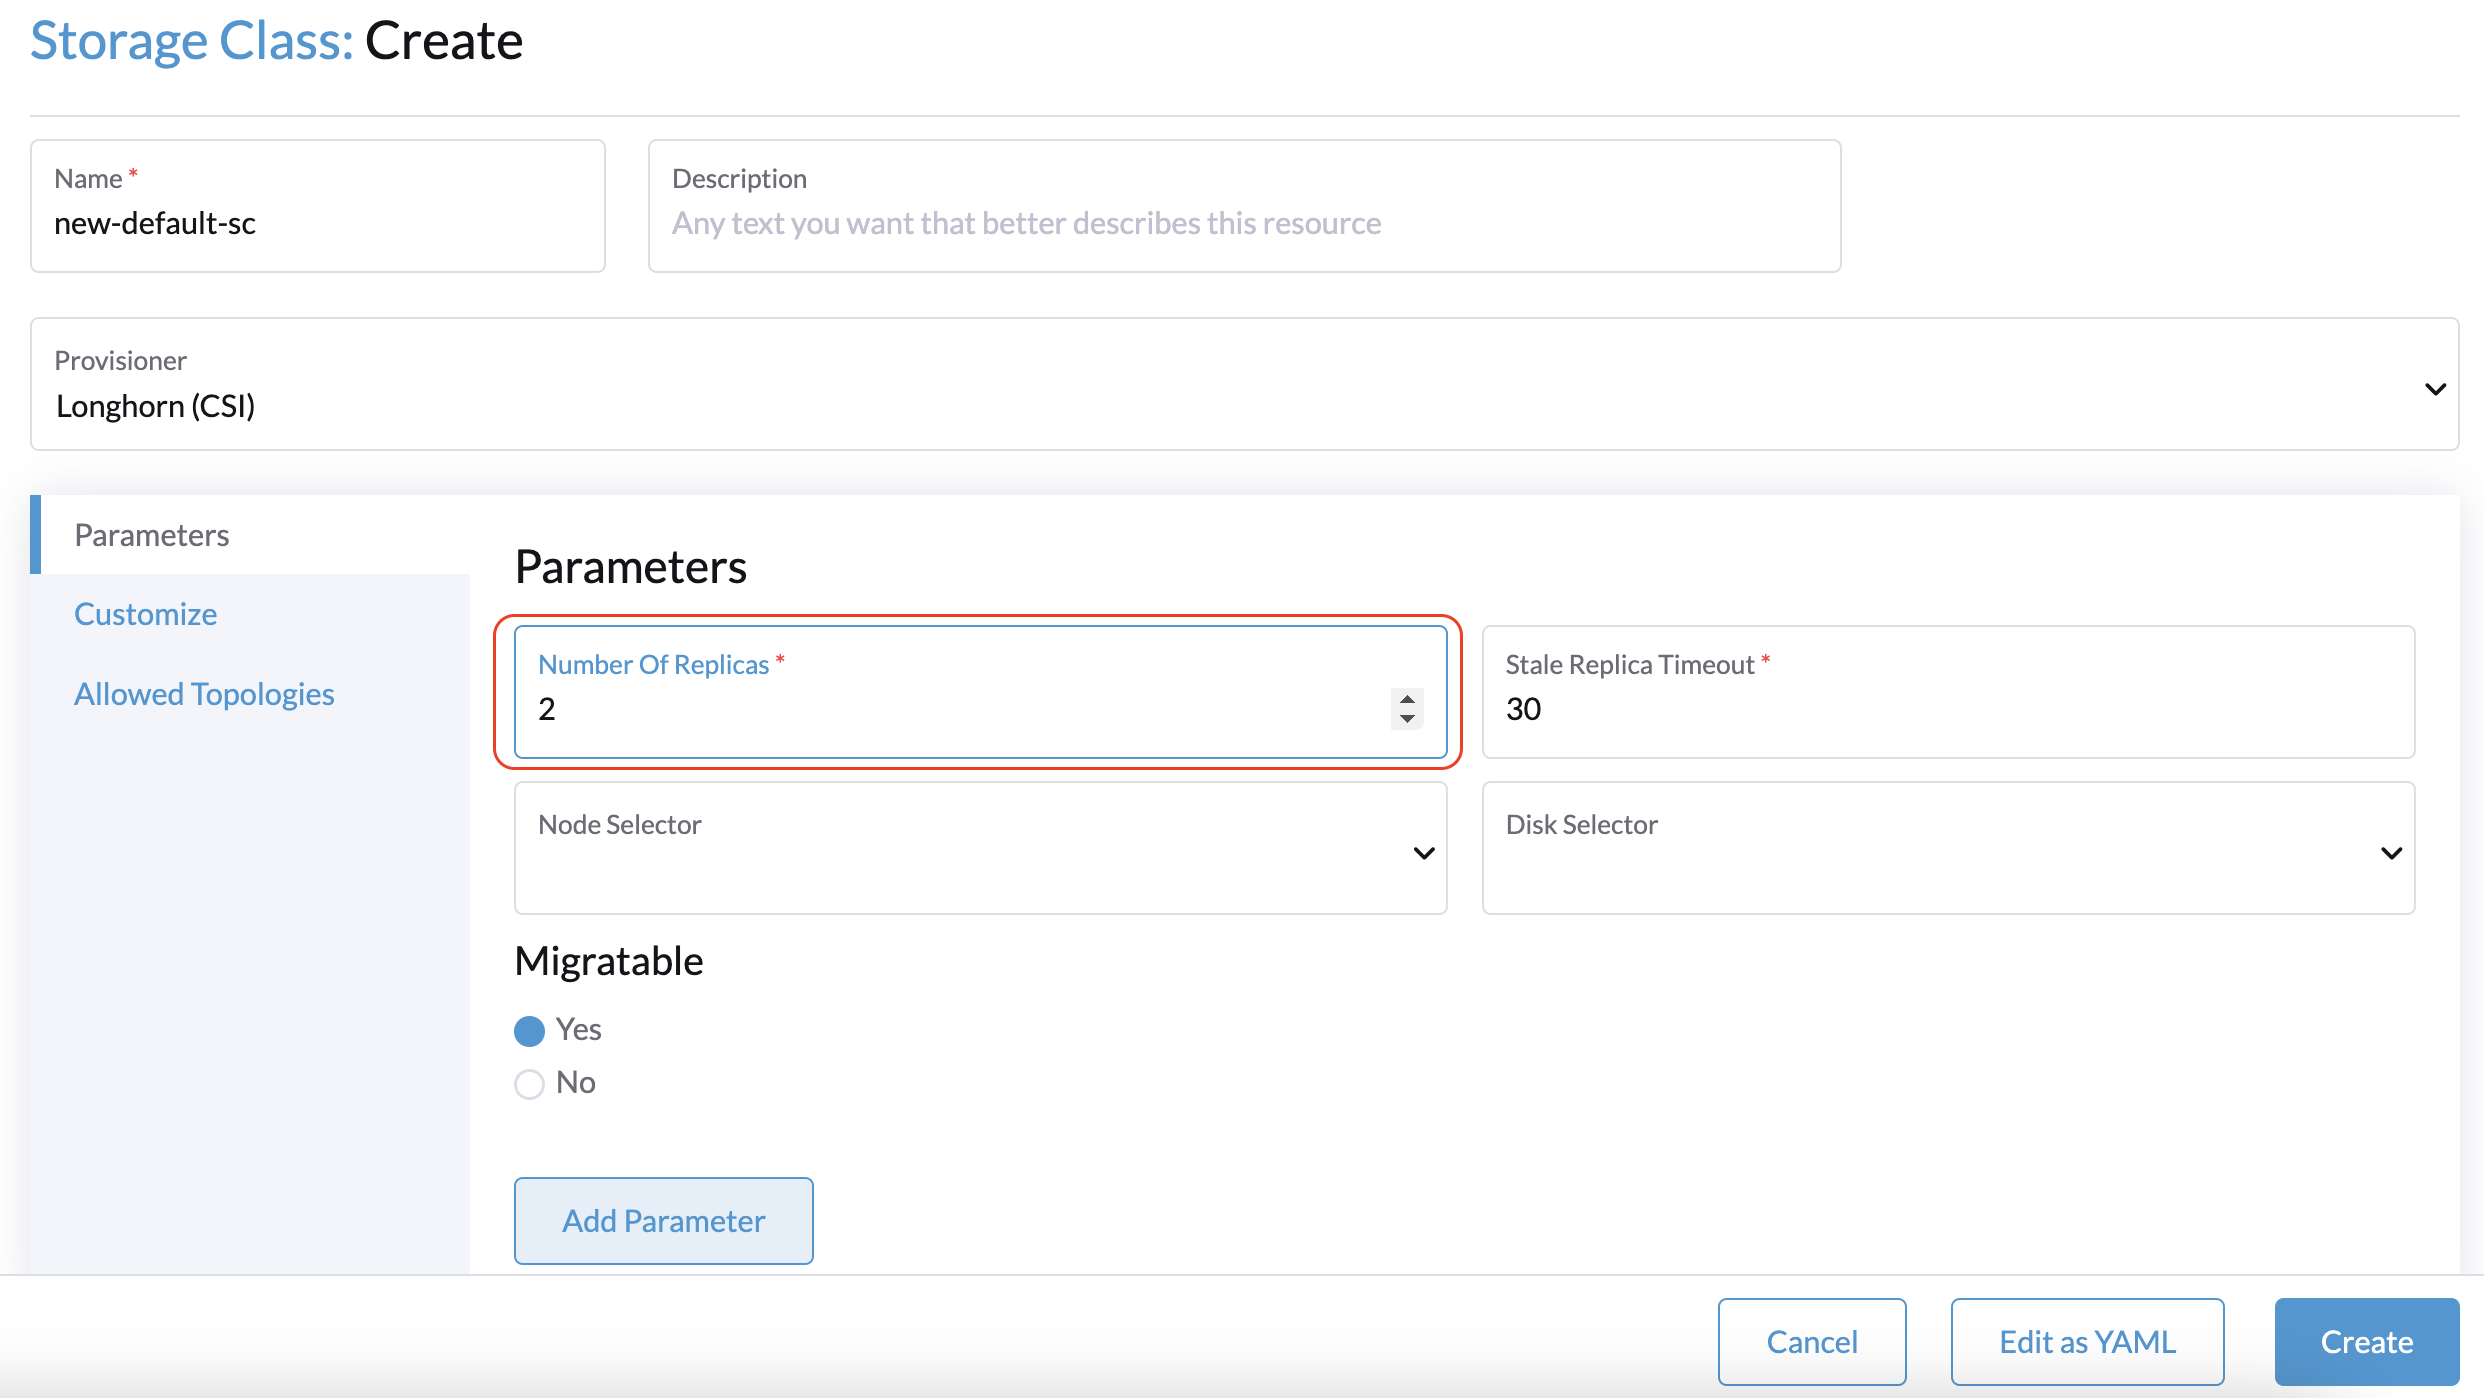
Now it’s time for storage. We define two disks, one for the OS image and one for empty storage. In the first one, we will use the image depicted in images.tf, and in the second one, we will create a standard virtio disk. 


Fig. 9 – VM disks and disk variables 

These disks will end up being Persistent Volumes in the Kubernetes cluster deployed inside a Storage Class defined in Longhorn. 


Fig. 10 – Cloud-init configuration 

Lastly, we find a cloud-init definition that will perform configurations in the OS once the VM is booted. There’s nothing new in this last block; it’s a standard cloud-init configuration. 

The VM creation process 

Once all the setup of the .tf files is done, it is time to run the Terraform commands. Remember to be in the path where all the files have been created before executing the commands. In case you are new to Terraform like I was, it is a good idea to investigate the documentation or go through the tutorials on the Hashicorp website before starting this step.  

The first command is terraform init. This command will check the dependencies defined in versions.tf, download the necessary modules and review the syntaxis of the .tf files. If you receive no errors, you can continue creating an execution plan. The plan will be compared to the actual situation and to previous states, if any, to ensure that only the missing pieces compared with what we defined in the .tf files are created or modified as needed. Terraform, like other tools, use an idempotent approach, so we want to reach a concrete state.  

My advice for creating the execution plan is to use the command terraform plan -out FILENAME so the plan will be recorded in that file, and you can review it. At this point, nothing has been created or modified yet. When the plan is ready, the last command will be terraform apply FILENAME; FILENAME is the plan file previously created. This command will start making all the changes defined in the plan. In this case, it downloads the OS image and then creates the VM. 


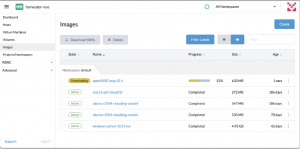
Fig. 11 – Image download process 


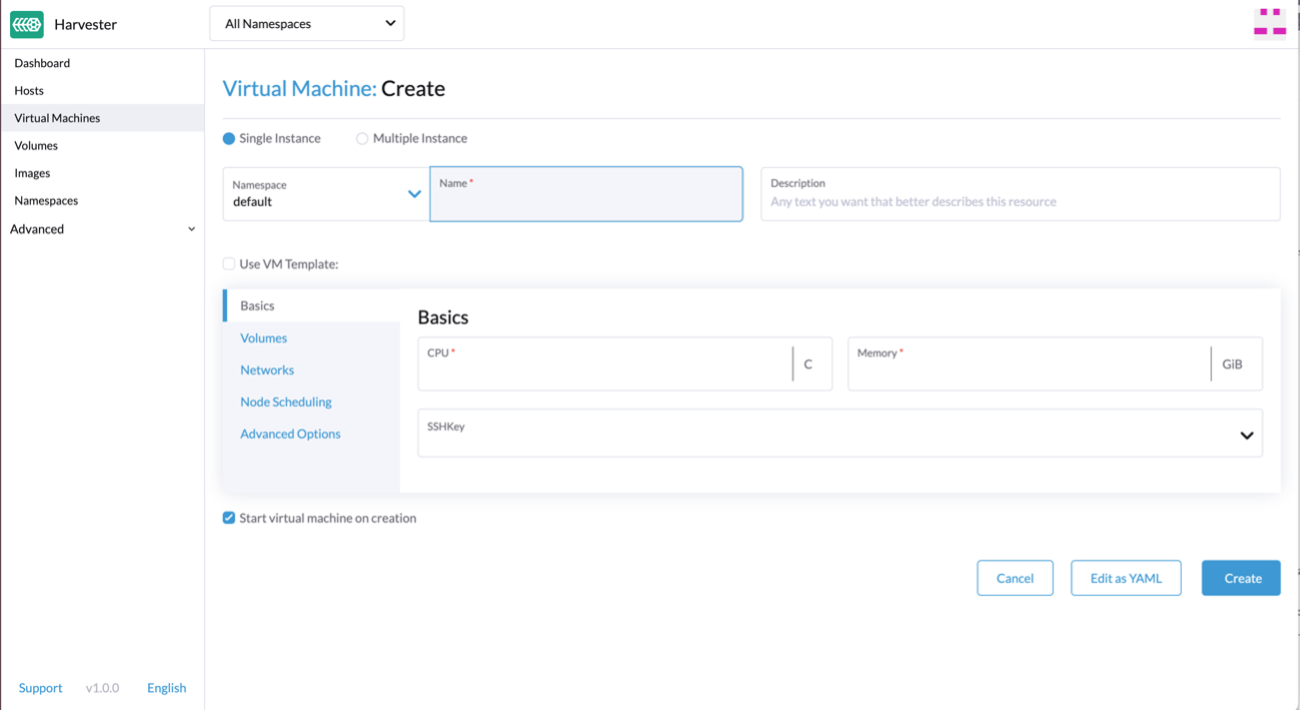
Fig. 12 – VM starting 

Remember that I used an existing network, otherwise, creating a network resource would have been necessary. We wait for a couple of minutes, and voila! Our VM is up and running. 


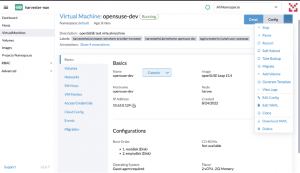
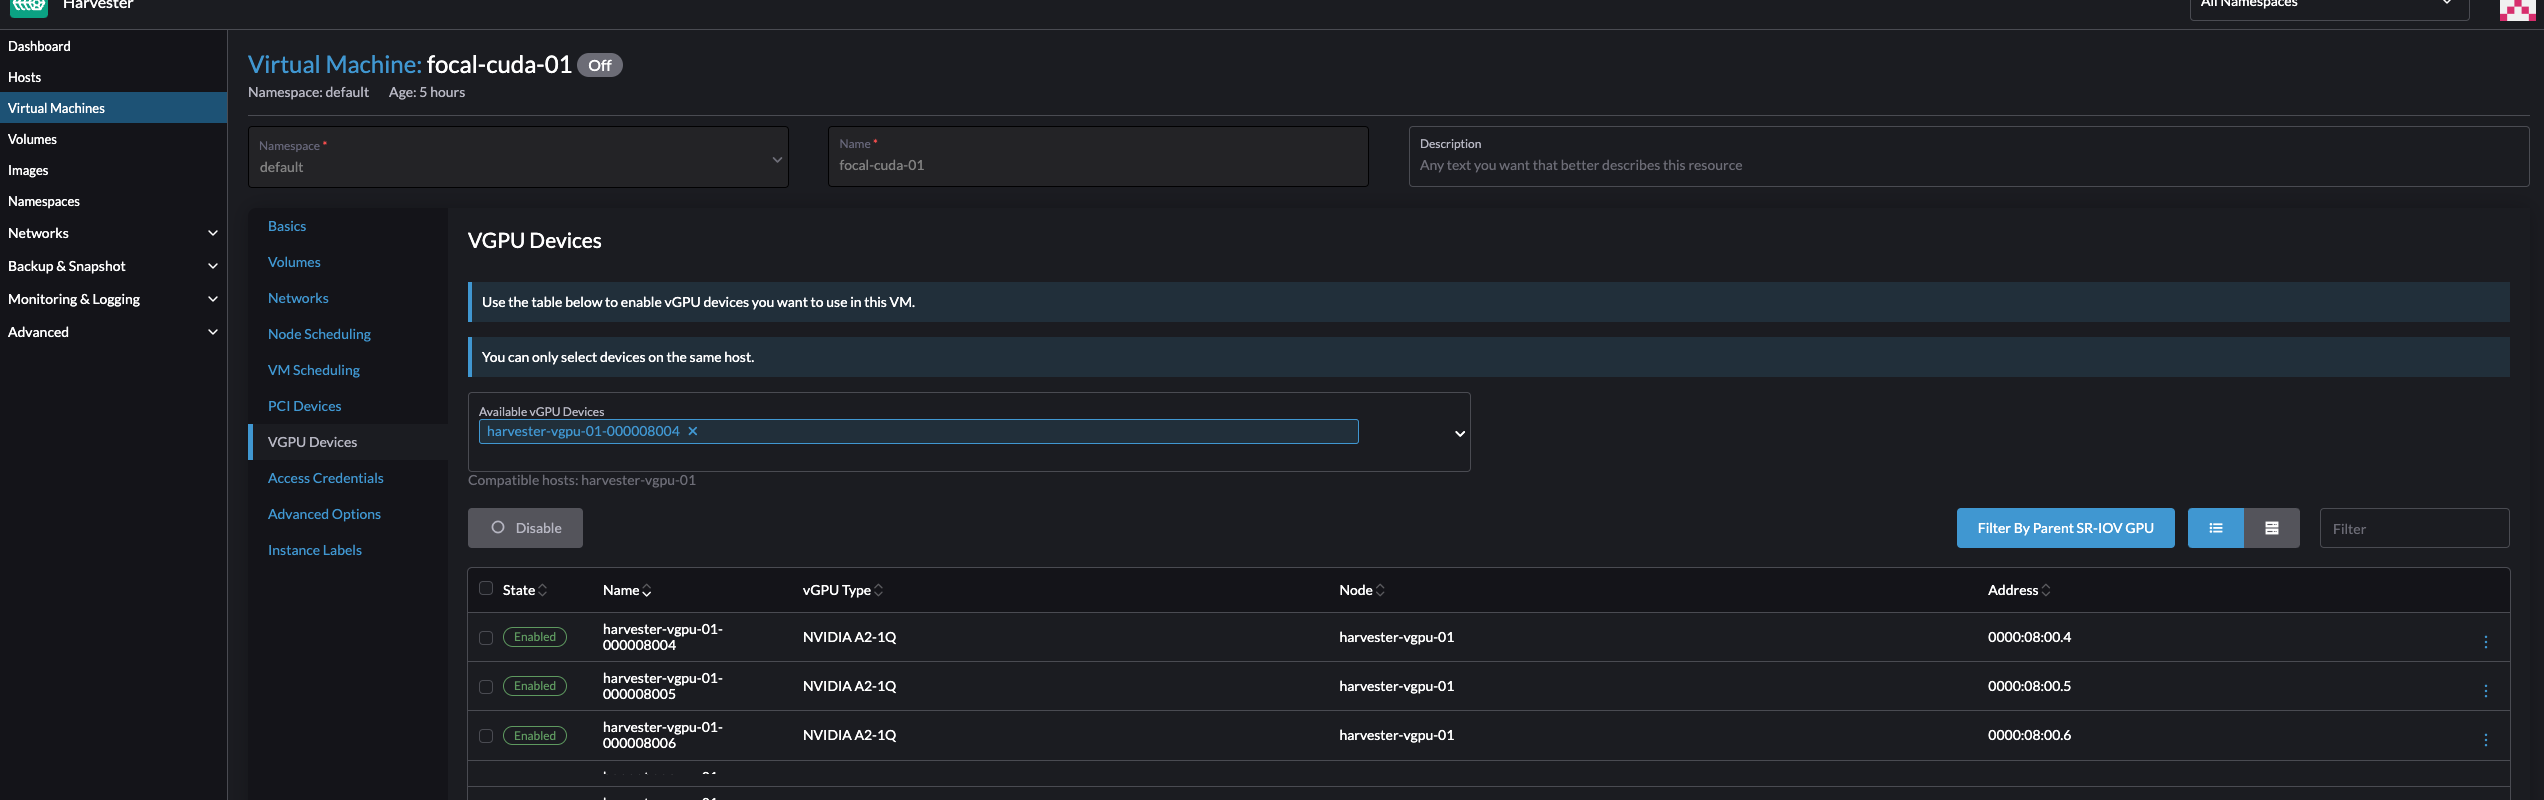
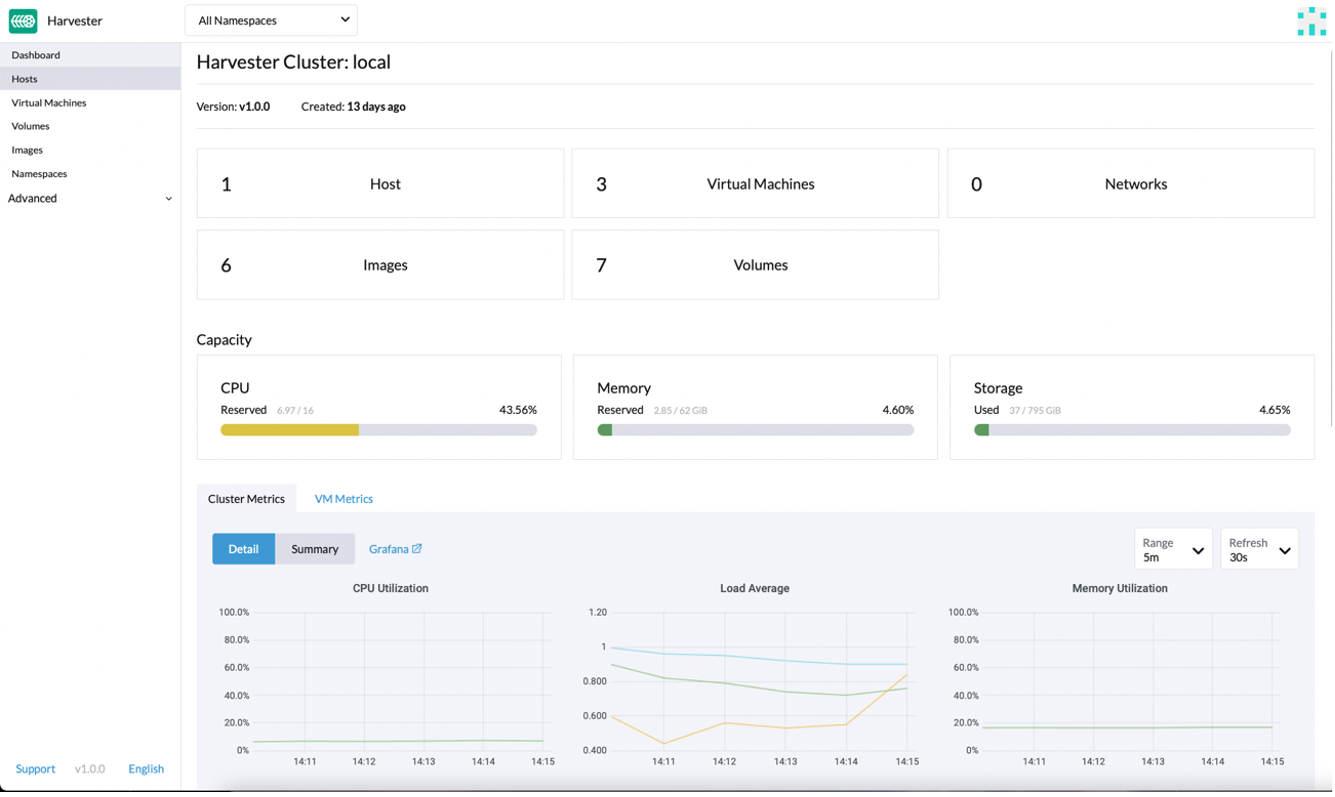
Fig. 13 – VM details 

In the picture above, we can see that the VM is running and has an IP, the CPU and memory are as we defined and the OS image is the one specified in the images.tf file. Also, the VM has the tag defined in vms.tf and a label describing that the VM was provisioned using Terraform. Moving down to the Volumes tab, we’ll find the two disks we defined, created as PVs in the Kubernetes cluster. 


Fig. 14 – VM volumes 


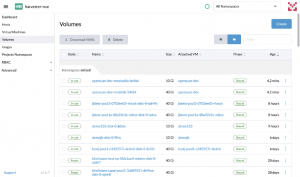
Fig. 16 – VM disks (PVC) 

Now the openSUSE VM is ready to use it! 


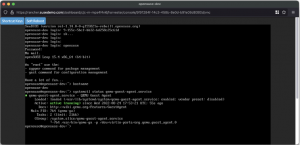
Fig. 17 – openSUSE console screen 

If you want to destroy what we have created, run terraform destroy. Terraform will show the list of all the resources that will be destroyed. Write yes to start the deletion process. 

Summary 

In this post, we have covered the basics of the Harvester Terraform provider. Hopefully, by now, you understand better how to use Terraform to manage Harvester, and you are ready to start making your own tests.  

If you liked the post, please check the SUSE and Rancher blogs, the YouTube channel and SUSE & Rancher Community. There is a lot of content, classes and videos to improve your cloud native skills. 

What’s Next:

Want to learn more about how Harvester and Rancher are helping enterprises modernize their stack speed? Sign up here to join our Global Online Meetup: Harvester on October 26th, 2022, at 11 AM EST.

Comparing Hyperconverged Infrastructure Solutions: Harvester and OpenStack

Wednesday, 10 August, 2022

Introduction

The effectiveness of good resource management in a secure and agile way is a challenge today. There are several solutions like Openstack and Harvester, which handles your hardware infrastructure as on-premise cloud infrastructure. This allows the management of storage, compute, and networking resources to be more flexible than deploying applications on single hardware only.

Both OpenStack and Harvester have their own use cases. This article describes the architecture, components, and differences between them to clarify what could be the best solution for every requirement.

This post analyzes the differences between OpenStack and Harvester from different perspectives: infrastructure management, resource management, deployment, and availability.

Cloud management is about managing data center resources, such as storage, compute, and networking. Openstack provides a way to manage these resources and a dashboard for administrators to handle the creation of virtual machines and other management tools for networking and storage layers.

While both Harvester and OpenStack are used to create cloud environments, there are several differences I will discuss.

According to the product documentation, OpenStack is a cloud operating system that controls large pools of compute, storage and networking resources throughout a data center. These are all managed through a dashboard that gives administrators control while empowering their users to provision resources through a web interface.

Harvester is the next generation of open source hyperconverged infrastructure (HCI) solutions designed for modern cloud native environments. Harvester also uses KubeVirt technology to provide cloud management with the advantages of Kubernetes. It helps operators consolidate and simplify their virtual machine workloads alongside Kubernetes clusters.

Architecture

While OpenStack provides its own services to create control planes and configures the infrastructure provided, Harvester uses the following technologies to provide the required stacks:

Harvester is installed as a node operating system using an ISO or a pxe-based installation, which uses RKE2 as a container orchestrator on top of SUSE Linux Enterprise Server to provide distributed storage with Longhorn and virtualization with Kubevirt.

APIs

Whether your environment is in production or in a lab setting, API use is far-reaching— for programmatic interactions, automations and new implementations.

Throughout each of its services, OpenStack provides several APIs for its functionality and provides storage, management, authentication and many other external features. As per the documentation, the logical architecture gives an overview of the API implementation.

In the diagram above, you can see the APIs a productive Openstack provides in bold.

Although OpenStack can be complex, it allows a high level of customization.

Harvester, in the meantime, uses Kubernetes for virtualization and Longhorn for storage, taking advantage of their APIs and allowing a high level of customization from the containerized architecture perspective. It can also be extended through the K8s CustomResourceDefinitions, which expands and migrates easier.

At the networking level, Harvester only supports VLAN through bridges and NIC bounding. Switches and advanced network configurations are outside the scope of Harvester.

OpenStack can provide multiple networking for advanced and specialized configurations.


Deployment

OpenStack provides several services on bare metal servers, such as installing packages and libraries, configuring files, and preparing servers to be added to OpenStack.

Harvester provides an ISO image preconfigured to be installed on bare metal servers.

Just install or pxe-install the image, and the node will be ready to join the cluster. This adds flexibility to scale nodes quickly and securely as needed.

Node types

OpenStack’s minimum architecture requirements consist of two nodes: a controller node to manage the resources and provide the required APIs and services to the environment and a compute node to host the resources created by the administrator. The controller nodes will maintain their roles supported in a production architecture.

Harvester nodes are interchangeable. It can be deployed in all-in-one mode, and the same node serving as a controller will act as compute node. This makes Harvester an excellent choice to consider for Edge architecture.

Cluster management

Harvester is fully integrated with Rancher, making adding and removing nodes easy. There is no need to preconfigure new compute nodes or handle the workloads since Rancher manages the cluster management.

Harvester can start in a single node (also known as all-in-one), where the node serves as a compute and a single node control plane. Longhorn, deployed as part of Harvester, provides the storage layer. When the cluster reaches three nodes, Harvester will reconfigure itself to provide High Availability features without disruption; the nodes can be promoted to the control plane or demoted as needed.

In OpenStack, roles (compute, controller, etc.) are locked since the node is being prepared to be added to the cluster.

Operations

Harvester leverages Rancher for authentication, authorization, and cluster management to handle the operation. Harvester integration with Rancher provides an intuitive dashboard UI where you can manage both at the same time.

Harvester also provides monitoring, managed with Rancher since the beginning. Users will see the metrics on the dashboard, shown below:

The dashboard also provides a single source of truth to the whole environment.


Storage

In Harvester, storage is provided by Longhorn as a service running on the compute nodes, so Longhorn scales easily with the rest of the cluster as new nodes are added. There is no need for extra nodes for storage. There is also no need to have external storage controllers to communicate between the control plane, compute, and storage nodes. Storage is distributed along the Harvester nodes from the view of the VMs (there is no local storage), and it also supports backups to NFS or S3 buckets.


Conclusion

Harvester is a modern, powerful cloud-based HCI solution based on Kubernetes, fully integrated with Rancher, that eases the deployment, scalability and operations.

While Harvester only supports NIC bounding and VLAN (bridge) methods, more networking modes will be added.

For more specialized network configurations, OpenStack is the preferred choice.

Want to know more?

Check out the resources!

You can also check this in-depth SUSECON session delivered by my colleague Guang Yee:


Harvester is open source — if you want to contribute or check what is going on, visit the Harvester github repository

Managing Your Hyperconverged Network with Harvester

Friday, 22 July, 2022

Hyperconverged infrastructure (HCI) is a data center architecture that uses software to provide a scalable, efficient, cost-effective way to deploy and manage resources. HCI virtualizes and combines storage, computing, and networking into a single system that can be easily scaled up or down as required.

A hyperconverged network, a networking architecture component of the HCI stack, helps simplify network management for your IT infrastructure and reduce costs by virtualizing your network. Network virtualization is the most complicated among the storage, compute and network components because you need to virtualize the physical controllers and switches while dividing the network isolation and bandwidth required by the storage and compute. HCI allows organizations to simplify their IT infrastructure via a single control pane while reducing costs and setup time.

This article will dive deeper into HCI with a new tool from SUSE called Harvester. By using Kubernetes’ Container Network Interface (CNI) mechanisms, Harvester enables you to better manage the network in an HCI. You’ll learn the key features of Harvester and how to use it with your infrastructure.

Why you should use Harvester

The data center market offers plenty of proprietary virtualization platforms, but generally, they aren’t open source and enterprise-grade. Harvester fills that gap. The HCI solution built on Kubernetes has garnered about 2,200 GitHub stars as of this article.

In addition to traditional virtual machines (VMs), Harvester supports containerized environments, bridging the gap between legacy and cloud native IT. Harvester allows enterprises to replicate HCI instances across remote locations while managing these resources through a single pane.

Following are several reasons why Harvester could be ideal for your organization.

Open source solution

Most HCI solutions are proprietary, requiring complicated licenses, high fees and support plans to implement across your data centers. Harvester is a free, open source solution with no license fees or vendor lock-in, and it supports environments ranging from core to edge infrastructure. You can also submit a feature request or issue on the GitHub repository. Engineers check the recommendations, unlike other proprietary software that updates too slowly for market demands and only offers support for existing versions.

There is an active community that helps you adopt Harvester and offers to troubleshoot. If needed, you can buy a support plan to receive round-the-clock assistance from support engineers at SUSE.

Rancher integration

Rancher is an open source platform from SUSE that allows organizations to run containers in clusters while simplifying operations and providing security features. Harvester and Rancher, developed by the same engineering team, work together to manage VMs and Kubernetes clusters across environments in a single pane.

Importing an existing Harvester installation is as easy as clicking a few buttons on the Rancher virtualization management page. The tight integration enables you to use authentication and role-based access control for multitenancy support across Rancher and Harvester.

This integration also allows for multicluster management and load balancing of persistent storage resources in both VM and container environments. You can deploy workloads to existing VMs and containers on edge environments to take advantage of edge processing and data analytics.

Lightweight architecture

Harvester was built with the ethos and design principles of the Cloud Native Computing Foundation (CNCF), so it’s lightweight with a small footprint. Despite that, it’s powerful enough to orchestrate VMs and support edge and core use cases.

The three main components of Harvester are:

  • Kubernetes: Used as the Harvester base to produce an enterprise-grade HCI.
  • Longhorn: Provides distributed block storage for your HCI needs.
  • KubeVirt: Provides a VM management kit on top of Kubernetes for your virtualization needs.

The best part is that you don’t need experience in these technologies to use Harvester.

What Harvester offers

As an HCI solution, Harvester is powerful and easy to use, with a web-based dashboard for managing your infrastructure. It offers a comprehensive set of features, including the following:

VM lifecycle management

If you’re creating Windows or Linux VMs on the host, Harvester supports cloud-init, which allows you to assign a startup script to a VM instance that runs when the VM boots up.

The custom cloud-init startup scripts can contain custom user data or network configuration and are inserted into a VM instance using a temporary disc. Using the QEMU guest agent means you can dynamically inject SSH keys through the dashboard to your VM via cloud-init.

Destroying and creating a VM is a click away with a clearly defined UI.

VM live migration support

VMs inside Harvester are created on hosts or bare-metal infrastructure. One of the essential tasks in any infrastructure is reducing downtime and increasing availability. Harvester offers a high-availability solution with VM live migration.

If you want to move your VM to Host 1 while maintaining Host 2, you only need to click migrate. After the migration, your memory pages and disc block are transferred to the new host.

Supported VM backup and restore

Backing up a VM allows you to restore it to a previous state if something goes wrong. This backup is crucial if you’re running a business or other critical application on the machine; otherwise, you could lose data or necessary workflow time if the machine goes down.

Harvester allows you to easily back up your machines in Amazon Simple Storage Service (Amazon S3) or network-attached storage (NAS) devices. After configuring your backup target, click Take Backup on the virtual machine page. You can use the backup to replace or restore a failed VM or create a new machine on a different cluster.

Network interface controllers

Harvester offers a CNI plug-in to connect network providers and configuration management networks. There are two network interface controllers available, and you can choose either or both, depending on your needs.

Management network

This is the default networking method for a VM, using the eth0 interface. The network configures using Canal CNI plug-ins. A VM using this network changes IP after a reboot while only allowing access within the cluster nodes because there’s no DHCP server.

Secondary network

The secondary network controller uses the Multus and bridge CNI plug-ins to implement its customized Layer 2 bridge VLAN. VMs are connected to the host network via a Linux bridge and are assigned IPv4 addresses.

IPv4 addresses’ VMs are accessed from internal and external networks using the physical switch.

When to use Harvester

There are multiple use cases for Harvester. The following are some examples:

Host management

Harvester dashboards support viewing infrastructure nodes from the host page. Kubernetes has HCI built-in, which makes live migrations, like Features, possible. And Kubernetes provides fault tolerance to keep your workloads in other nodes running if one node goes down.

VM management

Harvester offers flexible VM management, with the ability to create Windows or Linux VMs easily and quickly. You can mount volumes to your VM if needed and switch between the administration and a secondary network, according to your strategy.

As noted above, live migration, backups, and cloud-init help manage VM infrastructure.

Monitoring

Harvester has built-in monitoring integration with Prometheus and Grafana, which installs automatically during setup. You can observe CPU, memory, storage metrics, and more detailed metrics, such as CPU utilization, load average, network I/O, and traffic. The metrics included are host level and specific VM level.

These stats help ensure your cluster is healthy and provide valuable details when troubleshooting your hosts or machines. You can also pop out the Grafana dashboard for more detailed metrics.

Conclusion

Harvester is the HCI solution you need to manage and improve your hyperconverged infrastructure. The open source tool provides storage, network and computes in a single pane that’s scalable, reliable, and easy to use.

Harvester is the latest innovation brought to you by SUSE. This open source leader provides enterprise Linux solutions, such as Rancher and K3s, designed to help organizations more easily achieve digital transformation.

Get started

For more on Harvester or to get started, check the official documentation.

Getting Hands on with Harvester HCI

Monday, 2 May, 2022

When I left Red Hat to join SUSE as a Technical Marketing Manager at the end of 2021, I heard about Harvester, a new Hyperconverged Infrastructure (HCI) solution with Kubernetes under the hood. When I started looking at it, I immediately saw use cases where Harvester could really help IT operators and DevOps engineers. There are solutions that offer similar capabilities but there’s nothing else on the market like Harvester. In this blog, I’ll give an overview of getting started with Harvester and what you need for a lab implementation.­


First, let me bring you up to speed on Harvester. This HCI solution from SUSE takes advantage of your existing hardware with cutting edge open source technology, and, as always with SUSE, offers flexibility and freedom without locking you in with expensive and complex solutions.

Figure 1 shows, at a glance, what Harvester is and the main technologies that compose it.


Fig. 1 – Harvester stack 


The base of the solution is the Linux operating system. Longhorn provides lightweight and easy-to-use distributed block storage system for Kubernetes — in this case for the VMs running on the cluster. RKE2 provides the Kubernetes layer where KubeVirt runs, providing virtualization capabilities using KVM on Kubernetes. The concept is simple: like in Kubernetes, there are pods running in a cluster. The big difference is that there are VMs inside those pods. 

To learn more about the tech under the hood and technical specs, check out this blog post from Sheng Yang introducing Harvester technical details.

The lab

I set up a home lab based on a Slimbook One node with an AMD Ryzen 7 processor, with 8 cores and 16 threads, 64GB of RAM and 1TB NVMe SSD — this is twice the minimum requirements for Harvester. In case you don’t know Slimbook, it is a brand focused on hardware oriented for Linux and open source software. You’ll need an ethernet connection for Harvester to boot, so if you don’t have a dedicated switch to connect your server, just connect it to the router from your ISV.


Fig. 2 – Slimbook One 


The installation

The installation was smooth and easy since Harvester ships as an appliance. Download the ISO image and install it on a USB drive or use PXE for the startup. In this process, you’ll be asked some basic questions to configure Harvester during the installation process. 

Fig. 3 – ISO Install


As part of the initial set up you can create a token that can be used later to add nodes to the cluster. Adding more nodes to the cluster is easy; you just start another node with the appliance and provide the token so the new node can join to the Kubernetes cluster. This is similar for what you do with RKE2 and K3s when adding nodes to a cluster. After you provide all the information for the installation process, you’ll have to wait approximately 10 minutes for Harvester to finish the set up. The Harvester configuration is stored as a yaml file and can be sourced from a URL during the installation to make the installation repeatable and easy to keep on a git repository.


Once the installation is finished, on the screen you’ll see the IP/DNS to connect Harvester and whether Harvester is ready or not. Once ready, you can log into the UI using the IP/DNS. The UI is very similar to Rancher and gives you the possibility to use a secure password in the first login. 


Fig. 4 – Harvester installation finished & ready screen 


The first login and dashboard

When you log in for the first time, you’ll see that it is easy to navigate.  Harvester benefits from a clean UI; it’s easy to use and completely oriented toward virtualization users and operators. Harvester offers the same kind of experience that IT operators would expect of a virtualization platform like oVirt. 


Fig. 5 – Harvester dashboard 


The first thing you’ll find once logged in is the dashboard, which allows you to see all the basic information about your cluster, like hosts, VMs, images, cluster metrics and VM metrics. If you navigate down the dashboard, you’ll find an event manager that shows you all the events segregated by kind of object.


When you dig further into the UI, you´ll find not only the traditional virtualization items but also Kubernetes options, like managing namespaces. When we investigate further, we find some namespaces are already created but we can create more in order to take advantage of Kubernetes isolation. Also, we find a fleet-local namespace which gives us a clue about how Kubernetes objects are managed inside the local cluster. Fleet is a GitOps-based deployment engine created by Rancher to simplify and improve cluster control. In the Rancher UI it’s referred to as ‘Continuous Deployment.’

Creating your first VM

Before creating your first VM you need to upload the image you’ll use to create it.  Harvester can use qcow2, raw and ISO images which can be uploaded from the Images tab using a URL or importing them from your local machine. Before uploading the images, you have the option to select which namespace you want them in, and you can assign labels (yes, Kubernetes labels!) to use them from the Kubernetes cluster. Once you have images uploaded you can create your first VM.

The VM assistant feels like any other virtualization platform out there: you select CPU, RAM, storage, networking options, etc. 


Fig. 6 – VM creation


However, there are some subtle differences. First, you must select a namespace where to deploy the VM, and you have the possibility to see all the VM options as yaml code. This means your VMs can be defined as managed as code and integrated with Fleet. This is a real differentiator from more traditional virtualization platforms. Also, you can select the node where the VM will be running, use the Kubernetes scheduler to place the VM on the best node, apply scheduling rules or select specific nodes that do not support live migration. Finally, there is the option to use containers alongside VMs in the same pod; the container image you select is a sidecar for the VM. This sidecar container is added as a disk from the Harvester UI. Cloud config is supported out of the box to configure the VMs during the first launch as you could expect from solutions like OpenStack or oVirt. 

Conclusion

Finding Kubernetes concepts on a virtualization solution might be a little awkward at the beginning. However, finding things like Grafana, namespace isolation and sidecar containers in combination with a virtualization platform really helps to get the best of both worlds. As far as use cases where Harvester can be of use, it is perfect for the Edge, where it takes advantage of the physical servers you already have in your organization since it doesn’t need a lot of resources to run. Another use case is as an on-prem HCI solution, offering a perfect way to integrate VMs and containers in one platform. The integration with Rancher offers even more capabilities. Rancher provides a unified management layer for hybrid cloud environments, offering central RBAC management for multi-tenancy support; a single pane of glass to manage VMs, containers and clusters; or deploying your Kubernetes clusters in Harvester or on most of the cloud providers in the market. 

We may be in a cloud native world now, but VMs are not going anywhere. Solutions like Harvester ease the integration of both worlds, making your life easier. 

To get started with Harvester, head over to the quick start documentation. 

You can also access this informative on-line session which provides a comprehensive recap of all the essential details needed to evaluate Harvester in your very own local environment:

Join the SUSE & Rancher community to learn more about Harvester and other SUSE open source projects.


Tags: ,, Category: Appliances, Cloud Computing, DevOps Comments closed

Harvester: A Modern Infrastructure for a Modern Platform

Tuesday, 21 December, 2021

Cloud platforms are not new — they have been around for a few years. And containers have been around even longer. Together, they have changed the way we think about software. Since the creation of these technologies, we have focused on platforms and apps. And who could blame anyone? Containers and Kubernetes let us do things that were unheard of only a few years ago.

What about the software that runs the infrastructure to support all these advancements? Over the same time, we have seen advancements — some in open source but the most with proprietary solutions. Sure, there is nothing wrong with running open source on top of a proprietary solution. These systems have become very good at what they do: running virtual machines but not container or container platforms, for that matter.

The vast majority of this infrastructure software is proprietary. This means you need two different skill sets to manage each of these — one proprietary, one Kubernetes. This is a lot to put on one team; it’s almost unbearable to put on one individual. What if there was an open infrastructure that used the same concepts and management plane as Kubernetes? We could lower the learning curve by managing our clusters the same way we can manage our host. We trust Kubernetes to manage clusters — why not our hosts?

Harvester: Built on Open Cloud Native Technology

Harvester is a simple, elegant, and light hyperconverged infrastructure (HCI) solution built for running virtual machines and Kubernetes clusters on bare metal servers. With Harvester reaching General Availability, we can now manage our host with the same concepts and management plane as our clusters. Harvester is a modern infrastructure for a modern platform. Completely open source, this solution is built on Kubernetes and incorporates other cloud native solutions, including Longhorn and Kubevirt, and leveraging all of these technologies transparently to deliver a modern hypervisor. This gives Harvester endless possibilities with all the other projects that integrate with Kubernetes.

This means operators and infrastructure engineers can leverage their existing skill sets and will find in Harvester a familiar HCI experience. Harvester easily integrates into cloud native environments, and offers enterprise-grade, turnkey features without costly overhead of the proprietary alternatives — saving both time and money.

A Platform for the Edge

Harvester’s small footprint means it is a great choice for the unique demands of hardware at the edge. Harvester gives operators the ability to deploy and manage VMs and Kubernetes clusters on a single platform. And because it integrates into Rancher, Harvester clusters can be managed centrally using all the great tooling Rancher provides. Edge applications will also benefit from readily available enterprise-grade storage, without costly and specialized storage hardware required. This enables operators to keep compute and storage as close to the user as possible, without sacrificing management and security. Kubernetes is quickly becoming a standard for edge deployments, so an HCI that also speaks this language is beneficial.

Harvester is a great solution for data centers, which come in all shapes and sizes. Harvester’s fully integrated approach means you can use high-density hardware with low-cost local storage. This saves on equipment costs and the amount of rack space required. A Harvester cluster can be as small as three servers, or an entire rack. Yet it can run just as well in branch or small-office server rooms. And all of these locations can be centrally managed through Rancher.

A Platform for Modernizing Applications

Harvester isn’t just a platform for building cloud native applications but one that you can use to take applications from VMs to clusters. It allows operators to run VMs alongside clusters, giving developers the opportunity to start decomposing these monoliths to cloud native applications. With most applications, this takes months and sometimes years. With Harvester, there isn’t a rush. VMs and clusters live side by side with ease. It offers all of this in one platform with one management plane.

As cloud native technologies continue their trajectory as keys to digital transformation, next-gen HCI solutions need to offer functionality and simplicity with the capability to manage containerized and non-containerized workloads, storage and network requirements across any environment.

Conclusion

What’s unique about Harvester? You can use it to manage multiple clusters hosted on VMs or a Kubernetes distribution. It’s 100 percent open source and leverages proven technologies – so why not give it a try to simplify your infrastructure stack?  You’ll get a feature-rich operational experience in a single management platform, with the support of the open-source community behind it. We have seen the evolution of Harvester, from a fledgling open-source project to a full-on enterprise-ready HCI solution.

We hope you take a moment to download and give Harvester a try.

JOIN US at the Harvester Global Online Meetup – January  19 at 10am PT. Our product team will be on hand to answer your questions. Register here.

Tags: ,,, Category: Announcements, Announcements, Appliances, Rancher Blog, SUSE Blog Comments closed

Harvester Integrates with Rancher: What Does This Mean for You?

Thursday, 21 October, 2021

Thousands of new technology solutions are created each year, all designed to help serve the open source community of developers and engineers who build better applications. In 2014, Rancher was founded as a software solution aiming to help simplify the lives of engineers building applications in the new market of containers.

Today, Rancher is a market-leading, open source solution supported by a rich community helping thousands of global organizations deliver Kubernetes at scale.

Harvester is a new project from the SUSE Rancher team. It is a 100% open source, Hyperconverged Infrastructure (HCI) solution that offers the same expected integrations as traditional commercial solutions while also incorporating beneficial components of Kubernetes. Harvester is built on a foundation of cloud native technology to bridge the gap between traditional HCI and cloud native solutions.

Why Is This Significant? 

Harvester addresses the intersection of traditional HCI frameworks and modern containerization strategies. Developed by SUSE’s team of Rancher engineers, Harvester preserves the core values of Rancher. This includes enriching the open source community by creating Harvester as a 100% open, interoperable, and reliable HCI solution that fits any environment while retaining the traditional functions of HCI solutions. This helps users efficiently manage and operate their virtual machine workloads.

When Harvester is used with Rancher, it provides cloud native users with a holistic platform to manage new cloud native environments, including Kubernetes and containers alongside legacy Virtual Machine (VM) workloads. Rancher and Harvester together can help organizations modernize their IT environment by simplifying the operations and management of workloads across their infrastructure, reducing the amount of operational debt.

What Can We Expect in the Rancher & Harvester Integration?

There are a couple of significant updates in this v0.3.0 of Harvester with Rancher. The integration with Rancher v2.6.1 gives users extended usability across both platforms, including importing and managing multiple Harvester clusters using the Virtualization Management feature in Rancher v2.6.1. In addition, users can also leverage the authentication mechanisms and RBAC control for multi-tenancy support available in Rancher.  

Harvester users can now provision RKE & RKE2 clusters within Rancher v2.6.1 using the built-in Harvester Node Driver. Additionally, Harvester can now provide built-in Load Balancer support and raw cluster persistent storage support to guest Kubernetes clusters.  

Harvester remains on track to hit its general availability v1.0.0 release later this year.

Learn more about the Rancher and Harvester integration here.  

You can also check out additional feature releases in v0.3.0 of Harvester on GitHub or at harvesterhci.io.