Cloud Foundry in Azure, made easier
I’m proud to announce the release of our new SUSE Cloud Application Platform deployment tool, leveraging Azure Kubernetes Service (AKS), terraform, and a sleek new web application to provide you the quickest on-ramp to Cloud Foundry! The tool is bundled as a virtual machine image in the Azure Marketplace, which allows you to get up and running in less than an hour on as few as three virtual machines.
Traditionally, setting up Cloud Foundry can be quite a chore. We’ve worked hard to streamline the process, taking advantage of SUSE CAP’s lightweight container-based architecture and open-source tooling. When you start an instance of the deployment image, you will be greeted with a new web interface – named blue-horizon – which will walk you through just a few steps to get your cluster set up. Under the hood, blue-horizon runs terraform to deploy your application.
In order to streamline the workflow we have had to express some opinions about how the cluster will be set up:
- Everything is configured in a single resource group.
- An Azure DNS Zone must be used for the cluster (sub)domain, and it must be in the same resource group, and managed by the same service principal as the rest of the group’s resources.
- TLS certificates for deployed applications are automatically generated via Let’s Encrypt.
We’re looking into making this more flexible in the future.
Prerequisites
Before you get started, there are a few things you must do in order to achieve a successful deployment. We’ll guide you through set up with azure-cli where we can, but the accompanying documentation links also include directions for using the Azure web portal. Assume that anything in BOLD_ALL_CAPS needs to be replaced.
First off, you’ll need a resource group where SUSE CAP will be deployed:
az group create --location AZURE_LOCATION --name RESOURCE_GROUP_NAME
Next, you’ll need to create a service principal with permission to deploy the application, and maintain DNS entries on it:
az ad sp create-for-rbac --name CLUSTER_FQDN --role contributor --scopes /subscriptions/AZURE_SUBSCRIPTION_ID/resourceGroups/RESOURCE_GROUP_NAME
Keep the full output of that command, you’ll need it later. You also need the objectId of the service principal:
az ad sp list --display-name CLUSTER_FQDN --query [].objectId --output tsv
Now, add the DNS Zone Contributor role as well:
az role assignment create --role "DNS Zone Contributor" --assignee-object-id SERVICE_PRINCIPAL_OBJECT_ID --assignee-principal-type ServicePrincipal --resource-group RESOURCE_GROUP_NAME
You can now verify that both the Contributor and DNS Zone Contributor roles are assigned to your service principal:
az role assignment list --resource-group RESOURCE_GROUP_NAME --query '[].{name:principalName,role:roleDefinitionName}'
The output should have two entries: both with the same name you defined for the service principal, and with the roles Contributor and DNS Zone Contributor.
With that out of the way, we can work on DNS. At this time, you must delegate a publicly resolvable domain or subdomain to an Azure DNS Zone, and host entries in that zone will have TLS certificates provided by Let’s Encrypt.
Create the DNS Zone within your resource group:
az network dns zone create --name SUBDOMAIN --resource-group RESOURCE_GROUP_NAME
The output includes a list of nameServers – in your SUBDOMAIN registrar, delegate name service of your subdomain to those listed nameServers. Consult your registrar documentation for details.
You can verify the output on the Azure side using one of the listed nameServers:
dig @NAMESERVER ns SUBDOMAIN
… and do the same verification with a public DNS server:
dig @1.1.1.1 ns SUBDOMAIN
⚠ You will not be able to proceed until the domain delegation is propagated to public DNS servers.
Let’s go
Start up an instance of the SUSE CAP Deployment image. The application requires 2GB of RAM, but it is not CPU or storage-intensive, so there’s no need to go overboard. We recommend a Standard_B1ms instance size. When you start the Virtual Machine, be sure to open port 80 (http) in order to access the web interface. We recommend running inside a Azure Virtual Network, and limiting ingress to only your IP address. You will have to allow egress to the Internet, though, as resources are downloaded from a number of sources.
When the VM is running, browse to the instance’s IP address. You will immediately be queried for a username and password: Use the VM’s name as the username, and your subscription ID as the password. Upon successful authentication, you will be greeted by blue-horizon’s Welcome screen, which will provide a brief review of the prerequisites, and provide you two paths for moving forward. We’ll cover the simple path, which you enter by clicking the “Start setup” button.
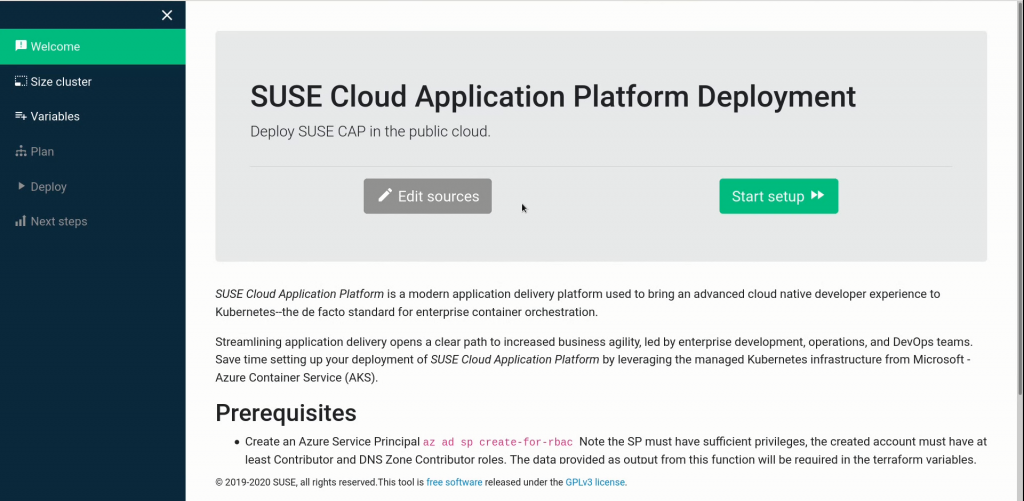
![]() Advanced users may enjoy the option to review and edit the terraform deployment scripts. These are available by clicking the Edit sources button instead.
Advanced users may enjoy the option to review and edit the terraform deployment scripts. These are available by clicking the Edit sources button instead.
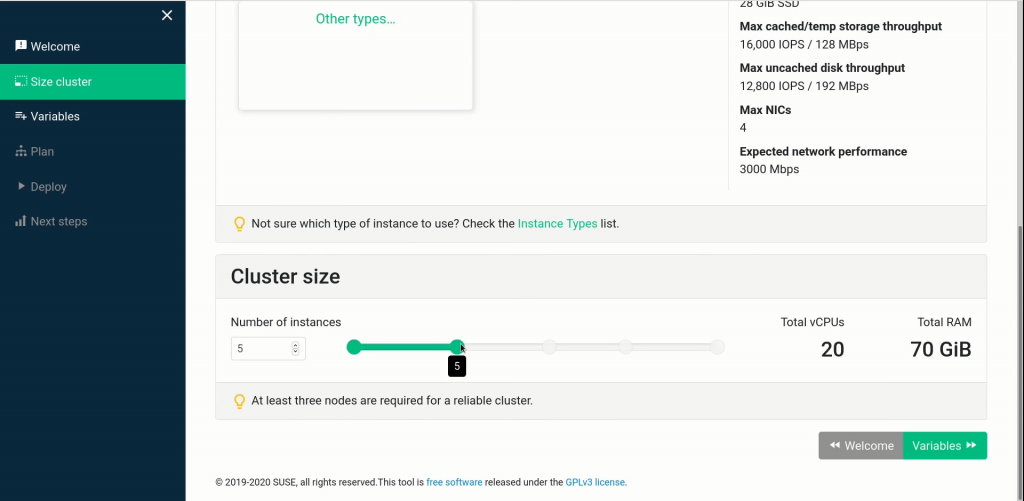
The 1st setup screen is for sizing your cluster. Select an instance type, then scroll down and set the cluster size. Please make sure you have adequate quota for the cluster size you are provisioning. Currently we support deploying kubernetes clusters of three to 50 nodes.
The next screen is a bit more complex; here you’ll provide all the variables needed to set up your cluster:
- your Azure subscription ID, resource group name, and the Azure region where it is located
- the service principal credentials
- a username and public key to enable SSH access to cluster nodes
- two passwords: for the Stratos ( the CAP admin web interface ) ‘admin’ account, and for the UAA ( User Account and Authentication ) ‘admin’ account
- the Kubernetes version to deploy (we set this to a sane default)
- the disk size to use for worker nodes (minimum 80GB)
- any tags you want applied to your worker nodes
- the (sub)domain you delegated to an Azure DNS Zone, the FQDN to use for the CAP cluster, and a prefix to use for each node’s hostname.
- your email address, for setting renewal notices on TLS certificates
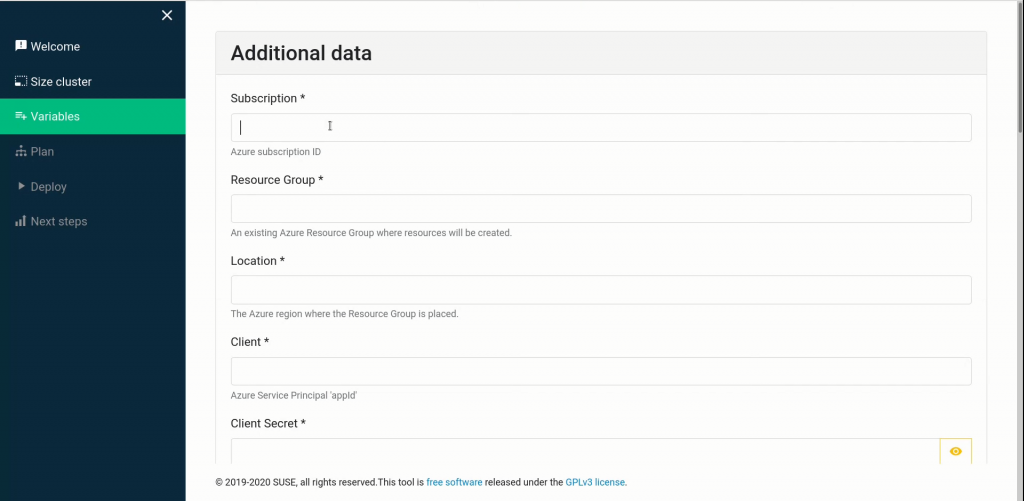
Once you’ve properly filled out the values, Save your data, double-check it, then move on to the action!
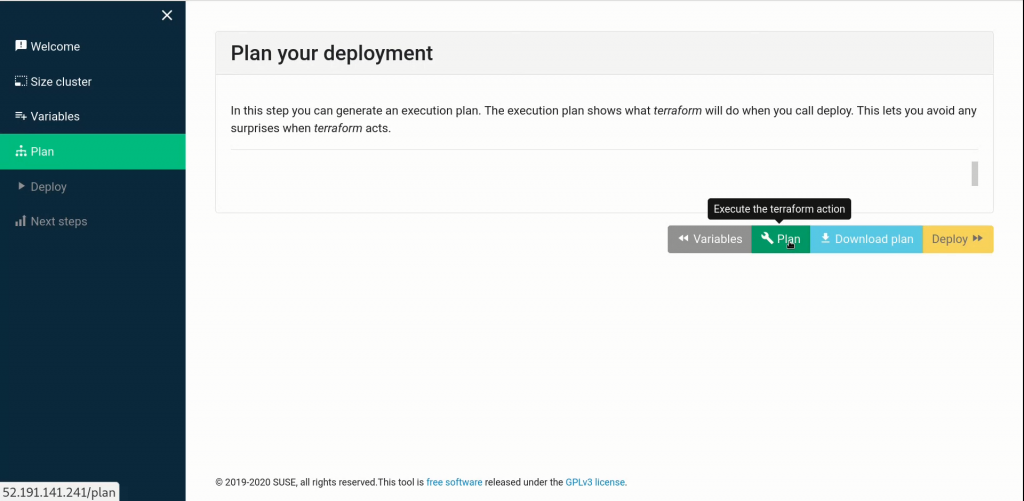
The next two screens will walk you through planning your deployment, and executing that plan via terraform.
When the deployment is complete, the Next steps screen will provide you some additional documentation pointers, and allow you to download a zip file containing assets you’ll need to access, modify, or tear down your cluster, including:
- a kubeconfig file for configuring kubectl
- all terraform scripts
- the variables you provided in a terraform-friendly format
- a log of the plan and deployment steps
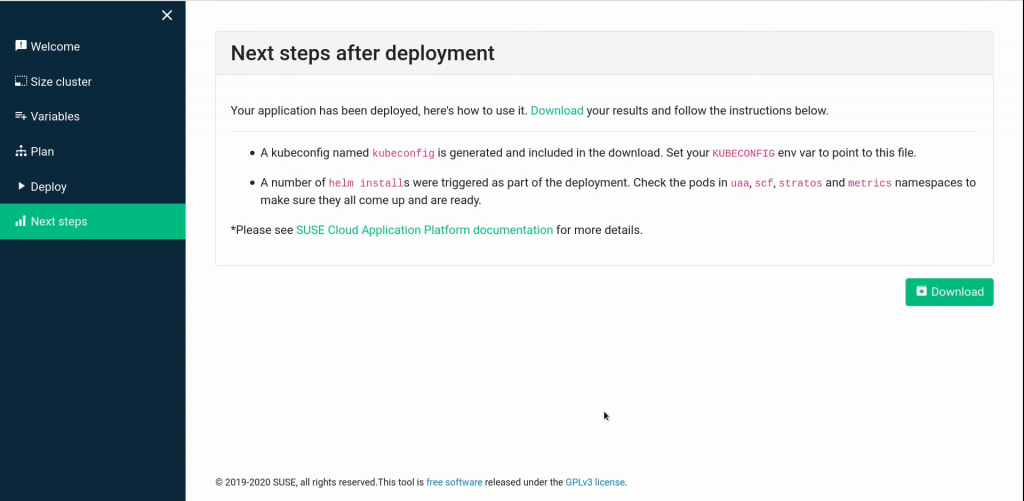
Armed with your kubeconfig, you can use kubectl to monitor the deployment process:
export KUBECONFIG=./kubeconfig
kubectl get pods --all-namespaces
When the post-deployment containers are all in a Completed state, your SUSE CAP cluster is ready to use – this usually takes about half an hour. You can work with it either via the cf-cli tool, or the Stratos web application, deployed at https://stratos.YOUR_CAP_SUBDOMAIN … check your Azure DNS Zone for the actual URL. Please see the SUSE CAP documentation as well.
A few notes
Stratos is currently deployed with a self-signed certificate, not a Let’s Encrypt certificate. We’re working on how to resolve that.
Stratos-metrics is not included in this initial release, but will be added in a subsequent release of the deployment application. You can add it yourself to an existing cluster, via helm. See the SUSE CAP documentation for more details.
The default configuration, with the terraform setup provided, is considered production ready.
Have fun with your new SUSE Cloud Application Platform!
Related Articles
Jan 30th, 2023
SLE-Micro in the Public Cloud
Feb 27th, 2023
No comments yet