CentOS Alternatives: Migrating Workloads From CentOS To OpenSUSE Leap – Migrating your webserver

Introduction
In this blog post we will show an example of how to migrate your Apache web server running on CentOS to openSUSE Leap, all while keeping downtime to a minimum.
Our approach will encompass the following steps:
- Configuring the New Web Server: We will set up the new web server in openSUSE Leap, setting up a load balancer and a virtual IP.
- Automated Testing Implementation: To ensure smooth functionality, automated testing will be established to validate the new setup.
- DNS Modification: We’ll change existing web server DNS entry to direct traffic towards the Load Balancer’s IP.
- Backup and Decommissioning: The final phase involves the backup and eventual decommissioning of the old web server.
| Webserver DNS | webserver.mydemo.lab |
| OpenSUSE Leap DNS | myopensuse.mydemo.lab |
| Centos DNS | mycentos9.mydemo.lab |
| Web content type | Static HTML |
| Web server | Apache 2.4 |
| Virtual IP | 192.168.122.123 |
Setting Up the openSUSE Leap Webserver
First, we need to install the OS, to do so we can follow the detailed instructions provided in one of our blog posts. For instance, the openSUSE Leap step-by-step installation guide or, if you want to install multiple machines, you can consult the steps outlined in here to create an installation server.
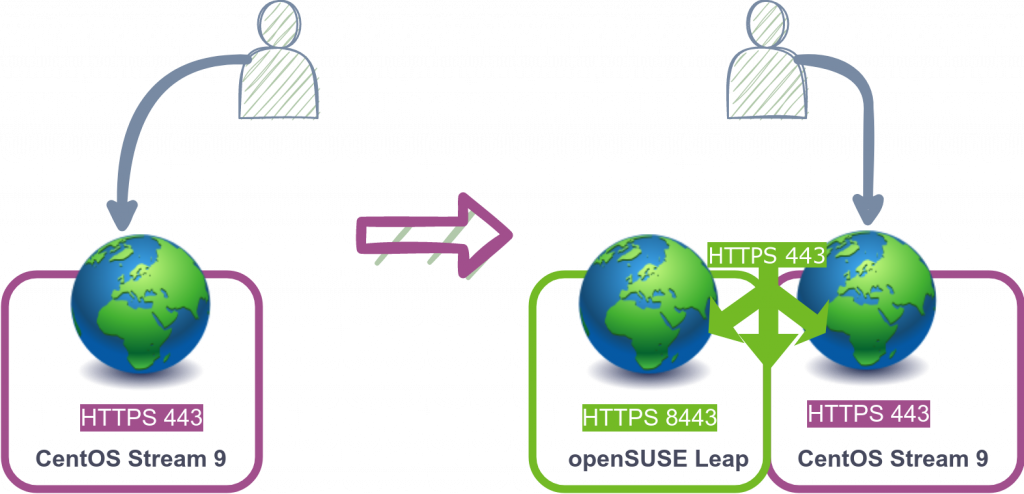
Once the server is installed, we will proceed to setup the Apache webserver, HAproxy to act as the load balancer, a virtual IP and copy the contents from the existing webserver to the new one, in this example the webserver contains a set of static HTML pages.
In this image we can see the end setup on this step. We will have a load balancer setup on the new openSUSE Leap server which will balance the requests between the new and old web servers, at this point the users are still connecting to the old CentOS server as we haven’t changed the DNS yet.
- Install the packages:
zypper install apache2 haproxy - Configure Apache
- Create the SSL config:
cat >/etc/apache2/vhosts.d/myserver-ssl.conf  <<EOF
<IfDefine SSL>
<IfDefine !NOSSL>
<VirtualHost _default_:8443>
        DocumentRoot "/srv/www/htdocs"
        ServerName mywebserver.mydemo.lab:8443
        ServerAdmin webmaster@mydemo.lab
        ErrorLog /var/log/apache2/error_log
        TransferLog /var/log/apache2/access_log
        SSLEngine on
        SSLUseStapling  on
        SSLCertificateFile /etc/apache2/ssl.crt/localhost-server.crt
        SSLCertificateKeyFile /etc/apache2/ssl.key/localhost-server.key
        CustomLog /var/log/apache2/ssl_request_log   ssl_combined
</VirtualHost>
</IfDefine>
</IfDefine>
EOF
- Create the SSL config:
- Setup non-standard ports
sed 's/Listen 443/Listen 8443/;s/Listen 80/Listen 8080/' -i /etc/apache2/listen.conf - Enable SSL
sed 's/APACHE_SERVER_FLAGS="/APACHE_SERVER_FLAGS="SSL /' -i /etc/sysconfig/apache2 - Copy the SSL certificates
scp mycentos9:/etc/pki/tls/certs/localhost.crt /etc/apache2/ssl.crt/localhost-server.crt scp mycentos9:/etc/pki/tls/private/localhost.key /etc/apache2/ssl.key/localhost-server.key - Enable and start apache
systemctl enable --now apache2
- Configure the virtual IP
nmcli con mod "Wired connection 1" +ip4 '192.168.122.123/24' nmcli con reload - Configure HAproxy
- Configure HAproxy
cat >>/etc/haproxy/haproxy.cfg <<EOF frontend http bind :80 mode http http-request redirect scheme https code 301 if !{ ssl_fc } frontend mywebserver bind :443 mode tcp default_backend webserver backend webserver mode tcp balance roundrobin server mycentos9 mycentos9.mydemo.lab:443 check server myopensuse myopensuse.mydemo.lab:8443 check EOF - Enable and start haproxy
systemctl enable --now haproxy
- Configure HAproxy
- Configure the firewall
for i in 80 443 8080 8443 9000; do firewall-cmd --add-port=${i}/tcp --permanent; done; firewall-cmd --reload - Copy the website
rsync -avz mycentos9:/var/www/html/ /srv/www/htdocs/
Create some automated tests
We want to make sure everything works as expected, so we will create a small script that will compare the outputs from both the new and old servers.
diff -q -b <(curl -k https://myopensuse.mydemo.lab:8443/ 2>/dev/null) <(curl -k https://mycentos9:443/ 2>/dev/null) >/dev/null || echo "Output differs"
When executed, this one-liner remains silent if the webservers generate identical outputs. If differences arise, the message “Output differs” will be displayed.
Now let’s run it but changing “myopensuse” port with 443 which is the one used by the load balancer. This will allow us to test the load balancer. To assess the load balancer’s functionality—set to round-robin—we can execute the command multiple times. This script demonstrates running the test 60 times, with a 2-second interval between each request. The complete test sequence takes approximately 2 minutes:
for e in (seq 1 60) ; do diff -q -b <(curl -k https://myopensuse.mydemo.lab:443/ 2>/dev/null) <(curl -k https://mycentos9:443/ 2>/dev/null) >/dev/null || echo "Output differs" ; sleep 2 ;done
It’s important to note that these commands serve as examples. While they compare a single static page between servers, real-world scenarios often involve multiple pages, including dynamically generated content.
Change the DNS
In this example we are going to change the DNS of webserver.mydemo.lab to point to the new virtual IP we just created, since the new server is configured with a load balancer, and we have tested in the previous step the output is the same there shouldn’t be any noticeable service interruption.
This is just one way to achieve the switch, it may not be suitable for all cases.
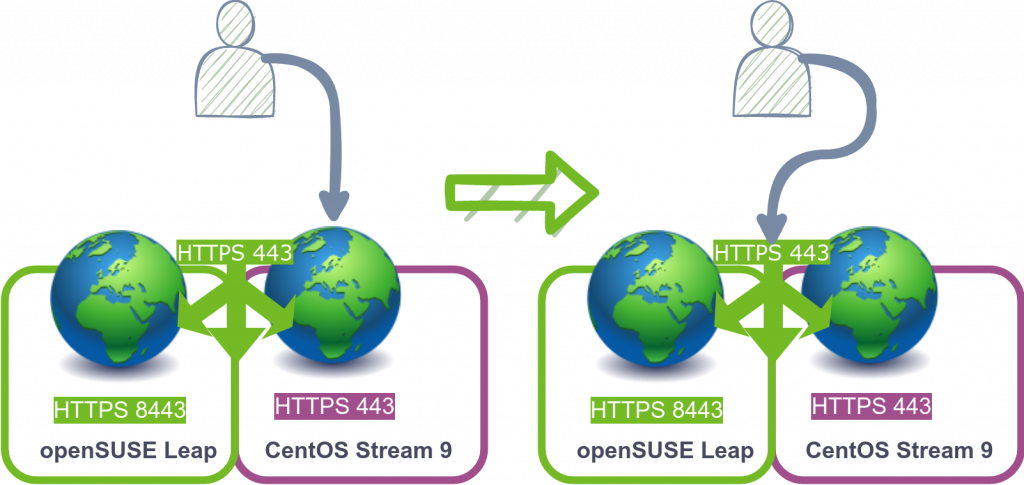
We can see in the picture above that the client will start connecting to the load balancer in openSUSE Leap instead of to CentOS webserver directly, this is because the DNS now points to the IP assigned to the load balancer.
Backup and Decommission
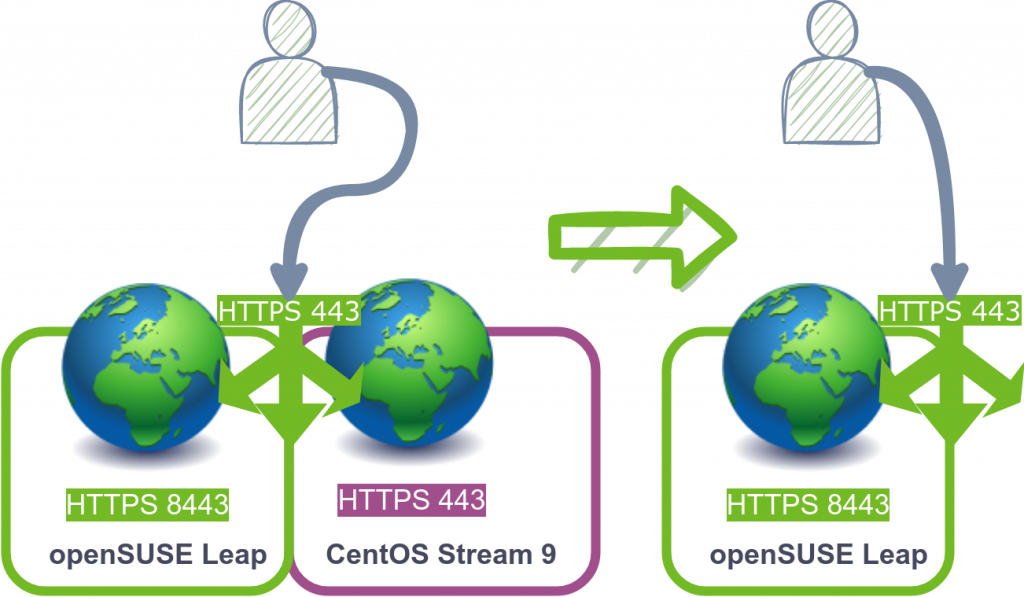
Having successfully established our new host to serve website requests, the next step involves backing up and decommissioning the old server. If the old server operates as a VM, creating a copy of the VM image after shutting it down is recommended.
Bear in mind that the DNS change may take time to be propagated, and certain clients could be caching the old IP address. To ensure a smooth transition, waiting for approximately a day is advisable before decommissioning the old server. If the server name is hardcoded in the client’s local hosts file, it’s recommended to remove it unless there is a specific reason for having it there.
To remove the old Centos from the load balancer list, it’s necessary to edit the HAproxy configuration file and remove the highlighted line:
vim /etc/haproxy/haproxy.cfg...
backend webserver
mode tcp
balance roundrobin
server mycentos9 mycentos9.mydemo.lab:443 check
server myopensuse myopensuse.mydemo.lab:8443 check
Following this, a configuration reload is required:
systemctl reload haproxy
This marks the conclusion of the process. With the load balancer in place, further nodes can be added to distribute the load efficiently. For those aiming to achieve High Availability, incorporating an additional load balancer is essential. More information about HA can be found in this documentation link.
Conclusion
We have seen an example of how we could migrate our webservers from CentOS to openSUSE Leap with minimal downtime. This process involves installing a Load Balancer and utilizing a Virtual IP, thereby laying the foundation for a highly available setup capable of scaling through the addition of new servers to the Load Balancer pool.
As a CentOS alternative, openSUSE brings numerous benefits, including stability, SUSE’s support to the community, powerful system management tools, advanced distro features, and access to a rich package repository. The active openSUSE community and easy migration tools further enhance the transition process. If you are seeking a robust and reliable Linux distribution for your workloads, you should consider openSUSE.
Looking for further insights into what you can achieve by migrating to openSUSE?, check out other blogs in this series:
- From CentOS to openSUSE Leap: How to Feel at Home
- Step-by-Step Guide Installing openSUSE Leap on your virtualized environment
- 10 Reasons to Migrate from CentOS to openSUSE
- CentOS Alternatives: Migrating Workloads From CentOS To OpenSUSE Leap – Automating With Ansible Part 1
Ready to experience the power and flexibility of openSUSE Leap?
Related Articles
Dec 09th, 2024
SUSE Receives 37 Badges in the Fall G2 Report
May 15th, 2025
Unlock Efficient Kubernetes Provisioning with ClusterClass
Oct 18th, 2024