Step by Step instructions for building a Multiple Architecture OpenSUSE Leap installation server
I’m back to Building Servers from Scratch
Playing around with Kubernetes and Edge Computing has opened up a world of possibilities for me, especially when it comes to breathing new life into the older equipment in my lab. Take, for example, my old Intel NUC i5 with 16GB RAM. It used to be a virtual host, but it’s been retired to a file cabinet drawer for a while now. Well, not anymore. It’s now serving as a pretty solid Kubernetes node.
Then there’s my stack of Raspberry Pi 4s. These little guys are always up to something different. Some days, they’re working together as a 5-node cluster. Other days, they’re spread out, each one simulating a small server in a different part of the world.
This constant repurposing means I’m often building machines from scratch. I wanted to make this process quicker and simpler. I wanted to be able to install a fresh server over the network in a snap, without having to rummage around for a USB stick to use as installation media.
So, I decided to take the plunge and set up an openSUSE Installation Server and a PXE boot server. With an Installation Server, all I need to do is boot the computer with a small installation image. Then, I can direct the install program to use the Installation Server as the source. Just like that, all the install files come streaming over the network from the installation server.
Preboot eXecution Environment (PXE) is a protocol that enables a computer to boot its operating system from a server via a network, without requiring a hard drive or an operating system installed locally. This means I can start the installation without looking for a thumb disk!”
I was pleasantly surprised to find out that there are Yast plugins available to automate most of the work. It’s like having a little helper to take care of the heavy lifting.
This is the first part of a two-part series. In this part, I’ll be talking about the Installation Server. In Part Two, we’ll dive into the PXE Server.
System Requirements
Software Requirements
openSUSE Leap 15.5 – Server Pattern (for smallest image)
Detailed instructions for this installation can be found at the following link:
Step-by-Step Guide Installing openSUSE Leap on your virtualized environment
Hardware Requirements
- Small Server or VM
- 1 or 2 Cores
- 2 GB of RAM
- 40 GB for OS + 10-15 Gigs for each OS
IP Addresses used in Example
- Server name: install
- IP address: 10.0.99.254
- Mask: 255.255.255.0
- DNS: 10.0.0.10
- Default Route: 10.0.99.1
- NTP: 10.0.0.1
Final Install URLs when Lab is completed
http://10.0.99.254/install/leap-15.5-x86/CD1/http://10.0.99.254/install/leap-15.5-arm/CD1/
Setup Installation server
Update openSUSE
Before starting, we need to ensure the server has the latest patches.
zypper ref && zypper up -y
Download and prepare Leap iso files
1) Create a folder to store iso files
mkdir -p /data/iso
cd /data/iso
2) Download openSUSE Leap x86 installation iso files
Now, let’s download the openSUSE Leap x86 installation ISO files. We will use wget to do this.
To get the latest URL, you can always go to get.opensuse.org
wget https://download.opensuse.org/distribution/leap/15.5/iso/openSUSE-Leap-15.5-DVD-x86_64-Build491.1-Media.iso
3) Download openSUSE Leap aarch64(ARM) installation iso files
- Repeat the process above to download the openSUSE Leap aarch64(ARM) installation ISO files.
wget https://download.opensuse.org/distribution/leap/15.5/iso/openSUSE-Leap-15.5-DVD-aarch64-Build491.1-Media.iso4) Verify files are downloaded completely
To ensure the files have downloaded correctly, you can run the ll command.
ll
Install Yast Plugin for Installation Server
1) Install Yast Plugin for Installation Server
Next, we will install the Yast Plugin for the Installation Server. This plugin simplifies the Installation Server setup process.
The plugin will handle everything from:
- Installing all necessary applications (think web server),
- Configure the Firewall (if needed)
- Setup Installation folders with proper rights
- Copy files from the ISO for the installation
zypper in yast2-instserver Configure Installation Server
1) Launch Installation Server Yast Plugin
Launch Yast and Select Miscellaneous->Installation Server
yast Select Miscellaneous->Installation Server

2) Select the Directory to Contain Repositories
This is the Directory where the Install Wizard will copy all of the files from the iso.
Choose the Directory to contain Repositories. For instance, you can leave it at the default (/srv/install).
Directory to Contain Repositories:
/srv/install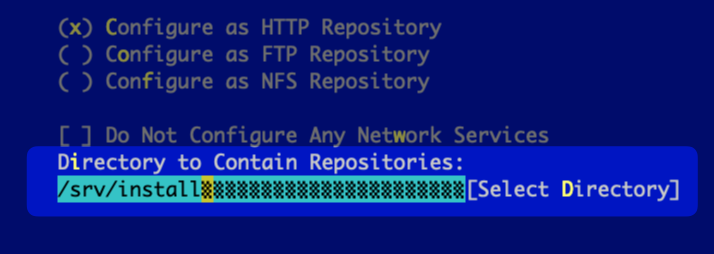
3) Set up a Directory Alias
Next, you’ll set up a Directory Alias, which will be a part of the URL when accessing the installation server.
In our example, we are going to set the Repository Name to ‘install‘
This will set the base portion of my URL to http://10.0.99.254/install
Directory Alias:
install
4) Setup Repository Name for openSUSE leap 15.5 x86
Now, set up the Repository Name for openSUSE leap 15.5 x86. This name will be used when referencing this installation server via the URL.
Because of this, we want the name to be simple and logical.
If we set our Repository Name to leap-15.5-x86 our install URL will now be http://10.0.99.254/install/leap-15.5-x86/
Repository Name:
leap-15.5-x86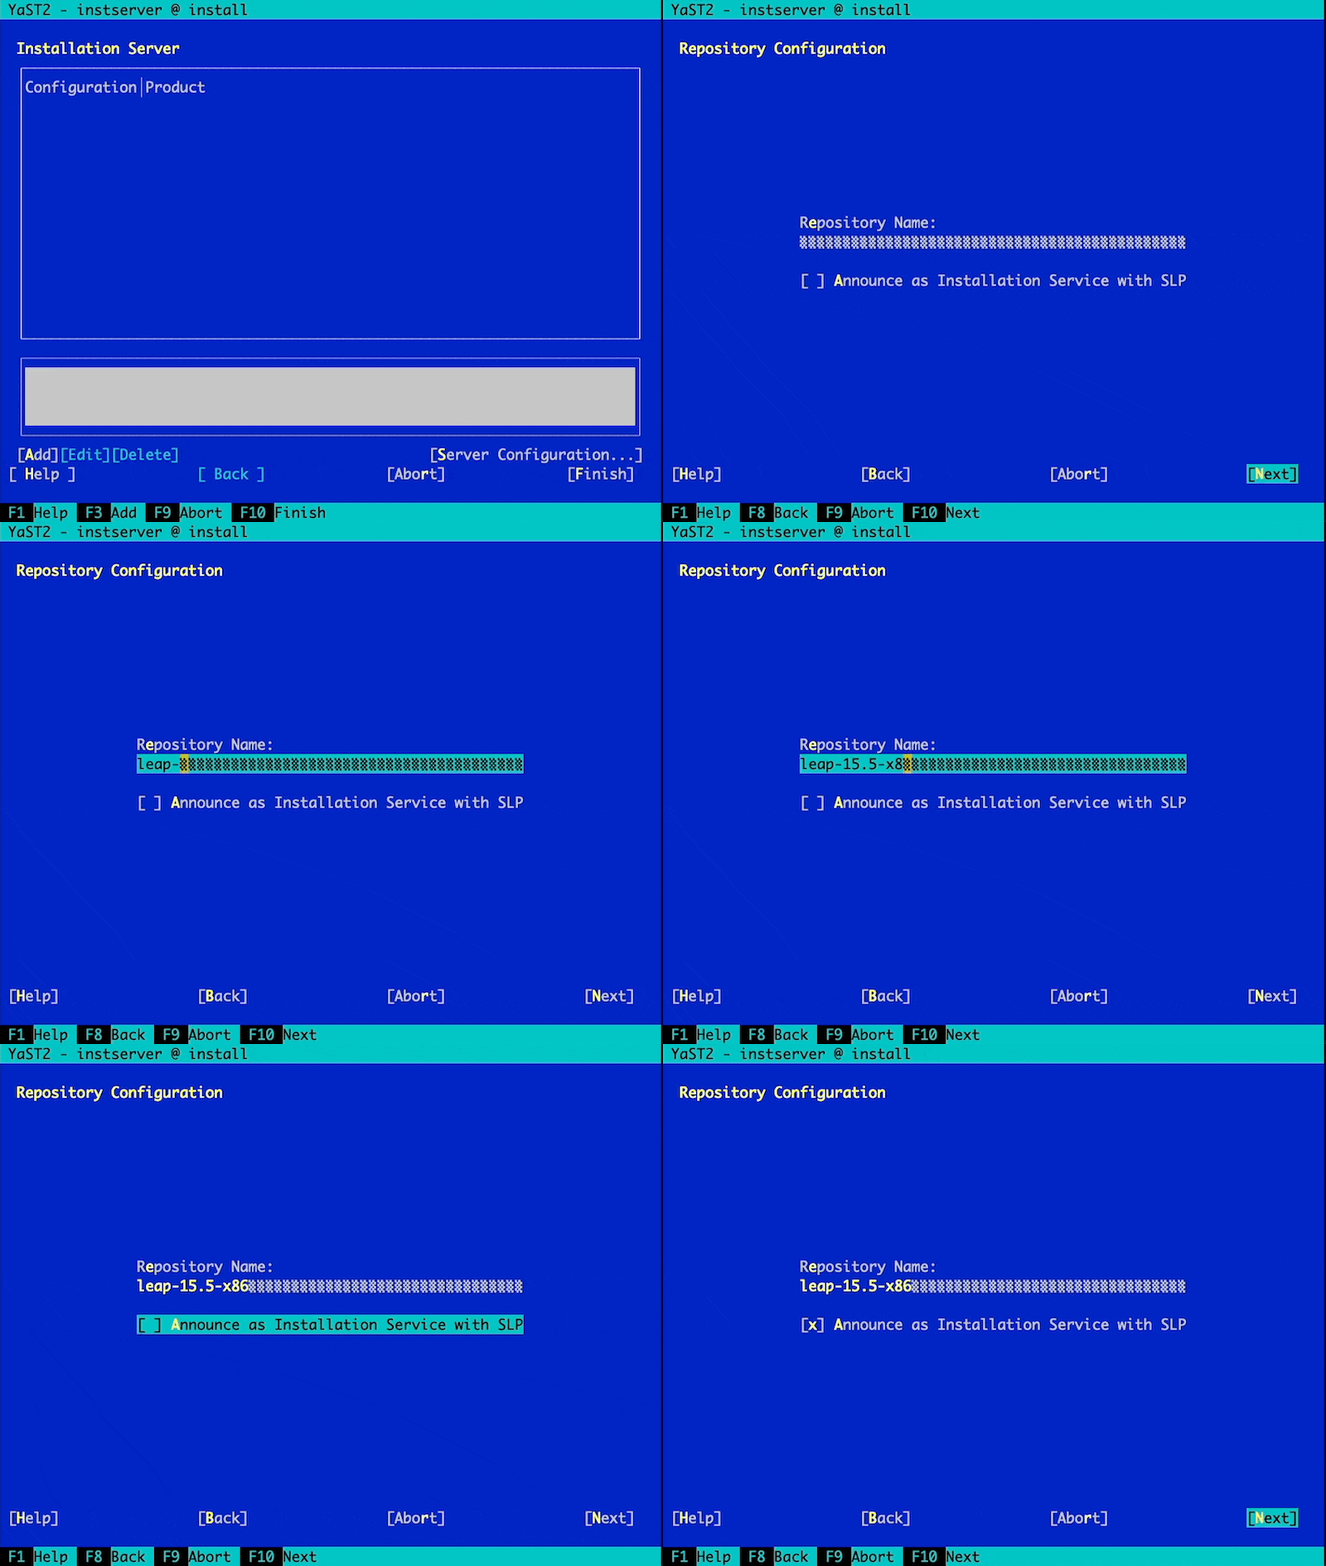
5) Select the Directory for the CD Images
Use ISO Images:
/data/iso

6) Select openSUSE-Leap-DVD-x86_64_Build491.1-Media.iso (or the current x86 iso)
Use ISO Images
openSUSE-Leap-DVD-x86_64_Build491.1-Media.isoopenSUSE-Leap-DVD-x86_64_Build491.1-Media.iso
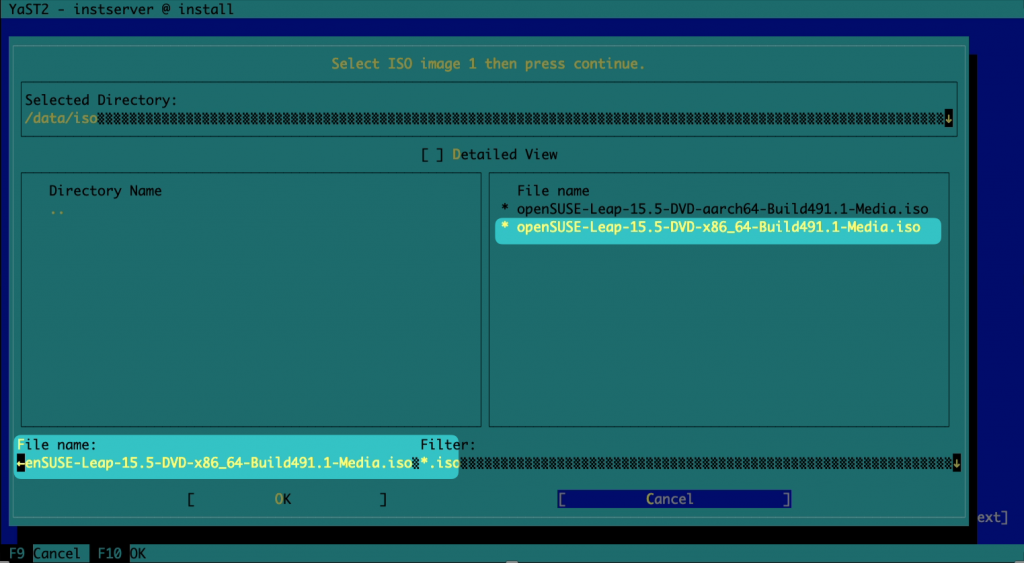
You will then see a copy while the iso is copying the data to do /srv/install

7) Setup Repository Name for openSUSE leap 15.5 arm
Repeat steps 4 to 6 for openSUSE Leap 15.5 arm:
Repository Name:
leap-15.5-armUse ISO Images:
/data/isoUse ISO Images:
openSUSE-Leap-DVD-aarch64_Build491.1-Media.iso
Testing the Installation Server
1) Testing in a Browser
You can test the Installation Server in a web browser since it’s configured to allow HTTP protocol.
Just enter your installation server’s URL, which should be http://10.0.99.254/install.
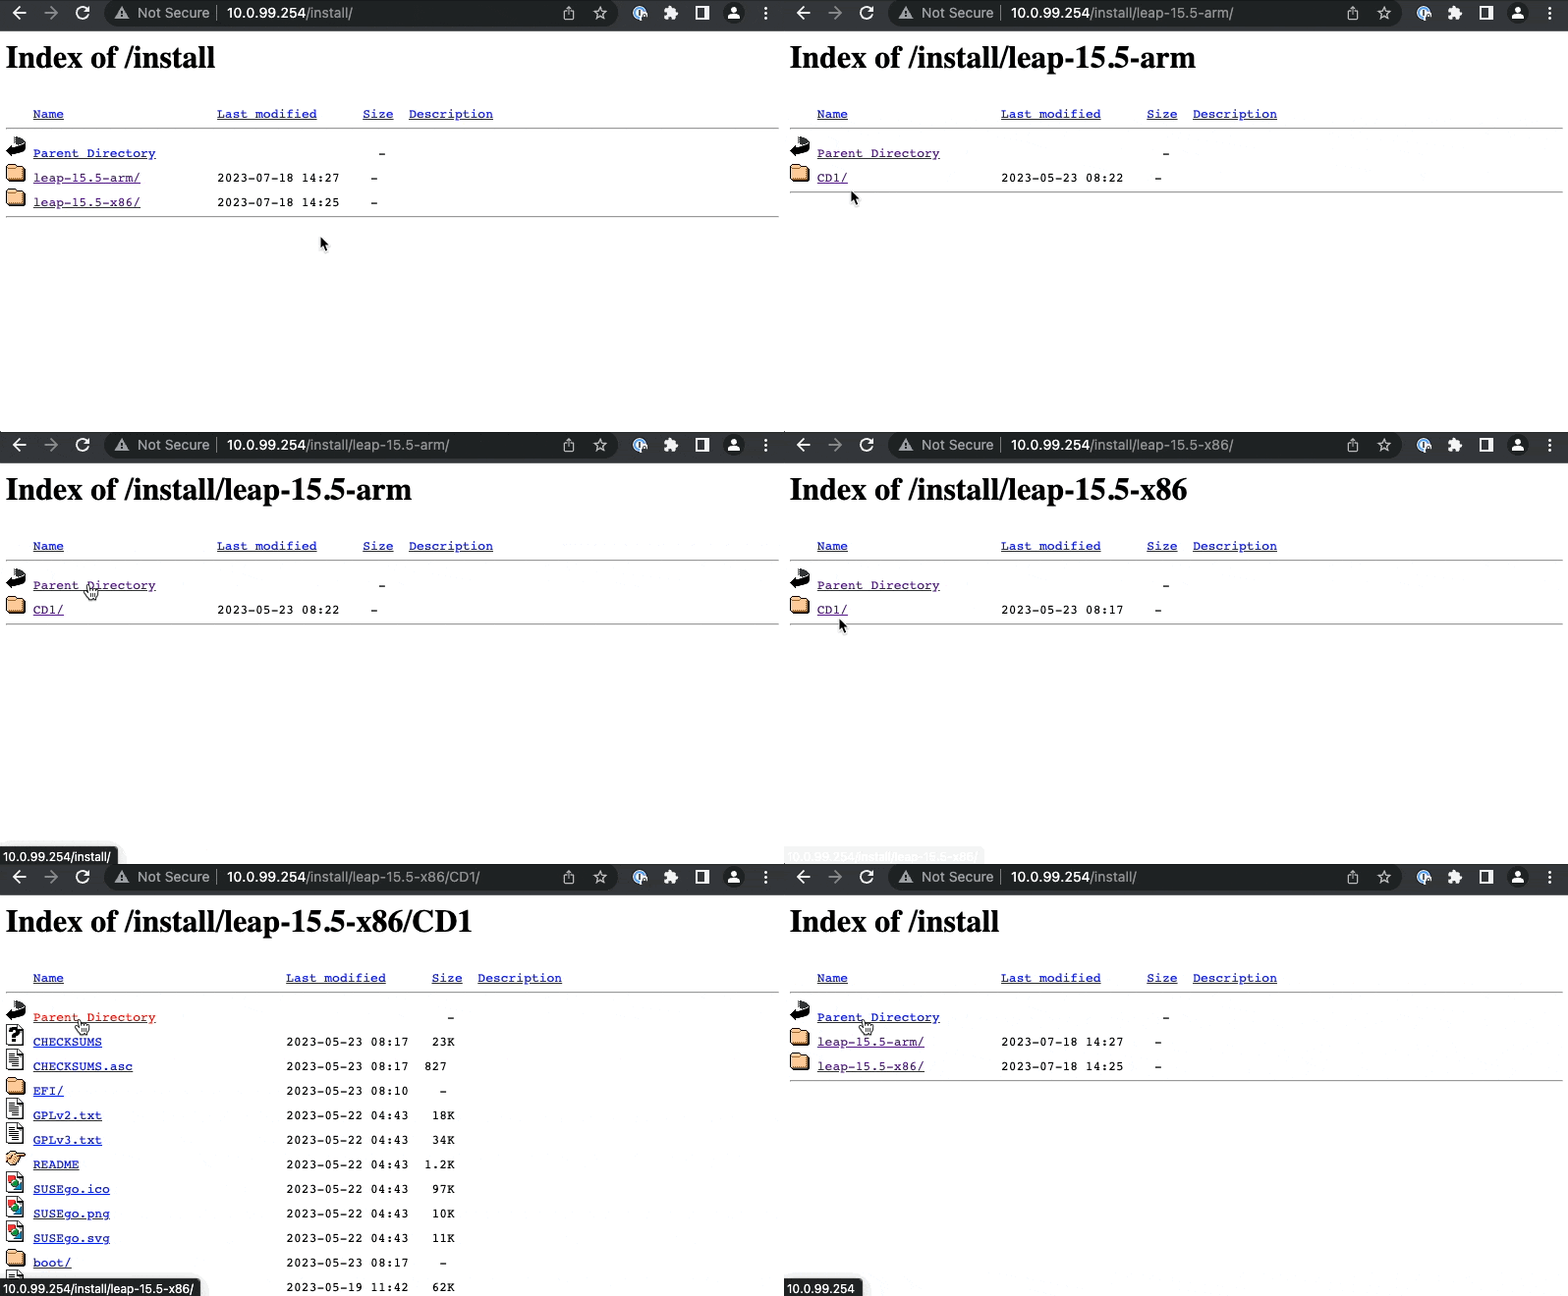
Using the Installation Server
1)Using the Installation Server
To use the Installation Server, you need to point the openSUSE Leap installation program to the HTTP source.
You can do this by simply pressing the F4 key when you are in the Boot Menu and Selecting an HTTP source
Boot Options:
Press F4Select
HTTPServer
10.0.99.254Directory
/data/iso/install/leap-15.5-x86/CD1/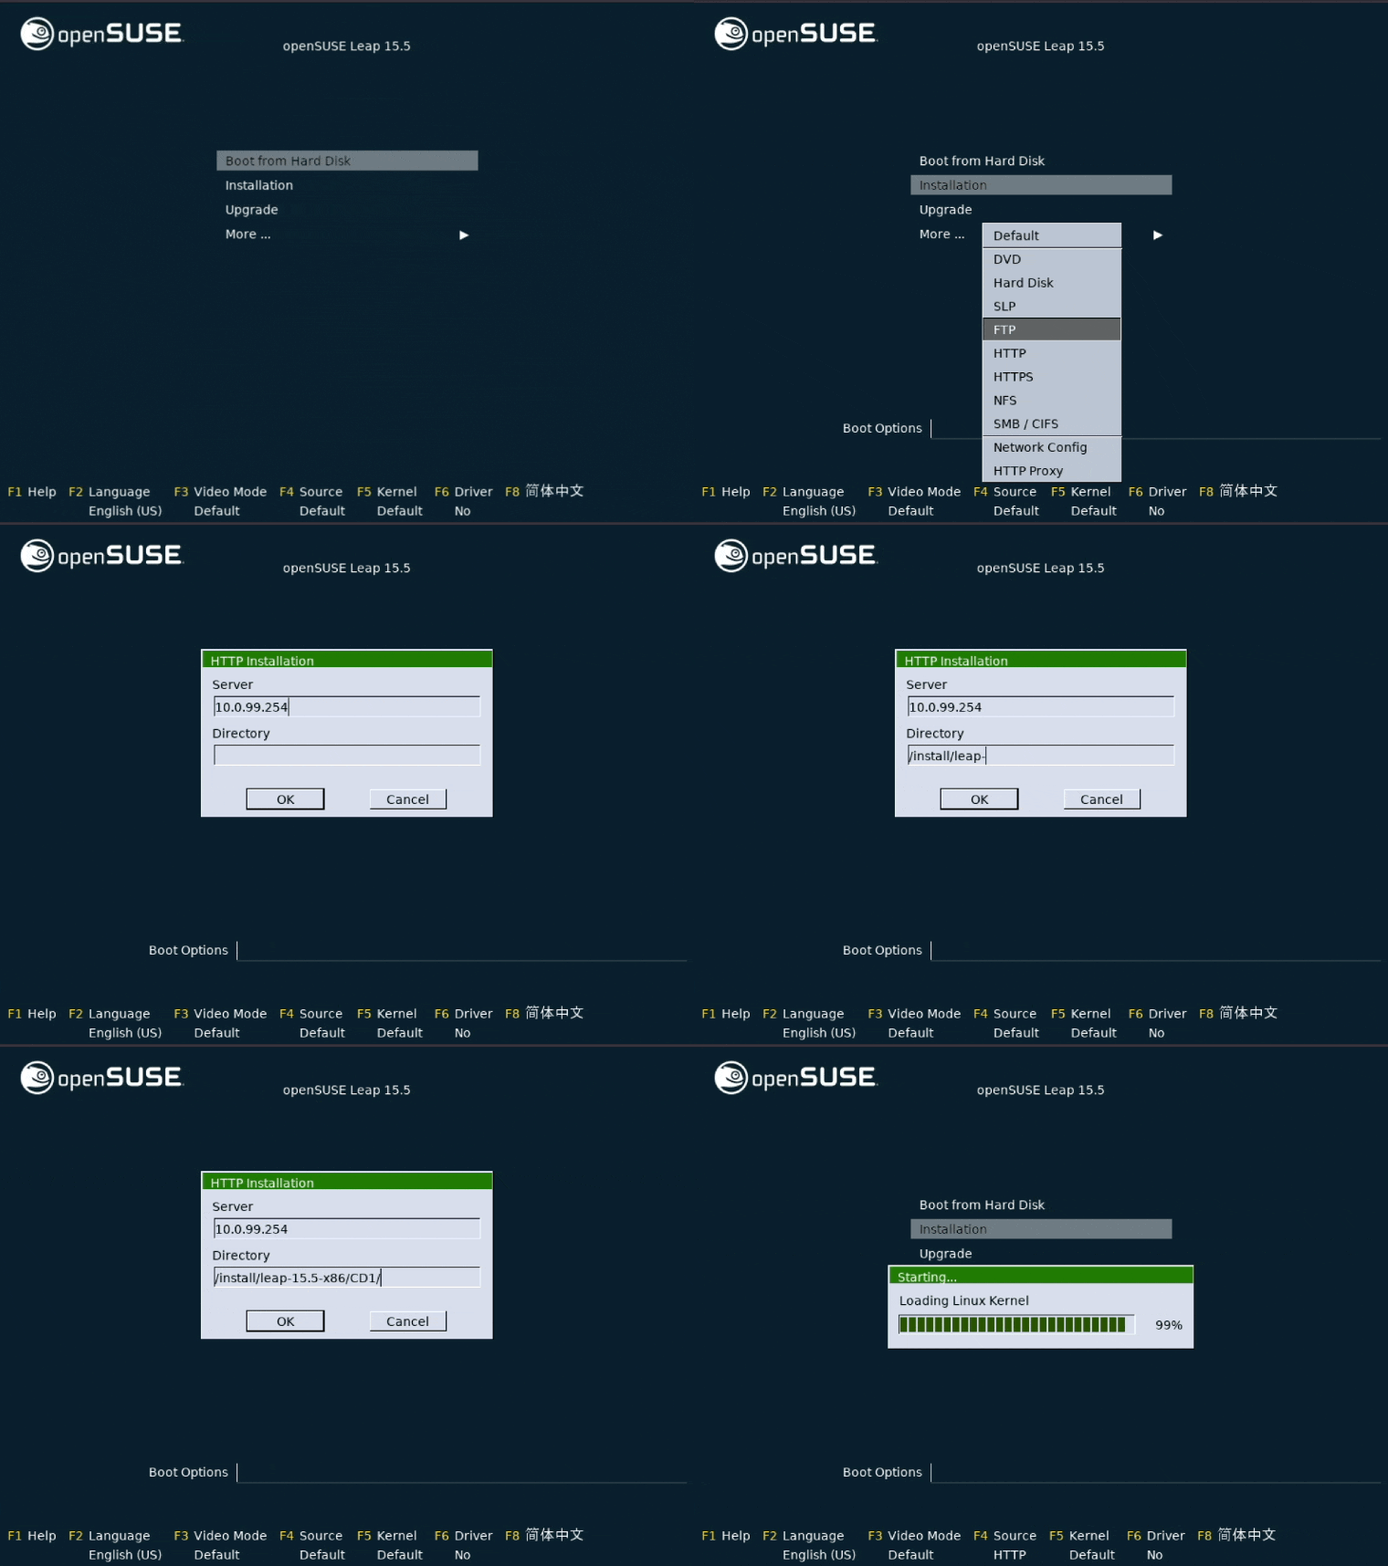
Conclusion
This blog post, the first of two, outlines the steps needed to setup an OpenSUSE Leap installation server.
If you are seeking a robust and reliable Linux distribution for your workloads, you should consider openSUSE.
As a CentOS alternative, openSUSE brings numerous benefits, including stability, SUSE’s support to the community, powerful system management tools, advanced distro features, and access to a rich package repository. The active openSUSE community and easy migration tools further enhance the transition process. If you are seeking a robust and reliable Linux distribution for your workloads, you should consider openSUSE.
Looking for further insights into what you can achieve by migrating to openSUSE?, check out other blogs in this series:
- From CentOS to openSUSE Leap: How to Feel at Home
- Step-by-Step Guide Installing openSUSE Leap on your virtualized environment
- 10 Reasons to Migrate from CentOS to openSUSE
Ready to experience the power and flexibility of openSUSE Leap?
Related Articles
Jun 14th, 2024
Ensuring Continued Support for CentOS 7 Beyond End of Life
Feb 16th, 2023

