CAPI, Fleet And GitOps: A New Way For Orchestrating Kubernetes Clusters With Rancher

Introduction
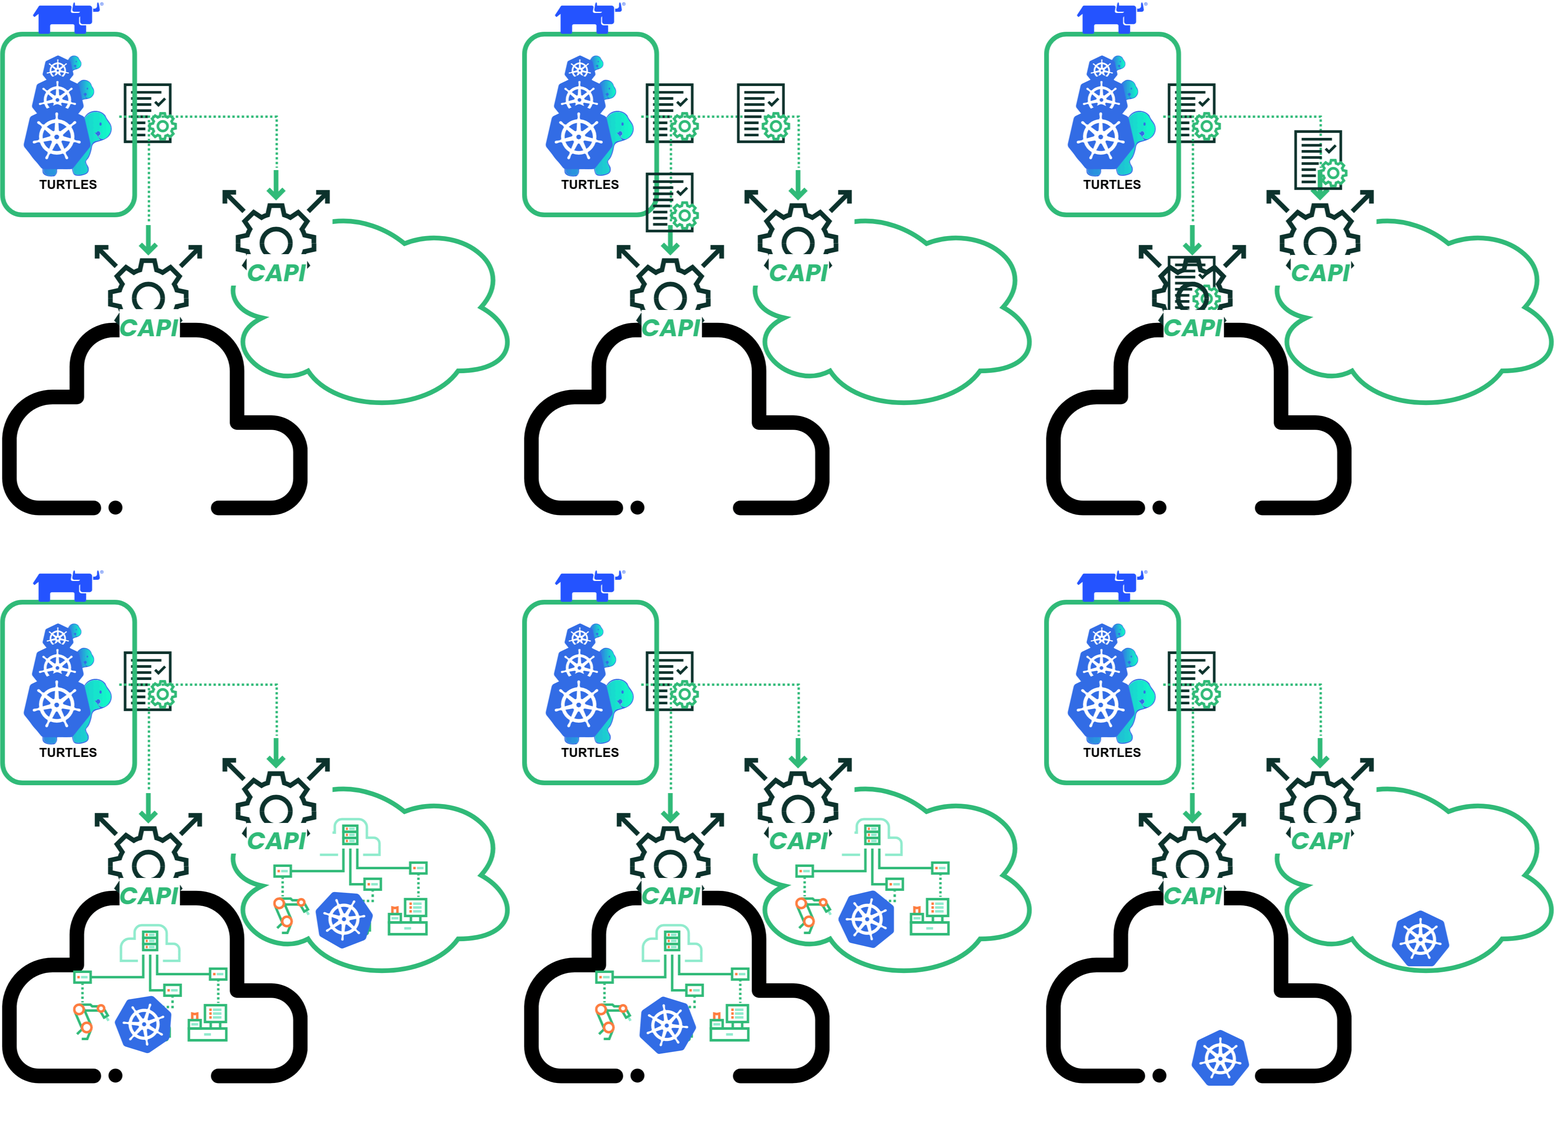
In this blogpost we will show how to use one of the new and interesting features Rancher 2.8 brings, Rancher Turtles, it will help you deploy clusters using Cluster API (CAPI).
It is an addition to the existing methods for deploying Kubernetes clusters using Rancher and it’s currently in early access technology state but expected to become fully supported in future versions.
Now with Rancher Turtles and the help of Fleet, Rancher’s GitOps tool, we can automate your clusters lifecycle on platforms that support CAPI in an easy manner.
When a provider supports CAPI, it means we can instruct them, using a common API, to provision and manage the resources we need for our cluster, without having to resort to use their platform-specific APIs. CAPI makes our job easier since we can have our Kubernetes clusters in a hybrid environment without too much customization and this allows us to easily switch providers if there is a need to do so.
What is CAPI?
CAPI stands for Cluster API and it is a “Kubernetes sub-project focused on providing declarative APIs and tooling to simplify provisioning, upgrading, and operating multiple Kubernetes clusters.” ( source: https://cluster-api.sigs.k8s.io/ ).
It is meant to help manage the lifecycle of Kubernetes clusters, independently if they are deployed on premises or in the cloud, making it platform agnostic, allowing you to define common cluster operations.
It is not meant to manage the lifecycle of the infrastructure underneath the clusters that is not required for Kubernetes to run, manage clusters spanning across different infrastructure providers or to configure cluster nodes other than at the creation or upgrade times.
For more information we recommend you to check The Cluster API Book ( specially the introduction and concepts part )
Setup Rancher Turtles (optional)
As mentioned in the introduction, Rancher Turtles is the technology that allows us to integrate with different CAPI providers, it doesn’t come by default with older versions of rancher but if you want to try it on an older cluster, this is how it can be done.
Requirements: Rancher 2.7 or higher
From the console, disable the embedded CAPI feature:
kubectl apply -f feature.yaml---
apiVersion: management.cattle.io/v3
kind: Feature
metadata:
name: embedded-cluster-api
spec:
value: false
...
kubectl delete mutatingwebhookconfiguration.admissionregistration.k8s.io mutating-webhook-configurationkubectl delete validatingwebjookconfigurations.admissionregistration.k8s.io validating-webhook-configuration
Add the Rancher Turtles repository
Now we switch to the management cluster, and add the Rancher Turtles application repository:
helm repo add turtles https://rancher-sandbox.github.io/rancher-turtles
Install Rancher Turtles
helm -n rancher-turtles-system install rancher-turtles --create-namespace --set cluster-api-operator.cert-manager.enabled=falsePlease note that Cert Manager is currently a requirement for Rancher Turtles. In this example we assume it’s installed, but, if you wish for the operator to install it automatically, please set cluster-api-operator.cert-manager.enabled=true (default option).
Install additional CAPI provider
kubectl apply -f capd-provider.yml---
apiVersion: v1
kind: Namespace
metadata:
name: capd-system
...
---
apiVersion: operator.cluster.x-k8s.io/v1alpha1
kind: InfrastructureProvider
metadata:
name: docker
namespace: capd-system
spec:
secretName: capi-env-variables
secretNamespace: capi-system
...
After this we are ready to provision a new cluster following GitOps principles.
Provisioning a new cluster following GitOps with Fleet!
We have talked about how CAPI makes it easy for you to deploy clusters in different platforms without having to learn new APIs and apply a lot of customization for each of them, now we are going to show you how we can use this CAPI definitions with Fleet to manage Kubernetes clusters following GitOps principles.
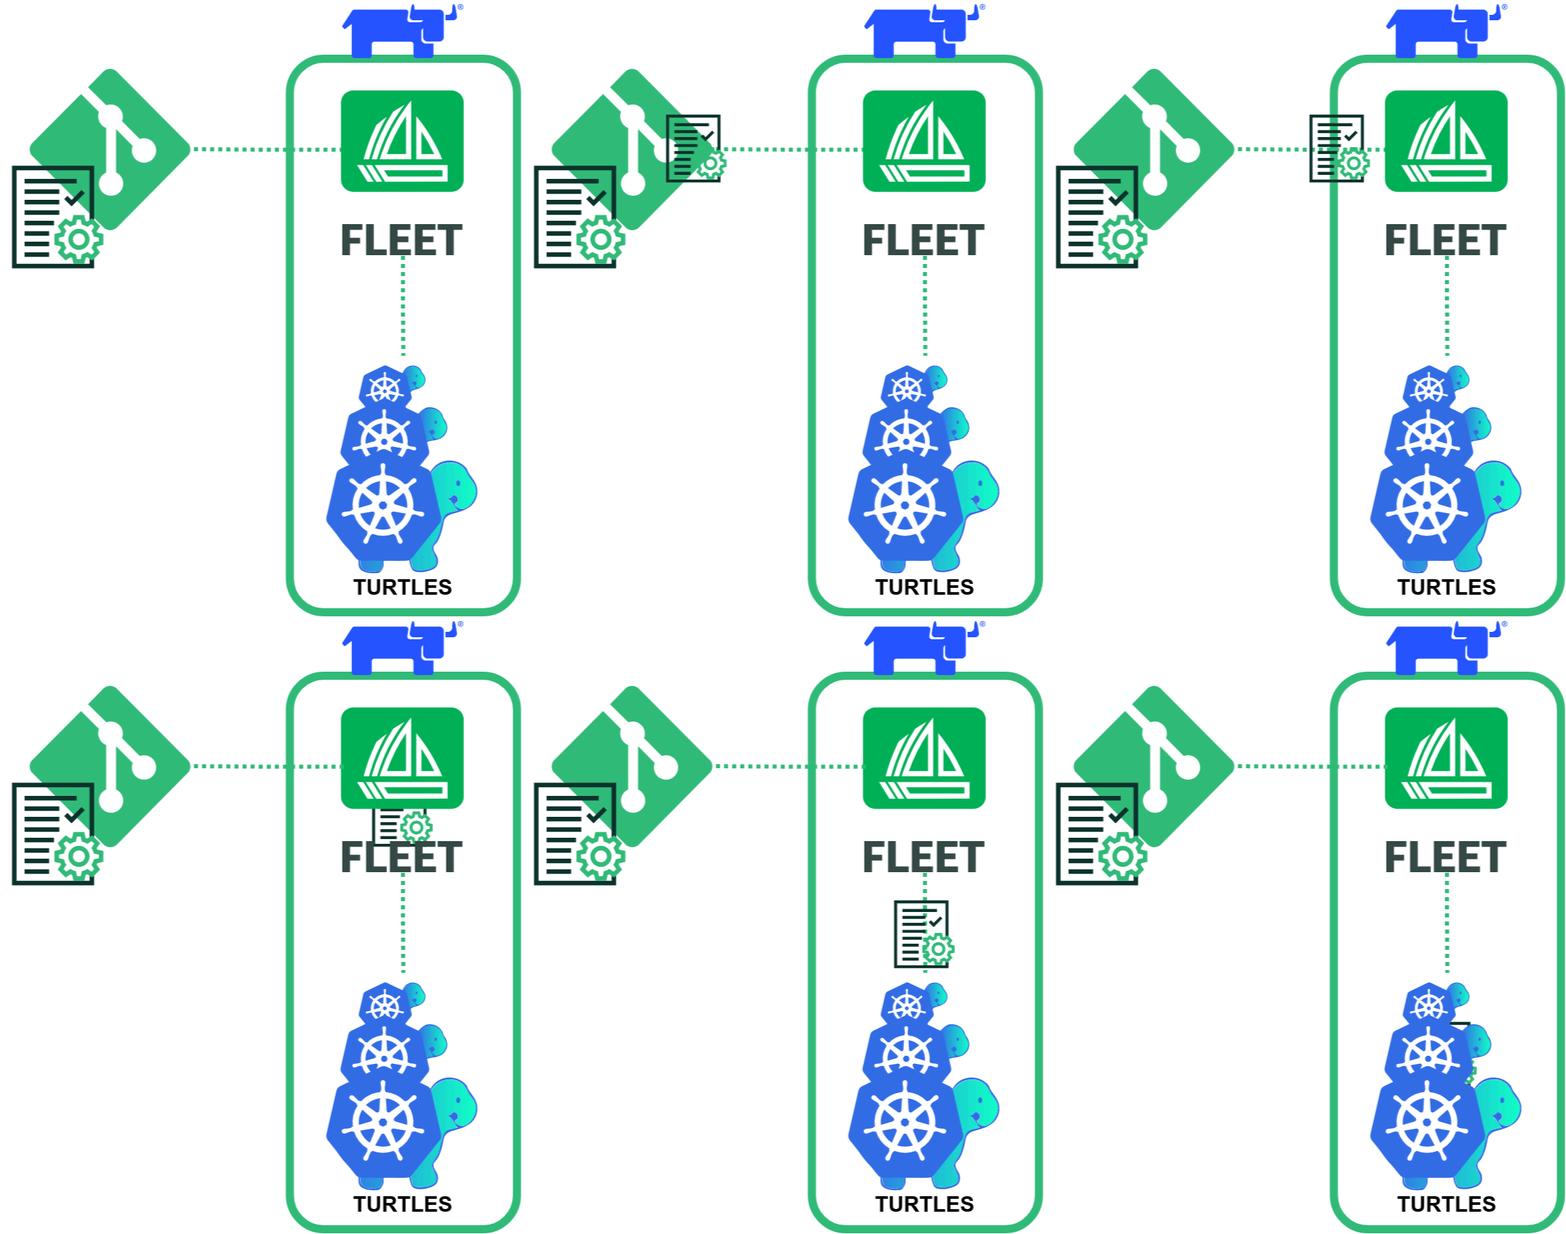
This will be the process:

Fleet will check those changes and when a CAPI cluster definition is found, Fleet will pass it on to Rancher Turtles.

Since we are talking about new features and Fleet, it is worth mentioning the new coming version of Fleet incorporates a particularly exciting feature:
With this we can now tell fleet that if a resource doesn’t match what has been defined in our GIT repository, it should overwrite it to leave it in the same state, we will create a new blog post about it with more details.
Configure Fleet
First, we will add our git repository to fleet, where we have the instructions.
Remember fleet by itself doesn’t deploy any cluster, it just triggers the process; the actual deployment is executed by the infrastructure provider.
kubectl apply -f myclusters-repo.yaml---
apiVersion: fleet.cattle.io/v1alpha1
kind: GitRepo
metadata:
name: clusters
namespace: fleet-local
spec:
repo:
https://github.com/rancher-sandbox/rancher-turtles-fleet-example.git
branch: main
paths:
- clusters
...
With this, when fleet detects a change in the repository “main” branch, on the path “/clusters”, it will apply the changes we have defined automatically.
Please note this is just an example, we can customize this repository definition to incorporate more complex conditions but the same concept remains.
So the process of adding clusters is streamlined; creating the cluster definition and approving the pull request should be the only steps required to have a new cluster ready.
Extra: Did you notice we are deploying on fleet-local namespace? If you are curious and want to know more please follow this link.
Configure rancher
Now we can go to rancher and indicate that we want to auto import all the clusters in the namespace where we load the CRDs.
To do so we will simply run the following command to enable rancher-auto-import feature
kubectl label namespace <mynamespace> cluster-api.cattle.io/rancher-auto-import=trueNotice in this example, the cluster definitions are introduced in the namespace “default”.
After a while we can see in Rancher “Cluster Management” section the new cluster has been imported and appears like any other cluster we are managing.
Explore the newly deployed cluster using CAPI
By clicking on the “Explore” button on the right side of the cluster we can manage it like with any other cluster in rancher.
If we copy the kubeconfig into our system and, for concenience, we run the following command to set it as the default to be used by kubectl and other tools:
export KUBECONFIG=<my-new-cluster-kubeconfig-file>Or specify it on the command line of our tool of choice.
We can start running commands to verify it works, for example:
kubectl get pods -A -w --insecure-skip-tls-verifyWhich should show us the pods running on the new cluster.
Conclusion
We have seen how easy it is to do GitOps with Rancher and Fleet by using CAPI and how this new feature opens new possibilities for automation and easy management of Kubernetes clusters.
We have seen how we can do this from the command line, but in the future Rancher will incorporate an UI extension to manage Turtles directly from the web UI, stay tuned!
For more information about Rancher Prime and how we can help your business to grow further and be more secure and agile with containers technology please visit our website.
If you want to learn more about Rancher, please feel free to download our free “Why rancher?” whitepaper, join one of our Rancher Rodeos or join Rancher Academy.
👉 For more information about SUSE products and services, please don’t hesitate to contact us.
Related Articles
Feb 27th, 2023
