Deploying SLURM using SLE HPC patterns
The expansion of High Performance Computing (HPC) beyond the niches of higher education and government realms to corporate and business computing use cases has been on the rise. One catalyst of this trend is increasing innovation in hardware platforms and software development. Both respectively drive down the cost of deploying supercomputing services with each iteration of advancement. Consider the commonality in science and business-based innovation spaces like Artificial Intelligence (AI) and machine learning. Access to affordable supercomputing services benefits higher education and business-based stakeholders alike. Thank you, Alexa?
Hardware overview
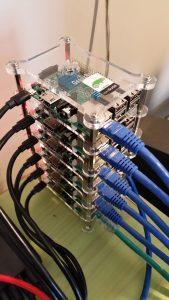
Making half of this point requires introduction to the hardware platform used for this example. Specifically, a collection of six ARMv8 CPU based Raspberry Pi 3 systems. Before scoffing at the example understand these Pis are really being used to demonstrate the latter, yet to be made point, of simplified HPC cluster software deployment. But, the hardware platform is still an important aspect.

Advanced RISC Machine (ARM) began working with Cray, a dominant force in the supercomputing space, in 2014. Initially collaborating with U.S. DoE and European Union based research projects interested in assessing the ARM CPU platform for scientific use. One motivator aside from the possibility of a lower cost hardware platform was the lessening of developer angst porting scientific software to ARM based systems. Most community authored scientific software does not fare well when ported to different hardware platforms (think x86 to GPU), but the move from x86 to ARMv8 is a far less troubled path. Often origin programming languages can be maintained, and existing code requires little change (and sometimes none).
Cray unveiled the first ARMv8 based supercomputer named “Isambard”, sporting 10,000 high performance cores, in 2017. . The debut comparison involved performance tests using common HPC code running on the most heavily utilised supercomputer in the U.K. at the University of Edinburgh, named “ARCHER”. The results demonstrated that the performance of the ARM based Isambard was comparable to the x86 Skylake processors used in ARCHER, but at a remarkably lower cost point.
Software overview
The Simple Linux Utility for Resource Management (SLURM), now known as the SLURM Workload Manager, is becoming the standard in many environments for HPC cluster use. SLURM is free to use, actively developed, and unifies some tasks previously distributed to discreet HPC software stacks.
- Cluster Manager: Organising management and compute nodes into clusters that distribute computational work.
- Job Scheduler: Computational work is submitted as jobs that utilise system resources such as CPU cores, memory, and time.
- Cluster Workload Manager: A service that manages access to resources, starts, executes, and monitors work, and manages a pending queue of work.
Software packages
SLURM makes use of several software packages to provide the described facilities.
On workload manager server(s)
- slurm: Provides the “slurmctld” service and is the SLURM central management daemon. It monitors all other SLURM daemons and resources, accepts work (jobs), and allocates resources to those jobs.
- slurm-slurmdbd: Provides the “slurmdbd” service and provides an enterprise-wide interface to a database for SLURM. The slurmdbd service uses a database to record job, user, and group accounting information. The daemon can do so for multiple clusters using a single database.
- mariadb: A MySQL compatible database that can be used for SLURM, locally or remotely.
- munge: A program that obfuscates credentials containing the UID and GID of calling processes. Returned credentials can be passed to another process which can validate them using the unmunge program. This allows an unrelated and potentially remote process to ascertain the identity of the calling process. Munge is used to encode all inter-daemon authentications amongst SLURM daemons.
Recommendations:
- Install multiple slurmctld instances for resiliency.
- Install the database used by slurmdbd on a very fast disk/partition (SSD is recommended) and a very fast network link if a remote server is used.
On compute node servers
- slurm-node: Provides the “slurmd” service and is the compute node daemon for SLURM. It monitors all tasks running on the compute node, accepts work (tasks), launches tasks, and kills running tasks upon request.
- munge: A program that obfuscates credentials containing the UID and GID of calling processes. Returned credentials can be passed to another process which can validate them using the unmunge program. This allows an unrelated and potentially remote process to ascertain the identity of the calling process. Munge is used to encode all inter-daemon authentications amongst SLURM daemons.
Recommendations:
- Install and configure the slurm-pam_slurm package to prevent users from logging into compute nodes not assigned to them, or where they do not have active jobs running.
Deployment
Identify the systems that will serve as workload manager hosts, database hosts, and compute nodes and install the minimal operating system components required. This example uses the openSUSE Leap 15 distribution. Because Leap 15 is based on the same code base as SLES 15, it is hoped this tutorial can be used interchangeably between them.
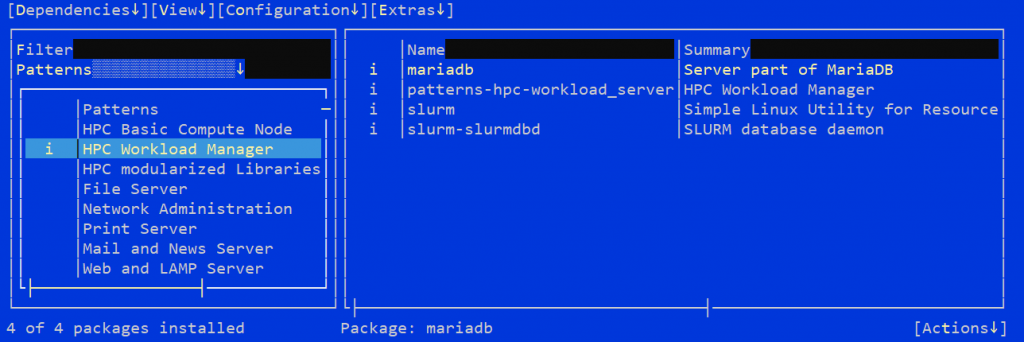
Fortunately, installing the packages required by the workload manager and compute node systems can be performed using existing installation patterns. Specifically, using the “HPC Workload Manager” and “HPC Basic Compute Node” patterns.

YaST HPC installation patterns
Note: The mariadb and slurm-pam_slurm packages are optional installations that can be selected when their respective patterns are selected.
Configuration
Following the software installations, some base configuration should be completed before implementing the SLURM control, database, or compute node daemons.
Workload manager and compute node systems
- NTP services must be configured across all systems ensuring all are participate in the same time service and time zones.
- DNS services are configured, and all cluster systems can resolve each other.
- SLURM users and groups in the /etc/passwd and /etc/group files should have the same UID and GID values across systems. Adjust ownership of file system components if necessary.
- /etc/slurm
- /run/slurm
- /var/spool/slurm
- /var/log/slurm
- Munge users and groups in the /etc/passwd and /etc/group files should have the same UID and GID values across systems. Adjust ownership of file system components if necessary.
- /etc/munge
- /run/munge
- /var/lib/munge
- /var/log/munge
- The same munge secret key must be used across all systems.
By default, the munge secret key resides in /etc/munge/munge.key.
The munge.key file is created using /dev/urandom at installation time via the command:
~# dd if=/dev/urandom bs=1 count=1024
Subsequently it will differ from host to host. One option to ensure consistency across hosts is pick one from any host and copy it to all other hosts.
You can also create a new, arguably more secure, secret key using the following method:
~# dd if=/dev/random bs=1 count=1024 >/etc/munge/munge.key
The following tasks verify that the munge software has been properly configured.
Generate a credential package for the current user on stdout:
~# munge -n
Check if a credential package for the current user can be locally decoded:
~# munge -n | unmunge
Check if a credential package for the current user can be remotely decoded:
~# munge -n | ssh <somehost> unmunge
Workload manager and database systems
- Open any required ports for the local firewall(s) as determined by daemon placement.
slurmctld port: 6817
slurmdbd port: 6819
scheduler port: 7321
mariadb port: 3306
Compute nodes must be able to communicate with the hosts running slurmctld.
For example, if the slurmctld, slurmdbd, and database are running on the same host:
~# firewall-cmd –permanent –zone=<cluster_network_zone> –add-port=6817/tcp
~# firewall-cmd –permanent –zone=<cluster_network_zone> –add-port=7321/tcp
~# firewall-cmd –reload
- Configure the default database used by SLURM, “slurm_acct_db”, and the database user and password.
Assuming the local database was not configured during the pattern-based installation, use the following commands to configure the “slurm_acct_db” database and “slurmdb user” post installation.
Ensure the database is running.
~# systemctl start mariadb
~# mysql_secure_installation
~# mysql -u root -p
Provide the root password.
At the “MariaDB [(none)]>” prompt, issue the following commands:
Create the database access user and set the user password.
~# create user ‘slurmdb’@’localhost’ identified by ‘<user_password>’;
Grant rights for the user to the target database.
~# grant all on slurm_acct_db.* TO ‘slurmdb’@’localhost’;
Note: Modify ‘localhost’ with an actual FQDN if required.
Create the SLURM database.
~# create database slurm_acct_db;
Validate the user and database exist.
~# SELECT User,Host FROM mysql.user;
~# SHOW DATABASES;
~# exit
Ensure the database is enabled at system startup.
~# systemctl enable mariadb
- Configure the database for real world use.
The default buffer size, log size, and lock wait time outs for the database should be adjusted before slurmdbd is started for the first time. Doing so prevents potential issues with database table and schema updates, and record purging operations.
Consider setting the buffer and log sizes equal in size to 50% or 75% of the host system memory and doubling the default time out settings.
Modify the settings in the /etc/my.cnf.d/innodb.cnf file:
[mysqld]
innodb_buffer_pool_size=256M
innodb_log_file_size=256M
innodb_lock_wait_timeout=1800
Note: The default buffer size is 128M.
To implement this change you must shut down the database and move/remove the log files:
~# systemctl stop mariadb
~# rm /var/lib/mysql/ib_logfile?
~# systemctl start mariadb
Verify the new buffer setting using the following command in the MariaDB shell:
~# SHOW VARIABLES LIKE ‘innodb_buffer_pool_size’;
- Configure the slurmdbd.conf file.
Ensure the /etc/slurm/slurmdbd.conf file contains the following directives with valid values:
AuthType=auth/munge
DbdHost=localhost
SlurmUser=slurm
LogFile=/var/log/slurm/slurmdbd.log
PidFile=/run/slurm/slurmdbd.pid
PluginDir=/usr/lib64/slurm
StorageType=accounting_storage/mysql
StorageHost=localhost
StoragePass=<user_password>
StorageUser=slurmdb
StorageLoc=slurm_acct_db
Consider adding directives and values to enforce life-cycles across job related database records:
PurgeEventAfter=12months
PurgeJobAfter=12months
PurgeResvAfter=2months
PurgeStepAfter=2months
PurgeSuspendAfter=1month
PurgeTXNAfter=12months
PurgeUsageAfter=12months
- Configure the slurm.conf file.
The /etc/slurm/slurm.conf file is used by the slurmctld and slurmd daemons. There are configuration file forms available online at slurm.schedmd.com site for the latest SLURM version to assist you in generating a slurm.conf file. Additionally, if the workload manager server also provides a web server the “/usr/share/doc/slurm-<version>/html” directory can be served locally to provide the SLURM documentation and configuration forms specific to the SLURM version installed.
For a feature complete configuration file:
https://slurm.schedmd.com/configurator.html
For a feature minimal configuration file:
https://slurm.schedmd.com/configurator.easy.html
Using the configurator.easy.html form, the following initial slurm.conf file was created:
ControlMachine=darkvixen102
AuthType=auth/munge
MpiDefault=none
ProctrackType=proctrack/cgroup
ReturnToService=1
SlurmUser=slurm
SwitchType=switch/none
TaskPlugin=task/none
SlurmctldPidFile=/run/slurm/slurmctld.pid
SlurmdPidFile=/run/slurm/slurmd.pid
SlurmdSpoolDir=/var/spool/slurm
StateSaveLocation=/var/spool/slurm
FastSchedule=1
SchedulerType=sched/backfill
SelectType=select/cons_res
SelectTypeParameters=CR_CPU_Memory
JobAcctGatherFrequency=30
SlurmctldLogFile=/var/log/slurm/slurmctld.log
SlurmdLogFile=/var/log/slurm/slurmd.log
NodeName=node[1-4] CPUs=4 RealMemory=950 Sockets=1 CoresPerSocket=4 ThreadsPerCore=1 State=UNKNOWN
PartitionName=normal_q Nodes=node[1-4] Default=YES MaxTime=480 State=UP
Add the following directives and values to the slurm.conf file to complete the database configuration and name the cluster. The cluster name will also be added to the database when all services are running.
ClusterName=hangar_hpc
AccountingStorageType=accounting_storage/slurmdbd
AccountingStorageHost=localhost
JobAcctGatherType=jobacct_gather/linux
Copy the completed /etc/slurm/slurm.conf file to all compute nodes.
Note: The “scontrol” utility is used to view and modify the running SLURM configuration and state across a cluster. Most changes in modified slurm.conf files distributed to cluster nodes can be implemented using the scontrol utility. Using the “reconfigure” argument the utility can force all daemons to re-read updated configuration files and modify runtime settings without requiring daemon restarts. Some configuration file changes, such as authentication, system roles, or ports, will require all daemons to be restarted.
Issue the following command on a system running slurmctld to reconfigure a cluster:
~# scontrol reconfigure
- Modify service systemd configuration files to honour daemon dependencies.
SLURM requires munge to be running before any SLURM daemon loads, the database to be up before slurmdbd loads, and slurmctld requires slurmdbd to be running before it loads. Modify the systemd service files for SLURM daemons to ensure these dependencies are met.
Locally customized systemd files must be placed in the /etc/systemd/system directory.
~# cp /usr/lib/systemd/system/slurmctld.service /usr/lib/systemd/system/slurmdbd.service /etc/systemd/system/
Add the prerequisite “After= services” to the file /etc/systemd/system/slurmdbd.service:
[Unit]
Description=Slurm DBD accounting daemon
After=network.target mariadb.service munge.service
ConditionPathExists=/etc/slurm/slurm.conf
…
Add the prerequisite “After= services” to the file /etc/systemd/system/slurmctld.service:
[Unit]
Description=Slurm controller daemon
After=network.target slurmdbd.service munge.service
ConditionPathExists=/etc/slurm/slurm.conf
…
- Enable the slurmdbd and slurmctld daemons to load at system start up, and then start them.
~# systemctl enable slurmdbd
~# systemctl enable slurmctld
~# systemctl start slurmdbd
~# systemctl start slurmctld
- Name the cluster within the SLURM account database.
Use the SLURM account information utility to write to, and read from the database.
~# sacctmgr add cluster hangar_hpc
~# sacctmgr list cluster
~# sacctmgr list configuration
~# sacctmgr list stats
Compute node systems
SLURM compute nodes are assigned to a job queue, in SLURM parlance called a partition, enabling them to receive work. Compute nodes ideally belong to partitions that align hardware with the type of compute work to be performed. The software required by a compute job can also dictate which partition in the cluster should be used for work.
Basic compute node deployment from a SLURM perspective is a straight forward task. Once the OS (a minimal pattern is again recommended) and the “HPC Basic Compute Node” pattern is deployed it becomes a matter of completing the following tasks.
- Open any required ports for the local firewall(s) as determined by daemon placement.
slurmd port: 6818
Note: It is recommended that local firewalls not be implemented on compute nodes. Compute nodes should rely on the host infrastructure to provide the security required.
- Distribute the cluster specific /etc/munge/munge.key file to the node.
- Distribute the cluster specific /etc/slurm/slurm.conf file to the node.
Note: The slurm.conf file specifies the partition compute nodes belongs to.
- Modify service systemd configuration files to honour daemon dependencies.
Again, SLURM requires munge to be running before any daemon loads. Specifically, munge needs to be running before slurmd loads. Modify the systemd service files for SLURM daemons to ensure these dependencies are met.
Locally customized systemd files must be placed in the /etc/systemd/system directory.
~# cp /usr/lib/systemd/system/slurmd.service /etc/systemd/system/
Add the prerequisite “After= services” to the file /etc/systemd/system/slurmd.service:
[Unit]
Description=Slurm node daemon
After=network.target munge.service
ConditionPathExists=/etc/slurm/slurm.conf
…
- Enable the slurmd daemon to load at system start up, and then start it.
~# systemctl enable slurmd
~# systemctl start slurmd
Taking the new cluster for a walk
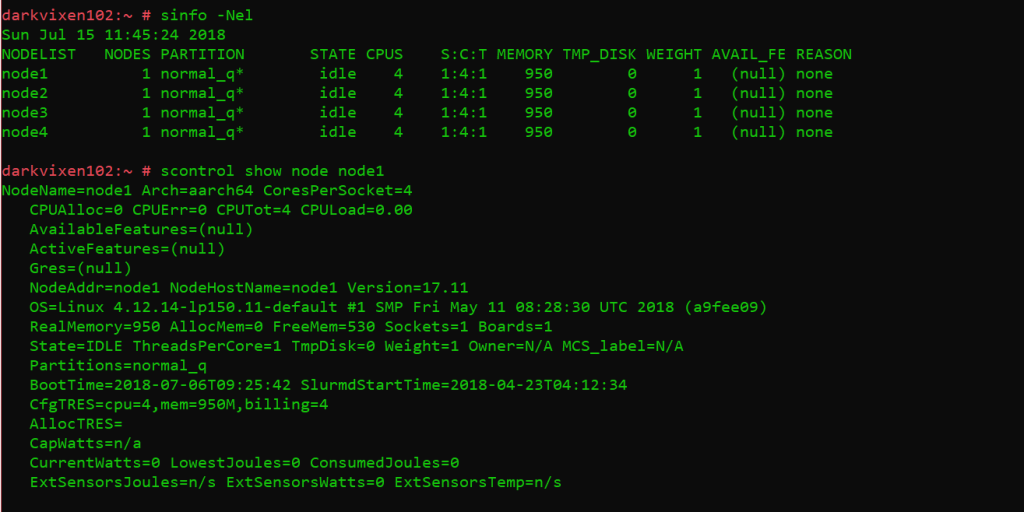
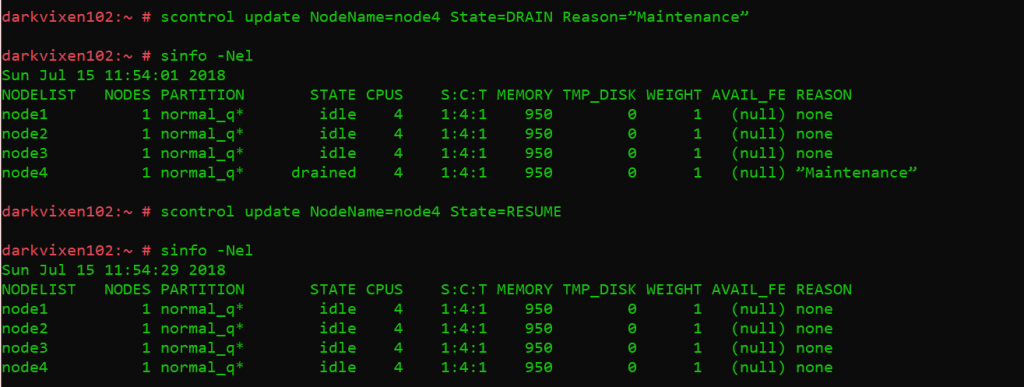
A basic assessment of the state of the cluster is now possible because all daemons are configured and running. The “sinfo” utility is used to view information about SLURM nodes and partitions, and again the “scontrol” command is used to view and modify the SLURM configuration and state across a cluster.
The following commands are issued from the management node running slurmctld:

Assessing node states and information.

Assessing partition states and information.

Assessing cluster configuration information.

Changing compute node states.
Summary
What is detailed here could easily be applied to other open source distributions of both Linux and SLURM. It should also be said that this example is not intended to over simplify what represents a proper production HPC cluster. Without even mentioning data and workflow design considerations, many standard HPC cluster system roles are not discussed. The short list would include high performance parallel file systems used for compute work operating over high speed interconnects, high capacity storage used as longer-term storage for completed compute work, applications (delivered traditionally or using containers), job submission nodes, and data transfer nodes, also using high speed interconnects. Hopefully this example serves as a basic SLURM tutorial, and demonstrates how the SLE 15 based openSUSE distribution unifies software components into an easily deployable HPC cluster stack that will scale and run against existing x86 and emerging ARM based hardware platforms.
Related Articles
Jun 02nd, 2022
OpenCost – open source Kubernetes cost monitoring
Feb 17th, 2023
SUSE Linux Enterprise Micro 5.4 Public Beta (Beta 2) is out!
Dec 12th, 2023
Intel® TDX Support Coming to SUSE Linux Enterprise Server
Jul 04th, 2022
Comments
Thanks for the post, it helped me to put the cluster of my organization to work, now with slurm.
Leopoldo,
Thank you! Happy to have helped.
— lawrence