























September 25th, 2026
This document is to basically provide a guide for people who wants to install HANA on SLES for SAP to test out solutions like Trento and HANA monitoring in SUSE Manager.
While working with MSP, they look for similar solutions in our documentation. From a production view we should ask them to follow SAP guidelines, however this document provides a starting point to understand the overall solution for educational and testing purposes.
In this blog we will see step by step implementation process of a 2-Node HANA DB with site replication along with SUSE High availability solutions.
Please Note:
SAP HANA SPS07 rev.073 is known to have issues. It should not be used, better to use rev.078 at least (even if you disable encryption).
SAPHanaSR is deprecated. For new installations, SAPHanaSR-angi should be used.
Reference Official Documents:
https://documentation.suse.com/sbp/sap-15/html/SLES4SAP-hana-angi-perfopt-15/index.html
System Landscape:
- Node 1:
IP: 192.168.211.42
Hostname: hana-n1 - Node 2:
IP: 192.168.211.43
Hostname: hana-n2 - HAWK Console VIP: 192.168.211.45
- Iscsi/NFS Server: 192.168.211.41
- HANA SID: HA1
- HANA Instance: 10
- Site 1: WDF
- Site 2: ROT
Pre-Requisites:
- Optional: M
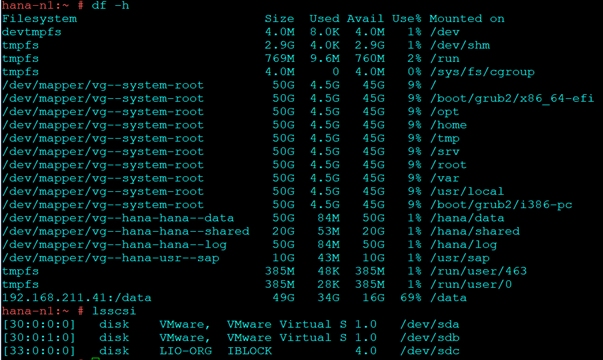
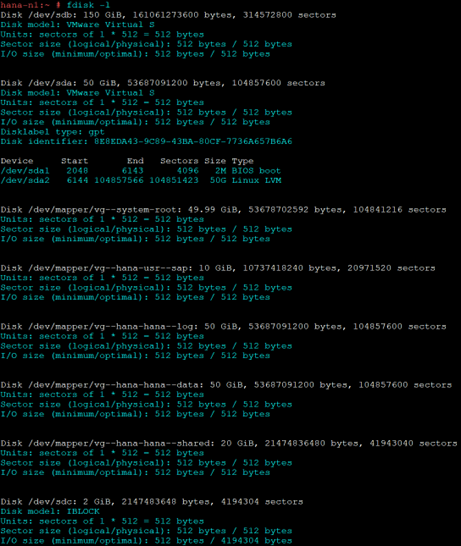
- Required Local Partitions: (The size mentioned here are for testing purpose and actual production deployment sizes may vary)
- /hana/data – 50 G
- /hana/shared – 20 G
- /hana/log – 50 G
- /usr/sap – 10 G
- Optional: NFS Partition /data
- iSCSI partition for SBD: 1 GB
SAP Installation
Download the files for SAP download center and place them on both servers.
I have used a /data NFS partition mounted on both servers.
Start the Installation
Node 1:
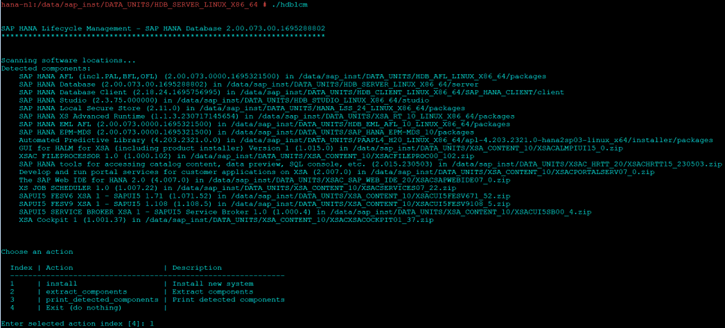
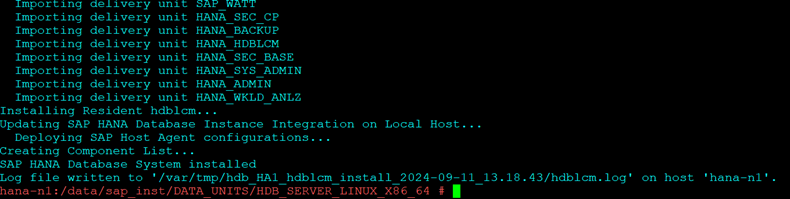
Navigate to HDB_SERVER_LINUX_X86_64 directory and execute hdblcm binary to start the installation
cd sap_inst/DATA_UNITS/HDB_SERVER_LINUX_X86_64
./hdblcm
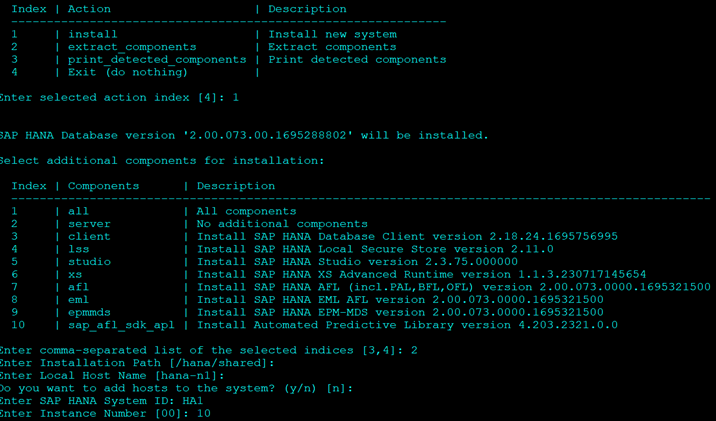
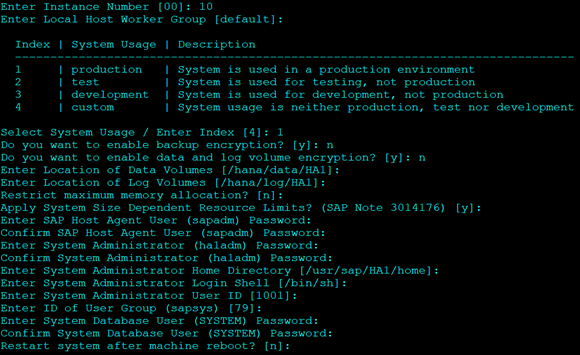
- Select Option 1 to start install
- Select 2 for Components
- Keep Defaults where ever mentioned
- For System Usage Select Production. Option 1.
- It will not affect the resource consumption, so you can select any.
- Select No for Encryption
- Enter Passwords as required.
- For DB Password it should have 1 upper case.
- Post the reboot option it will give you a summary as below
Node 2:
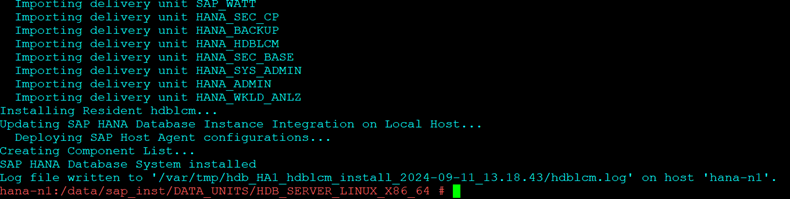
Once installation is finished repeat the same steps on Node 2 with same SID and Instance Number as on Node 1
Reference: Follow the official documentation starting from Point No.7
On Node 1: Login with ha1adm user and Backup the Database:
su - ha1adm
hdbsql -i 10 -u SYSTEM -d SYSTEMDB "BACKUP DATA FOR FULL SYSTEM USING FILE ('backup')"
Enable the Primary Node “node 1”:
hdbnsutil -sr_enable --name=WDF
Check SR on Node 1
hdbnsutil -sr_stateConfiguration --sapcontrol=1
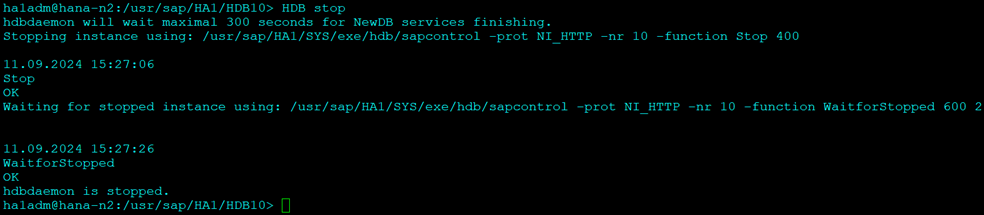
On the Second Node stop the Hana DB:
HDB stop
Copy the KEY and KEY-DATA file from the primary to the secondary site:
On Node2:
cd /usr/sap/HA1/SYS/global/security/rsecssfs/
scp 192.168.211.42:/usr/sap/HA1/SYS/global/security/rsecssfs/data/SSFS_HA1.DAT data/
scp 192.168.211.42:/usr/sap/HA1/SYS/global/security/rsecssfs/key/SSFS_HA1.KEY key/
Now Register the second Node:
hdbnsutil -sr_register --name=ROT --remoteHost=hana-n1 --remoteInstance=10 --replicationMode=sync --operationMode=logreplay
Start Secondary and Check SR Configuration
HDB start
Check Replication Status
hdbnsutil -sr_stateConfiguration --sapcontrol=1
Note that the mode is “SYNC”
Further details on replication can be found using the script hdbsettings:
HDBSettings.sh systemReplicationStatus.py --sapcontrol=1
Follow the below step in Both Nodes.
Edit the global.ini file and enter the below parameters
vim /hana/shared/HA1/global/hdb/custom/config/global.in

[ha_dr_provider_saphanasr]
provider = SAPHanaSR
path = /usr/share/SAPHanaSR/
execution_order = 1

[trace]
ha_dr_saphanasr = info

[ha_dr_provider_sustkover]
provider = susTkOver
path = /usr/share/SAPHanaSR/
execution_order = 2

[trace]
ha_dr_sustkover = info

[ha_dr_provider_suschksrv]
provider = susChkSrv
path = /usr/share/SAPHanaSR/
execution_order = 3
action_on_lost=stop

[trace]
ha_dr_suschksrv = info
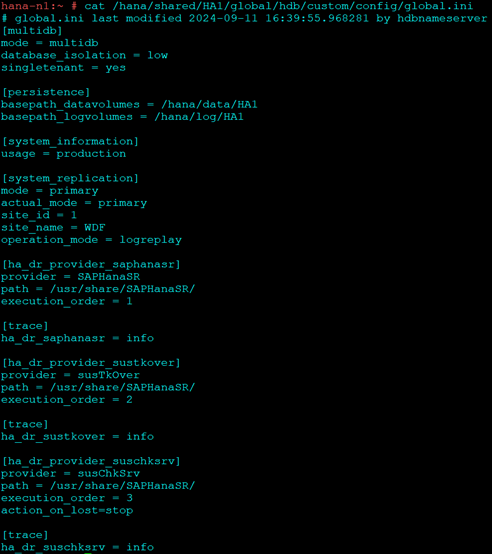
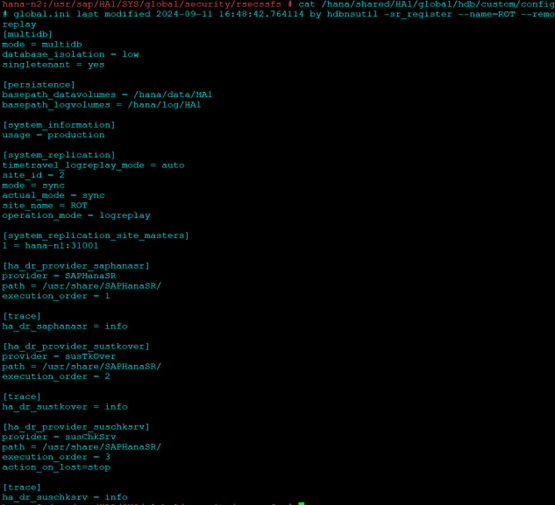
Also make sure the [system_replication] section has the operation mode parameter defined as logreplay
[system_replication]
mode = primary
actual_mode = primary
site_id = 1
site_name = WDF
operation_mode = logreplay
The file should look like this:
On Node1:
On Node 2:
Configure ha1adm user access to cluster on both nodes:
Create a new file SAPHanaSR in suders.d and add the below content:
vim /etc/sudoers.d/SAPHanaSR
# SAPHanaSR-ScaleUp entries for writing srHook cluster attribute and SAPHanaSR-hookHelper
ha1adm ALL=(ALL) NOPASSWD: /usr/sbin/crm_attribute -n hana_ha1_site_srHook_*
ha1adm ALL=(ALL) NOPASSWD: /usr/sbin/SAPHanaSR-hookHelper *
Check the newly configured hooks
Start HANA in both server using below command:
HDB start
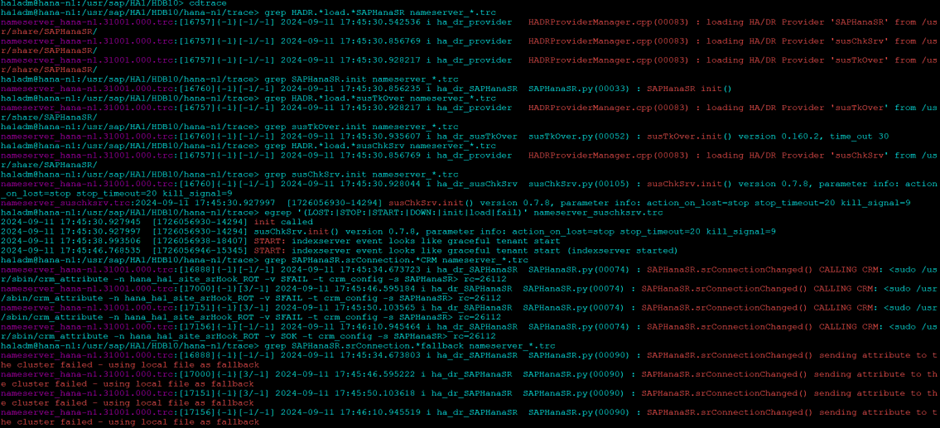
Once started check the hooks are loaded properly using cdtrace
cdtrace
grep HADR.*load.*SAPHanaSR nameserver_*.trc
grep SAPHanaSR.init nameserver_*.trc
grep HADR.*load.*susTkOver nameserver_*.trc
grep susTkOver.init nameserver_*.trc
grep HADR.*load.*susChkSrv nameserver_*.trc
grep susChkSrv.init nameserver_*.trc
egrep '(LOST:|STOP:|START:|DOWN:|init|load|fail)' nameserver_suschksrv.trc
grep SAPHanaSR.srConnection.*CRM nameserver_*.trc
grep SAPHanaSR.srConnection.*fallback nameserver_*.trc
Check Replication:
SAPHanaSR-showATTR
If you choose to configure multipath continue with below steps or else jump straight to HA installation point post making entry of disk ID in the above config
Refer the official guide for help :
You should be able to see the device in
fdisk -l
Next install multipath if not already installed
zypper install multipath*
Start and enable multipathd.service.
systemctl enable multipathd.service
systemctl start multipathd.service
Start and enable chronyd.service.
systemctl enable chronyd.service
systemctl start chronyd.service
Generate the multipath configuration file using the command
multipath -T >/etc/multipath.conf
This command should automatically configure multipath for the sbd device, however alias won’t be added.
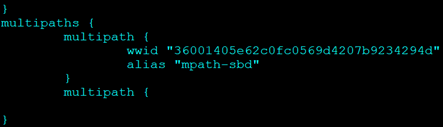
Reload multipath:
service multipathd reload
New device should be available in
fdisk -l

This is the device we will use in HA configuration.
Repeat the steps on Node 2
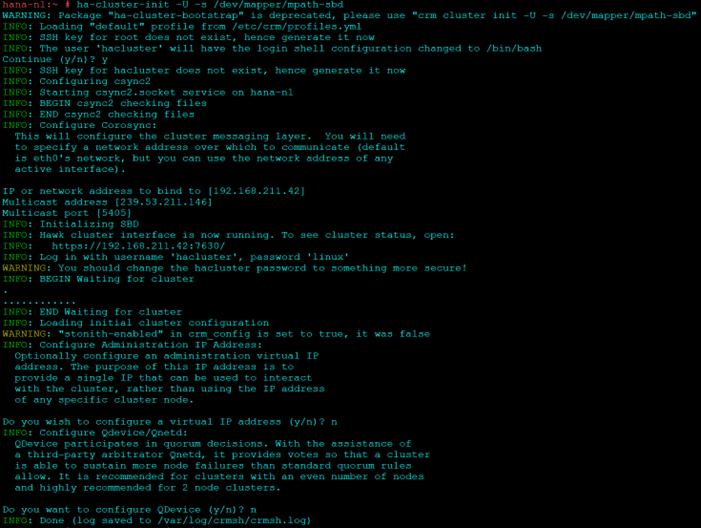
Initiate HA installation on Node1
ha-cluster-init -U -s /dev/mapper/mpath-sbd
Answer “No” for VIP and QDevice.
Some commands to check if SBD has been configured correctly:
egrep -v "(^#|^$)" /etc/sysconfig/sbd
sbd -d /dev/mapper/mpath-sbd dump
sbd -d /dev/mapper/mpath-sbd list
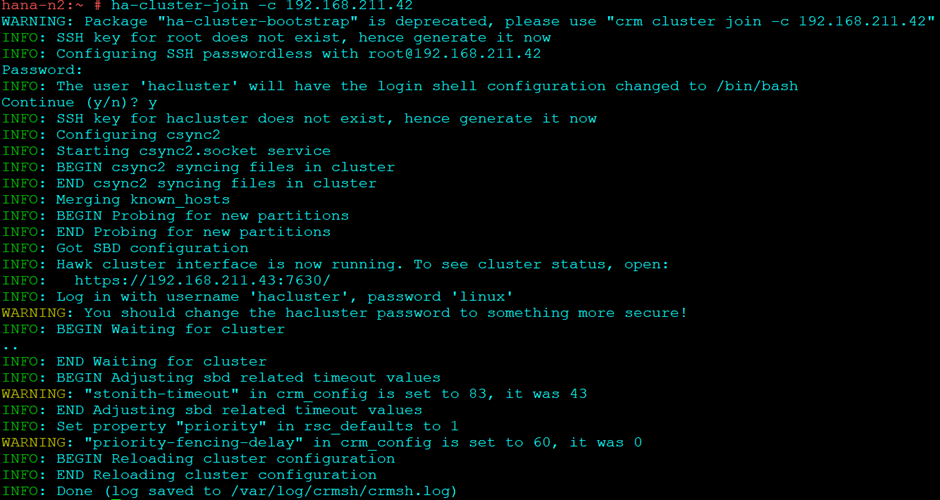
On second Node to join this cluster:
ha-cluster-join -c 192.168.211.42
To check the cluster: (On both nodes):
systemctl status pacemaker
systemctl status sbd
crm cluster start
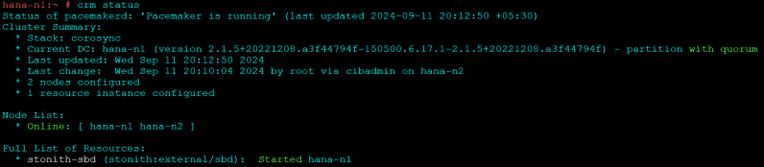
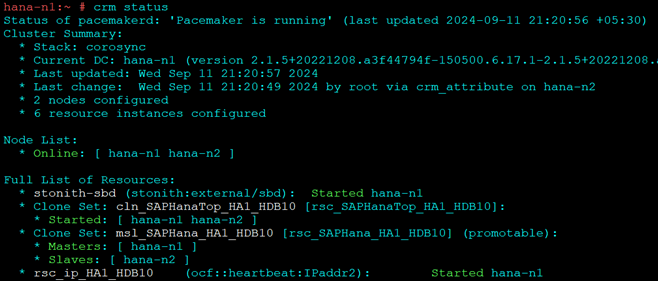
crm status
The Below steps are to be done only on one of the nodes, typically the master node or node 1.
Now that the initial cluster is setup lets configure SAP HANA multistate using separate configuration files and loading it into cluster.
The syntax would be as below:
vi crm-fileXX
crm configure load update crm-fileXX
Cluster bootstrap
vi crm-bs.txt
###
# enter the following to crm-bs.txt
property cib-bootstrap-options: \
stonith-enabled="true" \
stonith-action="reboot" \
stonith-timeout="150" \
priority-fencing-delay="30"
rsc_defaults rsc-options: \
resource-stickiness="1000" \
migration-threshold="5000"
op_defaults op-options: \
timeout="600" \
record-pending=true
Load config to cluster:
crm configure load update crm-bs.txt
STONITH device
vi crm-sbd.txt
###
# enter the following to crm-sbd.txt
primitive stonith-sbd stonith:external/sbd \
params pcmk_delay_max="15"
Load config to cluster:
crm configure load update crm-sbd.txt
SAPHanaTopology
vi crm-saphanatop.txt
###
# enter the following to crm-saphanatop.txt
primitive rsc_SAPHanaTop_HA1_HDB10 ocf:suse:SAPHanaTopology \
op monitor interval="10" timeout="600" \
op start interval="0" timeout="600" \
op stop interval="0" timeout="300" \
params SID="HA1" InstanceNumber="10"
clone cln_SAPHanaTop_HA1_HDB10 rsc_SAPHanaTop_HA1_HDB10 \
meta clone-node-max="1" interleave="true"
Load config to cluster:
crm configure load update crm-saphanatop.txt
SAPHana
vi crm-saphana.txt
# enter the following to crm-saphana.txt
primitive rsc_SAPHana_HA1_HDB10 ocf:suse:SAPHana \
op start interval="0" timeout="3600" \
op stop interval="0" timeout="3600" \
op promote interval="0" timeout="3600" \
op monitor interval="60" role="Master" timeout="700" \
op monitor interval="61" role="Slave" timeout="700" \
params SID="HA1" InstanceNumber="10" PREFER_SITE_TAKEOVER="true" \
DUPLICATE_PRIMARY_TIMEOUT="7200" AUTOMATED_REGISTER="false" \
meta priority="100"
ms msl_SAPHana_HA1_HDB10 rsc_SAPHana_HA1_HDB10 \
meta clone-max="2" clone-node-max="1" interleave="true" maintenance=true
Load config to cluster:
crm configure load update crm-saphana.txt
Virtual IP address
# vi crm-vip.txt
# enter the following to crm-vip.txt
primitive rsc_ip_HA1_HDB10 ocf:heartbeat:IPaddr2 \
op monitor interval="10s" timeout="20s" \
params ip="192.168.211.45"
Load config to cluster:
crm configure load update crm-vip.txt
Constraints for SAPHanaSR
#vim crm-cs.txt
# enter the following to crm-cs.txt
colocation col_saphana_ip_HA1_HDB10 2000: rsc_ip_HA1_HDB10:Started \
msl_SAPHana_HA1_HDB10:Master
order ord_SAPHana_HA1_HDB10 Optional: cln_SAPHanaTop_HA1_HDB10 \
msl_SAPHana_HA1_HDB10
Load config to cluster:
crm configure load update crm-cs.txt
Activating multi-state resource for cluster operation
crm resource refresh msl_SAPHana_HA1_HDB10
crm resource maintenance msl_SAPHana_HA1_HDB10 off
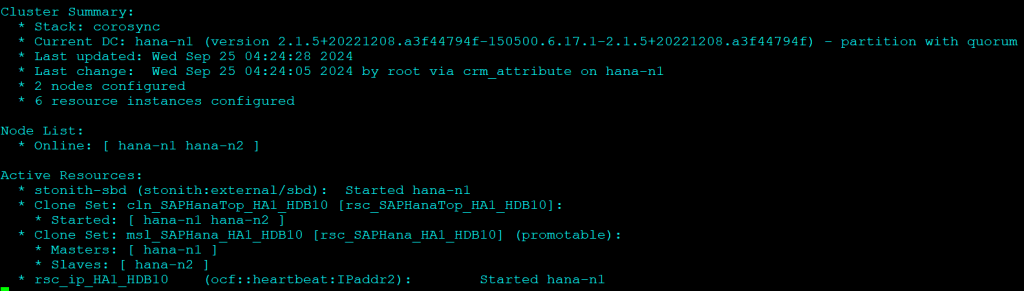
That’s it you successfully configured HANA with replication and HA.
If you go to your HAWK portal, you should see as below:
Check Replication and Cluster Status:
Test 1:
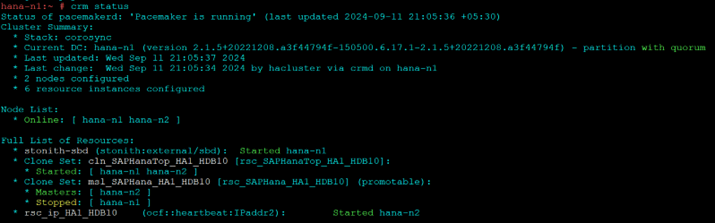
- Stop Hana on node 1
HDB stop
- Refresh cluster resource and check status
crm resource refresh rsc_SAPHana_HA1_HDB10 hana-n1
crm status
To Recover:
hdbnsutil -sr_register --name=WDF --remoteHost=hana-n2 --remoteInstance=10 --replicationMode=sync --operationMode=logreplay
Test 2:
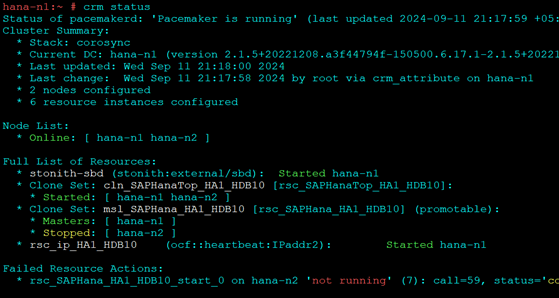
- Stop Hana on node 2
HDB stop
- Automatic take over should happen and node 1 should be promoted
- To Recover on Node 2
hdbnsutil -sr_register --name=ROT --remoteHost=hana-n1 --remoteInstance=10 --replicationMode=sync --operationMode=logreplay
- Node 2 should start and stay as secondary
If you are facing issue to start HANA, try clearing constraints in HA console once.
- https://documentation.suse.com/sbp/sap-15/html/SLES4SAP-hana-angi-perfopt-15/index.html#id-saphanasr-command-line-tools
- https://documentation.suse.com/sbp/sap-15/html/SLES4SAP-hana-angi-perfopt-15/index.html#id-constraints-for-saphanasr-angi
- https://documentation.suse.com/sbp/sap-15/html/SLES4SAP-hana-sr-guide-PerfOpt-15/
- https://documentation.suse.com/sbp/sap-15/html/SLES4SAP-hana-angi-perfopt-15/index.html#id-1.7.7.4
- https://documentation.suse.com/sles/15-SP5/html/SLES-all/cha-uuid.html#sec-uuid-understanduuid
- https://documentation.suse.com/sle-ha/15-SP5/html/SLE-HA-all/cha-ha-storage-protect.html#sec-ha-storage-protect-req
Related Articles
September 25th, 2026
Securing SAP from the inside out: OS-level security for IT leaders
August 19th, 2026
