SUSE AI: A new foundation for your private AI implementation (part 4)
Last time…
This is a series of articles dealing with SUSE AI, please take a look at the first article here.
In the last article, we set up many functional aspects of our cluster, including Storage Classes and the NVIDIA GPU Operator. Now we’re ready to deploy some AI workloads!
Installing Milvus
Milvus is an open-source vector database designed specifically for similarity search on massive datasets. It’s compatible with Ollama and really speeds up LLM processing.
IMPORTANT: Milvus requires a storageClass that supports Volume Expansion, or else it’ll fail silently during deployment. For example, NFS CSI, which we covered in the previous article.
Create the values file for Helm:
# vim customvalues-milvus.yaml
global:
  imagePullSecrets:
  - application-collection
cluster:
  enabled: true
standalone:
  persistence:
    persistentVolumeClaim:
      storageClassName: "<YOUR DEFAULT STORAGE CLASS>"
etcd:
  replicaCount: 1
  persistence:
    storageClassName: "<YOUR DEFAULT STORAGE CLASS>"
minio:
  mode: standalone
  replicas: 4
  rootUser: "admin"
  rootPassword: "adminminio"
  persistence:
    storageClass: "<YOUR DEFAULT STORAGE CLASS>"
  resources:
    requests:
      memory: 1024Mi
kafka:
  enabled: true
  name: kafka
  replicaCount: 3
  broker:
    enabled: true
  cluster:
    listeners:
      client:
        protocol: 'PLAINTEXT'
      controller:
        protocol: 'PLAINTEXT'
  persistence:
    enabled: true
    annotations: {}
    labels: {}
    persistentVolumeClaim:
      storageClassName: "<YOUR DEFAULT STORAGE CLASS>"
    accessModes:
      - ReadWriteOnce
    resources:
      requests:
        storage: 8Gi
pulsar:
  enabled: false
This file should work for most cases, with minimal resource usage. Customize as needed.
Install Milvus:
# helm upgrade --install milvus oci://dp.apps.rancher.io/charts/milvus -n suseai --version 4.2.2 -f customvalues-milvus.yaml
Wait until all components have been deployed. You can check the progress in Rancher.
Installing Open WebUI and Ollama
Ollama is one of the most used open-source AI projects at the moment, and is quickly becoming a standard to deal with language models. Basically, it manages your language models, and provides a standardized API to interact with them.
OpenWebUI is an open source project that provides a modern, good looking interface so your users can interact with the models via Ollama similar to chatbots like ChatGPT and Gemini. It also provides a workspace environment for developing new models, using pipelines, guardrails, RAGs and other advanced options.
To install it, first create a values file:
# vim customvalues-owui.yaml
global:
 imagePullSecrets:
 - application-collection
ollamaUrls:
 - http://open-webui-ollama.suseai.svc.cluster.local:11434
persistence:
 enabled: true
 storageClass: <YOUR STORAGE CLASS NAME>
ollama:
 enabled: true
 imagePullSecrets: application-collection
 ingress:
   enabled: false
 defaultModel: "gemma:2b"
 ollama:
   pull:
     models:
     - "gemma:2b"
     - "llama3.2:3b"
   gpu:
     enabled: true
     type: 'nvidia'
     number: 1
   persistentVolume:
     enabled: true
     storageClass: <YOUR STORAGE CLASS NAME>
pipelines:
 enabled: False
 persistence:
   storageClass: <YOUR STORAGE CLASS NAME>
ingress:
 enabled: true
 class: ""
 annotations:
   nginx.ingress.kubernetes.io/ssl-redirect: "true"
 host: <FQDN TO OWUI INGRESS>
 tls: true
extraEnvVars:
 - name: DEFAULT_MODELS
   value: "gemma:2b"
 - name: DEFAULT_USER_ROLE
   value: "user"
 - name: WEBUI_NAME
   value: "SUSE AI"
 - name: GLOBAL_LOG_LEVEL
   value: INFO
 - name: RAG_EMBEDDING_MODEL
   value: "sentence-transformers/all-MiniLM-L6-v2"
 - name: VECTOR_DB
   value: "milvus"
 - name: MILVUS_URI
   value: http://milvus.suseai.svc.cluster.local:19530
This example will install two models for testing, Gemma and Llama, and a basic RAG mechanism. Customize as needed.
Install OpenWebUI:
# helm upgrade --install open-webui oci://dp.apps.rancher.io/charts/open-webui -n suseai --version 5.16.0 -f customvalues-owui.yaml
You will get a text after the successful deployment, with the generated password. Please write this down!
OpenWebUI: we have a chatbot!
Congratulations, you now have a working chatbot! Log in to the FQDN you configured, and you should see a screen similar to this one:
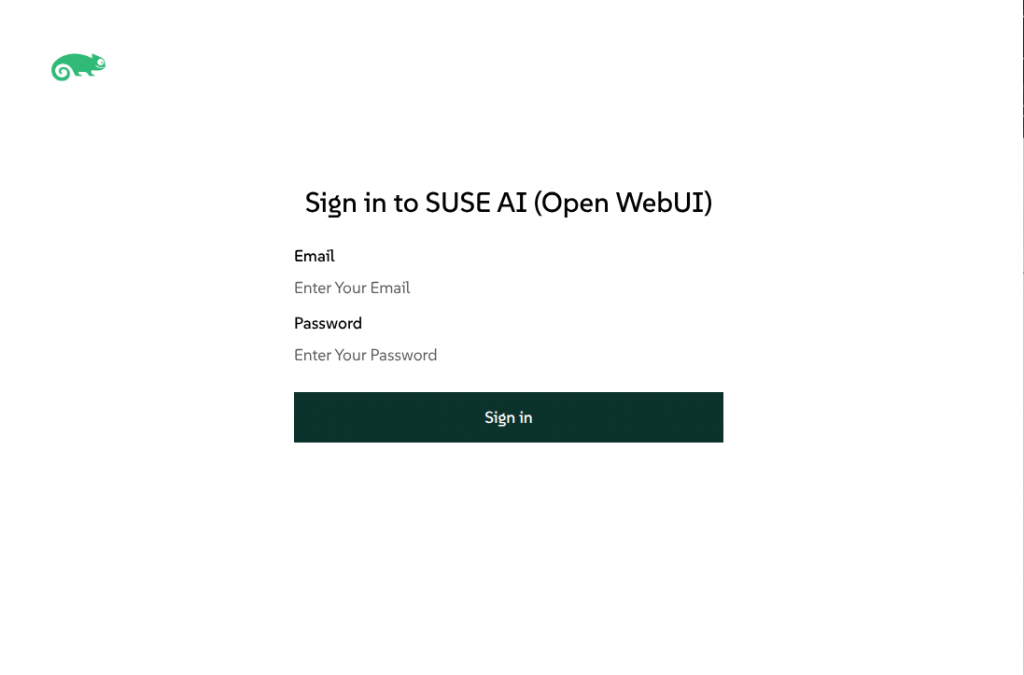
Log in as “admin” and use the password you created in the previous step.

Initially, you might not see any models in the top part. Please give it a few minutes for the files to be downloaded, and reload the page. You should now see “ollama” and “gemma2b” as options. Enjoy!
What’s next?
In the next article, we’ll explore OpenWebUI and its basic operation. We’ll also be working with SUSE Security, an incredibly powerful tool to monitor the communications of all your Kubernetes clusters. See you then!
Related Articles
Jun 01st, 2026
A Unified Approach to Virtualization
Dec 19th, 2024