RGW metadata Search with Elasticsearch
(This blog is wrtiten by Xidian Chen)
1. Understand data organization and storage
An object is the basic unit of data organization and storage in an object storage system. An object contains information that should be composed of metadata of data entities, data entities and user-defined metadata of data entities.

- Data refers to the real data maintained by the user, such as the content of a text file or a video file
- The basic and necessary meta-information in the data entity includes: which storage space belongs to, type, size, check value, last modification time, and other information to be saved except the data, which is generally composed of KV key-value pair
- For some businesses, more meta-information may be required. For example, a video file, in addition to the type, size, checksum, last modification time, the user’s business may also want additional traces, such as video style, lead actor, etc.
- Key: The Key value, namely the name of the object, is the character sequence with utF-8 encoding length greater than 0 and no more than 1024. Each object in a bucket must have a unique object key value
2. Metadata Search
Plan 1
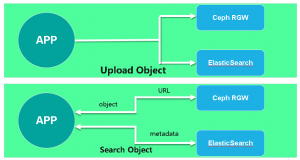
The architecture of this scheme is straightforward. The front-end application uploads the object to the Ceph RGW and sends the custom metadata of this object to the ElasticSearch cluster. When a user needs to get an object, a search request can be sent to ElasticSearch to get the object address. This request can be an object name or an object ID number, or a user-defined metadata. Once ElasticSearch returns the address of this object, the front-end application USES this address to obtain the object itself directly from the Ceph RGW.
It is not difficult to see the implementation process of the scheme. The idea of this scheme is relatively straightforward and its implementation is not difficult, but the data consistency between RGW and ElasticSearch completely depends on the front-end application. In addition to SDK, S3 has s3CMD, a command-line tool. RGW can also upload objects via HTTP request. Imagine that users can upload objects directly in the background rather than through the front-end application, which creates ElasticSearch which cannot synchronize corresponding metadata.
Plan 2
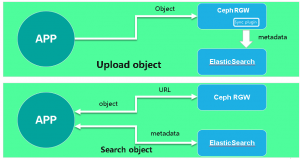
Since Ceph has added support for ElasticSearch after the Jewel release, we can achieve automatic synchronization of RGW metadata into ElasticSearch by defining new zone types and synchronization plug-ins. In this way, the consistency of RGW and ElasticSearch data is guaranteed, greatly reducing the coupling between front and rear ends.
As can be seen from the architecture diagram, the only difference between Plan 1 and Plan 2 is that there is no need to upload metadata to ElasticSearch when the front-end uploads objects. The built-in Sync Plugin in the Ceph RGW can automatically synchronize metadata to ElasticSearch.
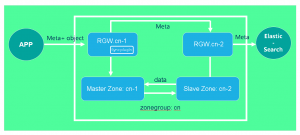
Final Plan
To achieve ElasticSearch for RGW metadata synchronization, we configured a ZoneGroup (CN) and added two zones: US-1 (master) and US-2 (Slave). In addition, an RGW instance is started on each zone respectively. Rgw.us-1 is used to accept read and write requests from the front end, and RGW.US-2 is used to synchronize metadata to ElasticSearch.
3. Demo
Env
- Architecture

- ES Cluster
| Host Name | Public Network | Admin Network |
| es-node001 | 192.168.2.101 | 172.200.50.101 |
| es-node002 | 192.168.2.102 | 172.200.50.102 |
| es-node003 | 192.168.2.103 | 172.200.50.103 |
- Ceph Cluster
| Host Name | Public Network | Admin Network | Cluster Network |
| admin | 192.168.2.39 | 172.200.50.39 | 192.168.3.39 |
| node001 | 192.168.2.40 | 172.200.50.40 | 192.168.3.40 |
| node002 | 192.168.2.41 | 172.200.50.41 | 192.168.3.41 |
Deploy ES Cluster
- Install JDK and ES packages, all nodes
# zypper -n in java-1_8_0-openjdk
# zypper -n in java-1_8_0-openjdk-devel
# zypper –no-gpg-checks -n in elasticsearch-5.6.0.rpm
- Configure ES
- es-node001
# cat /etc/elasticsearch/elasticsearch.yml | grep -v ^#
cluster.name: my-application
node.name: es-node001
network.host: 0.0.0.0
http.port: 9200
discovery.zen.ping.unicast.hosts: [“es-node001”, “es-node002″,”es-node003”]
- es-node002
# cat /etc/elasticsearch/elasticsearch.yml | grep -v ^# | grep -v ^$
cluster.name: my-application
node.name: es-node002
network.host: 0.0.0.0
http.port: 9200
discovery.zen.ping.unicast.hosts: [“es-node001”, “es-node002″,”es-node003”]
- es-node003
# cat /etc/elasticsearch/elasticsearch.yml | grep -v ^# | grep -v ^$
cluster.name: my-application
node.name: es-node003
network.host: 0.0.0.0
http.port: 9200
discovery.zen.ping.unicast.hosts: [“es-node001”, “es-node002″,”es-node003”]
- Enable Service
# systemctl daemon-reload
# systemctl enable elasticsearch.service
# systemctl start elasticsearch.service
# systemctl status elasticsearch.service
- Check port and network
# netstat -ntulp
Active Internet connections (only servers)
Proto Recv-Q Send-Q Local Address Foreign Address State PID/Program name
tcp 0 0 0.0.0.0:22 0.0.0.0:* LISTEN 1670/sshd
tcp6 0 0 :::9200 :::* LISTEN 14082/java
tcp6 0 0 :::9300 :::* LISTEN 14082/java
tcp6 0 0 :::22 :::* LISTEN 1670/sshd
- Check ES Cluster
- ES Cluster Version
# curl 192.168.2.101:9200
{
“name” : “5JyoL9w”,
“cluster_name” : “elasticsearch”,
“cluster_uuid” : “vCFofUJBR46zUmOKp_bDWA”,
“version” : {
“number” : “5.6.0”,
“build_hash” : “781a835”,
“build_date” : “2017-09-07T03:09:58.087Z”,
“build_snapshot” : false,
“lucene_version” : “6.6.0”
},
“tagline” : “You Know, for Search”
}
- Cluster nodes info
# curl -XGET ‘172.200.50.101:9200/_cat/nodes?v’
ip heap.percent ram.percent cpu load_1m load_5m load_15m node.role master name
172.200.50.53 16 71 0 0.01 0.01 0.00 mdi – node-3
172.200.50.52 17 70 0 0.08 0.07 0.02 mdi – node-2
172.200.50.51 13 65 0 0.02 0.01 0.00 mdi * node-1
- Status of Cluster
# curl -XGET ‘172.200.50.101:9200/_cluster/health?&pretty’
{
“cluster_name” : “my-application”,
“status” : “green”,
“timed_out” : false,
“number_of_nodes” : 3,
“number_of_data_nodes” : 3,
“active_primary_shards” : 0,
“active_shards” : 0,
“relocating_shards” : 0,
“initializing_shards” : 0,
“unassigned_shards” : 0,
“delayed_unassigned_shards” : 0,
“number_of_pending_tasks” : 0,
“number_of_in_flight_fetch” : 0,
“task_max_waiting_in_queue_millis” : 0,
“active_shards_percent_as_number” : 100.0
}
Deploy Ceph
- realm: gold
- zonegroup: us
- data zone: us-east-1
- metadata search zone: us-east-2
1、Create Master Zone
(1)Create Pool (node001)
# ceph osd pool create .rgw.root 8 8
# ceph osd pool create us-east-1.rgw.control 8 8
# ceph osd pool create us-east-1.rgw.meta 16 16
# ceph osd pool create us-east-1.rgw.log 8 8
# ceph osd pool create us-east-1.rgw.buckets.index 8 8
# ceph osd pool create us-east-1.rgw.buckets.data 64 64
# ceph osd pool application enable .rgw.root rgw
# ceph osd pool application enable us-east-1.rgw.control rgw
# ceph osd pool application enable us-east-1.rgw.meta rgw
# ceph osd pool application enable us-east-1.rgw.log rgw
# ceph osd pool application enable us-east-1.rgw.buckets.index rgw
# ceph osd pool application enable us-east-1.rgw.buckets.data rgw
# ceph osd pool create .rgw.root 8 8
# ceph osd pool create us-east-2.rgw.control 8 8
# ceph osd pool create us-east-2.rgw.meta 16 16
# ceph osd pool create us-east-2.rgw.log 8 8
# ceph osd pool create us-east-2.rgw.buckets.index 8 8
# ceph osd pool create us-east-2.rgw.buckets.data 64 64
# ceph osd pool application enable .rgw.root rgw
# ceph osd pool application enable us-east-2.rgw.control rgw
# ceph osd pool application enable us-east-2.rgw.meta rgw
# ceph osd pool application enable us-east-2.rgw.log rgw
# ceph osd pool application enable us-east-2.rgw.buckets.index rgw
# ceph osd pool application enable us-east-2.rgw.buckets.data rgw
(2)Delete Default Zone Group and Zone (Optional)
A default zone group named Default is created when the object gateway is installed with the default Settings. Since we no longer need the default locale group, we delete it
# radosgw-admin zonegroup list
{
“default_info”: “”,
“zonegroups”: [
“default” ]
}
# radosgw-admin zonegroup remove –rgw-zonegroup=default –rgwzone=default
# radosgw-admin period update –commit
# radosgw-admin zone delete –rgw-zone=default
# radosgw-admin period update –commit
# radosgw-admin zonegroup delete –rgw-zonegroup=default
# radosgw-admin period update –commit
(3)Create realm (admin)
# radosgw-admin realm create –rgw-realm=gold –default
# radosgw-admin realm list
{
“default_info”: “ded6e77f-afe6-475c-8fdb-e09f684acf18”,
“realms”: [
“gold”
]
(4)Create Master Zonegroup ( us ) (admin)
# radosgw-admin zonegroup create –rgw-zonegroup=us \
–endpoints=http://192.168.2.41:80 –master –default
# radosgw-admin zonegroup list
{
“default_info”: “6ac5588a-a0ae-44e7-9a91-6cc285e9d521”,
“zonegroups”: [
“us”
]
(5)Create Master Zone (us-east-1)
Randomly generate a key, and then use that key
# SYSTEM_ACCESS_KEY=$(cat /dev/urandom | tr -dc ‘a-zA-Z0-9’ | fold -w 20 | head -n 1)
# SYSTEM_SECRET_KEY=$(cat /dev/urandom | tr -dc ‘a-zA-Z0-9’ | fold -w 40 | head -n 1)
# SYSTEM_ACCESS_KEY=MebOITA7uiemM3UeASMn
# SYSTEM_SECRET_KEY=PIZYauzILJlMG0MylUkBwnR73hA0FQ1qb0qvOxER
# radosgw-admin zone create –rgw-zonegroup=us –rgw-zone=us-east-1 \
–endpoints=http://192.168.2.41:80 –access-key=$SYSTEM_ACCESS_KEY \
–secret=$SYSTEM_SECRET_KEY
# radosgw-admin zone list
{
“default_info”: “b7467d31-fb6b-46f5-aff2-8b6418356109”,
“zones”: [
“us-east-1”
]
(6)Delete default zone (Optional)
# radosgw-admin zone delete –rgw-zone=default
(7)Create User
# radosgw-admin user create –uid=zone.user \
–display-name=”Zone User” –access-key=$SYSTEM_ACCESS_KEY \
–secret=$SYSTEM_SECRET_KEY –system
{
“user_id”: “zone.user”,
“display_name”: “Zone User”,
“email”: “”,
“suspended”: 0,
“max_buckets”: 1000,
“subusers”: [],
“keys”: [
{
“user”: “zone.user”,
“access_key”: “MebOITA7uiemM3UeASMn”,
“secret_key”: “PIZYauzILJlMG0MylUkBwnR73hA0FQ1qb0qvOxER”
}
# radosgw-admin user list
# radosgw-admin user info –uid=zone.user
(8)Updates and Commit Period(Admin)
# radosgw-admin period update –commit
# radosgw-admin period get
{
“id”: “3f07279f-1182-47e3-9388-fc9999b3317c”,
“epoch”: 1,
“predecessor_uuid”: “b62f7c97-fa71-4a5e-9859-b4faa242ddef”,
“sync_status”: [],
“period_map”: {
“id”: “3f07279f-1182-47e3-9388-fc9999b3317c”,
“zonegroups”: [
{
“id”: “1d3b5143-f575-4f9f-91d2-9fdc62e82992”,
“name”: “us”,
“api_name”: “us”,
“is_master”: “true”,
“endpoints”: [
“http://192.168.2.41:80”
],
(9)Create node002 GW key (Admin)
# ceph auth add client.rgw.us-east-1 mon ‘allow rwx’ osd ‘allow rwx’ mgr ‘allow r’
# ceph auth get client.rgw.us-east-1 > /etc/ceph/ceph.client.us-east-1.keyring
# scp /etc/ceph/ceph.client.us-east-1.keyring node002:/etc/ceph/
(10)Start RADOS gateway (node002)
# zypper ref && sudo zypper in ceph-radosgw
# vim /etc/ceph/ceph.conf
[client.rgw.us-east-1]
rgw_frontends=”beast port=80″
rgw_zone=us-east-1
keyring = /etc/ceph/ceph.client.us-east-1.keyring
log file = /var/log/radosgw/rgw.us-east-1.radosgw.log
# mkdir /var/log/radosgw/
# systemctl restart ceph-radosgw@rgw.us-east-1
# systemctl enable ceph-radosgw@rgw.us-east-1
# systemctl status ceph-radosgw@rgw.us-east-1
2、Create Secondary Zone
(1)Create secondary zone:us-east-2 (Admin)
# radosgw-admin zone create –rgw-zonegroup=us –endpoints=http://192.168.2.42:80 \
–rgw-zone=us-east-2 –access-key=$SYSTEM_ACCESS_KEY \
–secret=$SYSTEM_SECRET_KEY
# radosgw-admin zone list
{
“default_info”: “57fd7201-3789-4fbd-adfa-b473614df315”,
“zones”: [
“us-east-1”,
“us-east-2”
]
(2)Update and Commit Period(Admin)
# radosgw-admin period update –commit
(3)Create rgw key (Admin)
# ceph auth add client.rgw.us-east-2 mon ‘allow rwx’ osd ‘allow rwx’ mgr ‘allow r’
# ceph auth get client.rgw.us-east-2 > /etc/ceph/ceph.client.us-east-2.keyring
# scp /etc/ceph/ceph.client.us-east-2.keyring node003:/etc/ceph/
(4)Start RADOS gateway (node003)
# zypper ref && sudo zypper in ceph-radosgw
# vim /etc/ceph/ceph.conf
[client.rgw.us-east-2]
rgw_frontends=”beast port=80″
rgw_zone=us-east-2
keyring = /etc/ceph/ceph.client.us-east-2.keyring
log file = /var/log/radosgw/rgw.us-east-2.radosgw.log
# mkdir /var/log/radosgw/
# systemctl restart ceph-radosgw@rgw.us-east-2
# systemctl enable ceph-radosgw@rgw.us-east-2
# systemctl status ceph-radosgw@rgw.us-east-2
(5)Check sync status(Admin)
# radosgw-admin sync status
realm c859877c-22aa-41ed-bcb4-23d36d8c212f (gold)
zonegroup 1d3b5143-f575-4f9f-91d2-9fdc62e82992 (us)
zone 57fd7201-3789-4fbd-adfa-b473614df315 (us-east-1)
metadata sync no sync (zone is master)
data sync source: a8ef6d51-d8de-40a2-98cc-c92ac62fb84f (us-east-2)
syncing
full sync: 0/128 shards
incremental sync: 128/128 shards
data is caught up with source
(6)Check disk of Capacity
# ceph df
RAW STORAGE:
CLASS SIZE AVAIL USED RAW USED %RAW USED
hdd 66 GiB 48 GiB 12 GiB 18 GiB 27.44
TOTAL 66 GiB 48 GiB 12 GiB 18 GiB 27.44
(7)Modify us-east-2 Deployment ,Modify tier-type and tier-config , Point the Port of Elasticsearch.
ElasticSearch Tier Type Configuration Parameters:
- endpoint: Specifies the ElasticSearch server endpoint to access.
- num_shards: (integer) The number of shards that ElasticSearch will be configured with on data synchronization initialization.
- num_replicas: (integer) The number of replicas that ElasticSearch will be configured with on data synchronization initialization.
- explicit_custom_meta: Specifies whether all user custom metadata will be indexed or whether the user needs to configure (at the bucket level) which customer metadata items should be indexed. This parameter defaults to false
Notes:Address is ES Master IP
# radosgw-admin zone modify –rgw-zone=us-east-2 –tier-type=elasticsearch \
–tier-config=endpoint=http://192.168.2.101:9200,num_shards=5,num_replicas=1
{
“id”: “7b2733a8-cbd6-4564-a509-b9abbb86f02a”,
“name”: “us-east-2”,
“domain_root”: “us-east-2.rgw.meta:root”,
“control_pool”: “us-east-2.rgw.control”,
“gc_pool”: “us-east-2.rgw.log:gc”,
“lc_pool”: “us-east-2.rgw.log:lc”,
“log_pool”: “us-east-2.rgw.log”,
“intent_log_pool”: “us-east-2.rgw.log:intent”,
“usage_log_pool”: “us-east-2.rgw.log:usage”,
“reshard_pool”: “us-east-2.rgw.log:reshard”,
“user_keys_pool”: “us-east-2.rgw.meta:users.keys”,
“user_email_pool”: “us-east-2.rgw.meta:users.email”,
“user_swift_pool”: “us-east-2.rgw.meta:users.swift”,
“user_uid_pool”: “us-east-2.rgw.meta:users.uid”,
“otp_pool”: “us-east-2.rgw.otp”,
“system_key”: {
“access_key”: “MebOITA7uiemM3UeASMn”,
“secret_key”: “PIZYauzILJlMG0MylUkBwnR73hA0FQ1qb0qvOxER”
},
“placement_pools”: [
{
“key”: “default-placement”,
“val”: {
“index_pool”: “us-east-2.rgw.buckets.index”,
“storage_classes”: {
“STANDARD”: {
“data_pool”: “us-east-2.rgw.buckets.data”
}
},
“data_extra_pool”: “us-east-2.rgw.buckets.non-ec”,
“index_type”: 0
}
}
],
“metadata_heap”: “”,
“tier_config”: {
“endpoint”: “http://192.168.2.101:9200”,
“num_replicas”: 1,
“num_shards”: 5
},
“realm_id”: “30114dc2-6e8d-41fa-9284-35e9fe8673eb”
}
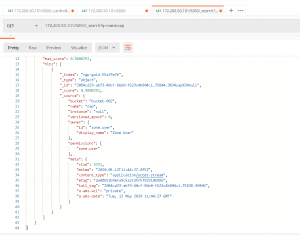
Verify with Postman
Related Articles
Sep 22nd, 2025
No comments yet