PCI Passthrough Demystified: Setting up AMD GPUs in Harvester
If you’ve ever tried to set up GPU passthrough, you know the struggle.
You edit the GRUB config, you isolate the IOMMU groups, you cross your fingers, and… you get a black screen. Or worse, the dreaded “Code 43.”
Setting up PCI passthrough is notoriously finicky, and doing it within a Hyper-Converged Infrastructure (HCI) solution like SUSE Virtualization adds another layer of complexity to the mix. However, the reward is worth the effort. Harvester provides a modern, Kubernetes-based management interface that makes handling these workloads significantly more scalable than standard KVM setups.
Today, we are going to demystify the process for AMD GPUs. We will walk through enabling IOMMU, managing vendor IDs, and configuring the Harvester YAML to ensure your “Team Red” graphics card plays nicely with your virtual machines.
But first, we need to talk about… Kubevirt?
Don’t get us wrong: SUSE Virtualization/Harvester runs the VM workloads under KVM. But it uses Kubevirt for managing the workloads. And it’s essential to understand what it is, and how it works in order to master SUSE Virtualization.
Basically, Kubevirt has the following structure when running a VM:
- Virt-api: responds to overall requests from kubectl and virtctl
- Virt-controller: monitors the stated of the the VMs (called Virtual Machine Instances or VMIs). Generates the “virt-launcher” pods to start the VMs.
- Virt-operator: maintains and upgrades the other components
- Virt-launcher: a pod that hosts the QEMU/KVM process.
- Virt-handler: a DaemonSet that runs on all worker nodes, communicates with virt-launcher and allows for features like live migration.
The complete workflow is:
- A VirtualMachine object is created via kubectl or by Harvester
- Virt-api validates the object via ValidatingWebhook
- Virt-controller creates a new virt-launcher pod
- If configured, the sidecar pod is started here to inject files/run scripts into what will become the “compute” pod.
- Kubernetes schedules the pod to a node
- Virt-controller updates the nodeName
- Virt-handler connects back to virt-launcher and commands QEMU via LIbvirt to start the VM (this creates the “compute” pod).

Driver Installation
For driver installation inside the VM, we’ll be focusing on SUSE Linux Enterprise 15 SP7.
First, we’ll need to install the following system packages:
- kernel-default (if you’re using a slim version of SLES, you’re probably using only kernel-default-base)
- kernel-devel
- kernel-source
Also, make sure you have updated the system and rebooted to be sure you’re using the matching kernel and header versions. These are the most common causes for a failed module compilation.
Follow the instructions from AMD: https://instinct.docs.amd.com/projects/amdgpu-docs/en/latest/install/detailed-install/package-manager/package-manager-sles.html
Follow the post-installation instructions to check that everything is correctly installed: https://instinct.docs.amd.com/projects/amdgpu-docs/en/latest/install/detailed-install/post-install.html
PCI Passthrough under Harvester
First, let’s enable the “pcidevices-controller” in Harvester:
- Go to Advanced-> Add-ons
- Find the line “pcidevices-controller”, click on the three dots next to it, then Enable
A new category “PCI Devices” should appear in the Advanced section after a few seconds. Click on it, and find your device. Click on the three dots next to it and select “Enable passthrough”. If you’re using IOMMU (recommended) you should be able to enable the passthrough for entire groups of devices. Be careful not to map an essential device, like a system chipset, on the host or Bad Things Will Happen™.
Now, open your VM’s definitions (Edit Config) and navigate to the PCI Devices section. Select your GPU device from the dropdown menu:
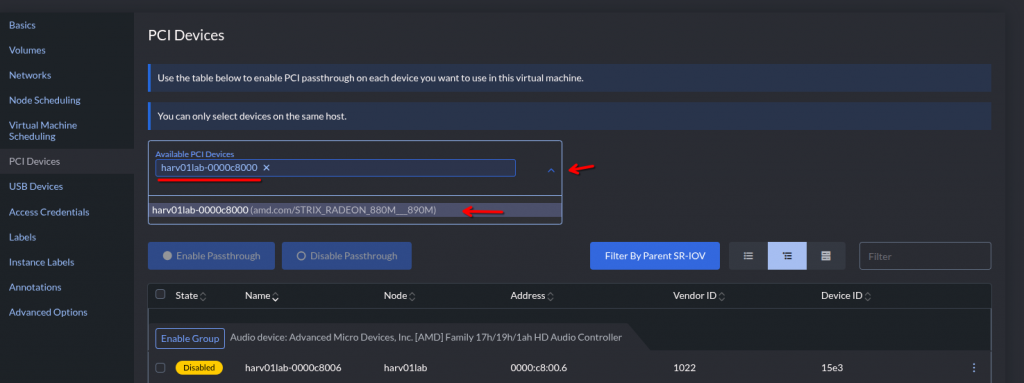
Make note of the ID shown here, you’ll need it! In this case, it’s “harv01lab-0000c8000” but it’ll vary depending on your hardware.
Start the VM and check out if the device is showing (lspci usually comes in the “pciutils” package):
# lspci | grep AMD
0f:00.0 Display controller: Advanced Micro Devices, Inc. [AMD/ATI] Strix [Radeon 880M / 890M] (rev c1)
In order to properly initialize the “amdgpu” kernel module, it is necessary to provide a VBIOS file to KVM. This happens because by default, KVM does not add a “rom” to the passthrough device. Symptoms in dmesg:
amdgpu 0000:0f:00.0: amdgpu: Unable to locate a BIOS ROM
amdgpu 0000:0f:00.0: amdgpu: Fatal error during GPU init
amdgpu 0000:0f:00.0: amdgpu: amdgpu: finishing device.
amdgpu: probe of 0000:0f:00.0 failed with error -22
Next, we’ll make that ROM file available in the VM via a hook sidecar container.
Configuring the Sidecar Container
Kubevirt offers a feature called “Hook Sidecar Container” to inject files and/or modify anything before the VM is started:
https://kubevirt.io/user-guide/user_workloads/hook-sidecar/
To use that, the “Sidecar” feature must be activated via featureGates on the Harvester host, if it’s not already activated:
# cat << END > enable-feature-gate.yaml
---
apiVersion: kubevirt.io/v1
kind: KubeVirt
metadata:
  name: kubevirt
  namespace: harvester-system
spec:
  configuration:
    developerConfiguration:
      featureGates:
        - Sidecar
END

# kubectl apply -f enable-feature-gate.yaml
(or, “kubectl edit -n harvestersystem kubevirt kubevirt” and change it manually)
Grabbing the BIOS file
- On the host system:
# cat /sys/firmware/acpi/tables/VFCT > /tmp/vfct_dump.bin
Use this script to find the signature in the dumped file and extract the VBIOS:
#!/usr/bin/python3
import struct

def extract_vbios(vfct_path, output_path):
    with open(vfct_path, "rb") as f:
        data = f.read()
    # Look for the ATOMBIOS signature start
    # AMD VBIOS usually starts with the standard 0x55AA signature
    # In VFCT, the VBIOS image starts shortly after the table header
    rom_start = data.find(b"\x55\xaa")

    if rom_start == -1:
        print("Error: Could not find VBIOS signature (55AA) in the dump.")
        return

    # In modern VFCT tables, the size is often listed in the header
    # or we can read the length byte from the VBIOS header itself (offset 2)
    rom_size = data[rom_start + 2] * 512
    print(f"Found VBIOS at offset {hex(rom_start)} with size {rom_size} bytes")
    with open(output_path, "wb") as f_out:
        f_out.write(data[rom_start : rom_start + rom_size])
    print(f"Successfully saved to {output_path}")

extract_vbios("vfct_dump.bin", "amdgpu.rom")
Now, let’s encode the file to BASE64:
# cat amdgpu.rom | base64 -w 0 > vbios_base64.txt
Create a ConfigMap and insert the base 64-encoded data:
# vim gpu_vbios-map.yaml
apiVersion: v1
kind: ConfigMap
metadata:
  name: gpu-vbios-rom
binaryData:
  # This matches the script we will use below
  gpu.rom: <INSERT THE CONTENTS OF vbios_base64.txt IN ONE LINE>
Apply the file to your Harvester host:
# kubectl apply -f gpu_vbios-map.yaml -n <NAMESPACE WHERE YOUR VM IS LOCATED>
- Create the hook script:
# vim gpu-xml-hook-script.yaml
apiVersion: v1
kind: ConfigMap
metadata:
  name: gpu-xml-hook-script
data:
  gpu_vbios.sh: |
    #!/bin/sh
    tempFile=$(mktemp --dry-run)
    echo $4 > $tempFile
    ALIAS="ua-hostdevice-harv01lab-0000c8000"
    ROM_DIR="/var/run/kubevirt-private/config-map/gpu-rom-vol"
    ROM_PATH="${ROM_DIR}/gpu.rom"
    chmod 644 "${ROM_PATH}"
    cp $tempFile /tmp/before.xml
    sed -i "s@\(<alias name=\"${ALIAS}\"></alias>\)@\1<rom bar=\"on\" file=\"${ROM_PATH}\"/>@g" $tempFile
    cp $tempFile /tmp/after.xml
    cat $tempFile
Create the object with kubectl apply -f gpu-xml-hook-script.yaml -n <NAMESPACE WHERE YOUR VM IS LOCATED>. Please be aware of using the correct indentations!
Note that we are using the ID we collected earlier (in this case, “harv01lab-0000c8000”) to compose the device alias. This is being used to add a directive pointing to the file provided by the ConfigMap we defined earlier. It lives on a special directory called that’s mounted as a volume in the VM (which we will get into configuring next).
Modifying the VM definition
Now, we need to tell Kubevirt to start a sidecar container. Go to Virtual Machines, click on the three dots next to it, then Edit YAML. Look for the section “spec->template->metadata->annotations” and add the following:
hooks.kubevirt.io/hookSidecars: >-
          [{"image": "quay.io/kubevirt/sidecar-shim:v1.2.0-rc.0", "args":
          ["--version", "v1alpha2"], "configMap": {"name":
          "gpu-xml-hook-script", "key": "gpu_vbios.sh", "hookPath":
          "/usr/bin/onDefineDomain"}}]
Make sure it’s indented properly. Alternatively, you can use kubectl to change it:
# kubectl patch virtualmachine <VM NAME> -n <NAMESPACE WHERE THE VM IS LOCATED> --type='json' -p='[
  {"op": "add", "path": "/spec/template/metadata/annotations/hooks.kubevirt.io~1hookSidecars", "value": "[{\"image\": \"quay.io/kubevirt/sidecar-shim:v1.2.0-rc.0\", \"args\": [\"--version\", \"v1alpha2\"], \"configMap\": {\"name\": \"gpu-xml-hook-script\", \"key\": \"gpu_vbios.sh\", \"hookPath\": \"/usr/bin/onDefineDomain\"}}]"}
]'
Now, we need to add the volume mount referring to the configMap. Go to spec->template->spec->volumes and add the following section:
– configMap:
name: gpu-vbios-rom
name: gpu-rom-vol
Again, make sure to indent it properly. Alternatively, you can use kubectl:
# kubectl patch virtualmachine <VM NAME> -n <NAMESPACE WHERE THE VM IS LOCATED> --type='json' -p='[
  {"op": "add", "path": "/spec/template/spec/volumes/-", "value": {"name": "gpu-rom-vol", "configMap": {"name": "gpu-vbios-rom"}}}
]'
IMPORTANT: be aware that if you ever need to change anything in the UI, you might lose the added volume and might need to re-add it again. A missing volume will cause the VM to crash when starting!
Now, start the VM and it should boot normally. Check the dmesg and you should see something like this:

amdgpu 0000:0f:00.0: amdgpu: Fetched VBIOS from ROM BAR
amdgpu: ATOM BIOS: 113-STRIXEMU-001
If you don’t, please revise the YAML files again. A wrong indentation or a badly formatted configMap are common errors.
Configuring VRAM size
If you’re using an iGPU (embedded in the Ryzen processor), there’s only a limited amount of physical VRAM available. In my case, the Radeon 890M ships with 2GB of VRAM. But you can map main shared system memory for it. To do that, we’ll need to add a kernel parameter to GRUB.
- edit /etc/default/grub and look for the line GRUB_CMDLINE_LINUX_DEFAULT. Add the parameter “amdgpu.gttsize=<desired shared memory size in KB>”. For example, “amdgpu.gttsize=16384” uses up 16GB from the main system memory as VRAM.
- Recreate the grub config with “grub2-mkconfig -o /boot/grub.cfg”
- Reboot. You should see this in dmesg:
amdgpu 0000:0f:00.0: amdgpu: amdgpu: 2048M of VRAM memory ready
amdgpu 0000:0f:00.0: amdgpu: [drm] Configuring gttsize via module parameter is deprecated, please use ttm.pages_limit
amdgpu 0000:0f:00.0: amdgpu: amdgpu: 16384M of GTT memory ready.
If you don’t see these messages, look for other “amdgpu” messages that might point to other errors, like firmware errors.
Some distributions will require you to install a package like “kernel-firmware-amdgpu” before it can correctly initialize the chipset.
ROCm Installation
Alright, now that we have the hardware properly mapped and initialized, we’ll focus on getting the ROCm toolkit installed. This is the equivalent of the NVIDIA toolkit/CUDA in the AMD world.
Please follow the instructions from AMD here: https://rocm.docs.amd.com/projects/install-on-linux/en/latest/install/install-methods/package-manager/package-manager-sles.html
You only need to install the “rocm” package. The SDK packages are optional.
By the end of the process, you should be able to check your GPU is working properly with the “rocm-smi” command:
# rocm-smi
WARNING: AMD GPU device(s) is/are in a low-power state. Check power control/runtime_status
======================================== ROCm System Management Interface ========================================
================================================== Concise Info ==================================================
Device  Node  IDs              Temp    Power     Partitions          SCLK  MCLK  Fan  Perf  PwrCap  VRAM%  GPU%
              (DID,     GUID)  (Edge)  (Socket)  (Mem, Compute, ID)
==================================================================================================================
0       1     0x150e,   512    45.0°C  6.082W    N/A, N/A, 0         N/A   N/A   0%   auto  N/A     7%     0%
==================================================================================================================
============================================== End of ROCm SMI Log ===============================================
The command “rocminfo” should show an “HSA Agent” with your GPU:
…
*******
Agent 2
*******
  Name:                    gfx1150
  Uuid:                    GPU-XX
  Marketing Name:          AMD Radeon Graphics
  Vendor Name:             AMD
  Feature:                 KERNEL_DISPATCH
  Profile:                 BASE_PROFILE
  Float Round Mode:        NEAR
  Max Queue Number:        128(0x80)
  Queue Min Size:          64(0x40)
  Queue Max Size:          131072(0x20000)
  Queue Type:              MULTI
  Node:                    1
  Device Type:             GPU
…
And you’re done.
Installing Ollama
Ollama does support AMD GPUs natively, and will install an additional module automatically when installing.
To install Ollama, run the following command:
# curl -fsSL https://ollama.com/install.sh | sh
A systemd service will be created at /etc/systemd/system/ollama.service. Please add your environment variables here if needed, and use “systemd daemon-reload” before starting the service. A common change is to add:
Environment="OLLAMA_HOST=0.0.0.0"
To the [Service] section to allow it to communicate on external IPs.
To start the service, run:
# systemctl start ollama.service
To download a model, use the command
# ollama pull <model name>
And to launch a session with the model:
# ollama run <model name>
You can check that it’s actually using the GPU by looking at the logs with “journalctl -u ollama -xe”. You can also use “ollama ps” to check the CPU/GPU usage. If it only shows “CPU”, it’s not recognizing the GPU correctly.
If you’re using an external GPU…
If the GPU is not being detected properly, try adding the following environment variables to the Ollama service:
Environment="HSA_OVERRIDE_GFX_VERSION=11.0.2"
Environment="OLLAMA_LLM_LIBRARY=rocm_v6"
Environment="ROCR_VISIBLE_DEVICES=1"
Environment="OLLAMA_GPU_OVERHEAD=1"
Each variable tries to override different capabilities detection. Always do a “systemctl daemon-reload” and “systemctl restart ollama” after changing any of these.
If you’re using an iGPU…
Even though Ollama claims to support AMD natively with ROCm/HSA natively, I couldn’t get it to properly recognize the iGPU. This may work on a dedicated AMD GPU, but I had to use the Vulkan libraries to provide access to the hardware in my case.
Install the Vulkan libraries if you haven’t done so already:
# zypper install -y libvulkan1 vulkan-tools Mesa-libVulkan-devel Mesa-vulkan-device-select libvulkan_radeon
Check that your GPU is recognized by Vulkan
# vulkaninfo --summary
…
Devices:
========
GPU0:
        apiVersion         = 1.3.296
        driverVersion      = 24.3.3
        vendorID           = 0x1002
        deviceID           = 0x150e
        deviceType         = PHYSICAL_DEVICE_TYPE_INTEGRATED_GPU
        deviceName         = AMD Radeon Graphics (RADV GFX1150)
        driverID           = DRIVER_ID_MESA_RADV
        driverName         = radv
        driverInfo         = Mesa 24.3.3
        conformanceVersion = 1.2.7.1
        deviceUUID         = 00000000-0f00-0000-0000-000000000000
        driverUUID         = 414d442d-4d45-5341-2d44-525600000000
Now, add the following environment variables to the ollama.service:
Environment="OLLAMA_VULKAN=1"
Environment="GGML_VK_VISIBLE_DEVICES=0"
You should now be able to check in the logs that it’s properly using your iGPU.
Bonus: controlling Ollama behaviour
By default, Ollama will unload unused models from the GPU after a few minutes of inactivity. Depending on the model size, future queries may take a long time to be fulfilled until the model is loaded again. If you want to set this to 12 hours, you’d set this variable:
Environment="OLLAMA_LOAD_TIMEOUT=12h"
If you wish to see additional information about Ollama, like loading progress and statistics, add this variable:
Environment="OLLAMA_DEBUG=1"
If you’re getting “prompt truncated” messages, you’re probably hitting a context window size limit. You can define the context (in tokens) here. Be careful! This can make things very slow and take up more memory!
Environment="OLLAMA_CONTEXT_LENGTH=4096"
I hope this article was useful to you!
Related Articles
May 08th, 2025