Install SUSE Manager on Azure
Worried about how you’re going to manage your resources in the cloud?
This may not currently keep you awake at night, however whether in the cloud or on premise, you are will at some point face the challenges of inventory, configuration, vulnerability management and compliance.
Don’t panic! We have a simple solution below. See below how you can easily install SUSE Manager in the cloud for all you GNU/Linux on premise machines.
Resource creation
On Azure portal (portal Azure), create a new resource from the marketplace.
Look for: SUSE Manager 3.1 Server (BYOS)

The SUSE marketplace model will automatically propose VM sizes compliant with the (pre-requisite material) for SUSE Manager in production environment;
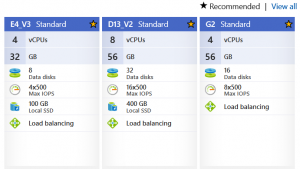
If you want to perform a test, select 1 machine with a minimum of 4Go RAM and 2vCPUS
Modifications on the VM
Your VM will require 2 modifications:
- Add a 200 Go data disk : it will be used to store data from SUSE Manager (database and RPM packages)
- Modify the NSG (firewall) in order to open ports 80 and 443
Connect and register
The marketplace template will deploy with all the pre-installed modules plus some dedicated to the cloud commands. You must register this server in the SUSE Customer Center in order to beneficiate from the updates and support from SUSE.
If you want to test this, please take advantage of the 60 days evaluation code for x86_64 server.
https://www.suse.com/products/suse-manager/download/
Once you have downloaded the code, execute the following commands:
SUSEConnect -r SUSE_MANAGER_CODE
SUSEConnect -p SUSE-Manager-Server/3.1/x86_64 -r SUSE_MANAGER_CODE
SUSE Manager 3.1 was released with SUSE Linux Enterprise 12 SP2.
You will have to upgrade to SLES12 SP3 for the latest patches and security updates.
zypper ref
zypper patch
zypper migration

Available migrations:

1 | SUSE Linux Enterprise Server 12 SP3 x86_64
SUSE Manager Server 3.1 x86_64 (already installed)
Select 1, agree with the license T&C and restart the VM.
Activate the swap
Via the Azure agent (waagent) you are going to activate the Swap space on the temporary disk sdb.
Edit the file /etc/waagent.conf
sed -i 's/ResourceDisk.EnableSwap=n/ResourceDisk.EnableSwap=y/' /etc/waagent.conf
sed -i 's/ResourceDisk.SwapSizeMB=0/ResourceDisk.SwapSizeMB=4096/' /etc/waagent.conf
systemctl restart waagent.service
Prepare data disk
The 200 Go data disk dedicated to SUSE Manager is visible under /dev/sdc (sda is the OS, sdb is the temp azure disk).
Please check that you are using sdc:
dmesg | grep "200 GiB"
[ 6.890044] sd 5:0:0:0: [sdc] 419430400 512-byte logical blocks: (215 GB/200 GiB)
Launch command suma-storage.
This command is cloud dedicated and used to prepare the disk you are adding.
/usr/bin/suma-storage /dev/sdc
Modify the file /etc/fstab in order to use this disk each time you restart:
echo "/dev/sdc1 /manager_storage xfs defaults 1 1" >> /etc/fstab
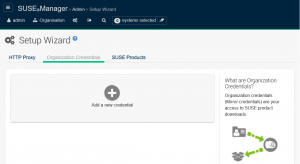
Configuration
Start SUSE Manager configuration:
sudo /sbin/yast2 susemanager_setup
Unlike a standard installation, the admin account has been created with a password.
This password is made of VM name and -suma.
Display the password on the console:
echo $(azuremetadata --instance-name --bare)-suma
The remaining procedure will be done from the SUSE Manager web interface.
You are ready to manage the life cycle of all your linux machines in Azure.
Find more info on SUSE website:
https://www.suse.com/documentation/suse-manager-3/singlehtml/book_suma_getting-started_31/book_suma_getting-started_31.html#preparing.and.registering.clients
https://www.suse.com/documentation/suse-manager-3/singlehtml/book_suma_advanced_topics_31/book_suma_advanced_topics_31.html#idm140588663755280
Related Articles
Jun 18th, 2024
No comments yet