Managing Your Linux Estate: Deploying SUSE Multi-Linux Manager on SLES via AWS
Managing a diverse Linux environment at scale shouldn’t feel like a chore. While SUSE Multi-Linux Manager (MLM) typically runs on SUSE Linux Enterprise Micro, many AWS customers have standardized their infrastructure on SUSE Linux Enterprise Server (SLES) 15. This post highlights the steps required to install MLM on SLES, specifically on AWS. It is not a comprehensive installation or configuration guide.
This post will assume some knowledge of SUSE Multi-Linux Manager and configuration. Refer to the documentation for additional details.
Prerequisites
To ensure a smooth deployment, you’ll need a few pieces in place. You will need licenses for SUSE Multi-Linux Manager, SUSE Linux Enterprise Server 15 SP7, and Multi-Linux Manager System Packs available in your SUSE Customer Center account.
Note
This configuration requires a BYOS (Bring Your Own Subscription) instance and license. Currently, MLM on SLES is not supported on PAYG (Pay-As-You-Go) instances.
To keep this post concise, we assume that you have a functional VPC already configured. This includes the VPC having access to the internet through a NAT Gateway and DNS configured. The MLM server and all clients will need to be able resolve the FQDN of the MLM server; both forward and reverse lookups are required.
It is a good idea to verify that you have the registration codes for SLES 15 SP7, MLM, and any System Packs for MLM available in your SUSE Customer Center (SCC) account.
Installation
To begin we need to deploy the SLES 15 SP7 instance into our VPC. You will need to subscribe to the listing in the AWS Marketplace. Because this is a BYOS subscription it will have no cost associated with the listing. After subscribing to the listing you are ready to deploy.
Create the Security Group
Before deploying the EC2 instance, you need to create a security group to help control the traffic allowed into your instance. You will want to ensure that only the required ports for your environment remain open. Refer to the table below to determine which ports to allow. The minimum required ports are in bold. You can find more detail in the network requirements documentation.
Do not forget to allow for some method of remote management of the host, either through SSH, AWS Instance Connect, or SSM Session Manager.
Note
For the sake of simplicity, the VPC CIDR range (10.0.0.0/22) is hardcoded in the examples below. In a production environment, it’s best practice to reference the Security Group ID of your client instances or create a Prefix List instead of referencing a specific range to ensure more dynamic and tighter security.
| Port | Protocol | Used by | Notes |
| 443 | TCP | HTTPS | Serves the Web UI, client, and server and proxy (tftpsync) requests. |
| 80 | TCP | HTTP | Required temporarily for some bootstrap repositories and automated installations. |
| 67 | TCP/UDP | DHCP | Required only if clients are requesting IP addresses from the server. |
| 69 | TCP/UDP | TFTP | Required if server is used as a PXE server for automated client installation. |
| 4505 | TCP | salt | Required to accept communication requests from clients. The client initiates the connection, and it stays open to receive commands from the Salt master. |
| 4506 | TCP | salt | Required to accept communication requests from clients. The client initiates the connection, and it stays open to report results back to the Salt master. |
| 5432 | TCP | PostgreSQL | Required to access the reporting database. |
| 5556 | TCP | Prometheus | Required for scraping Taskomatic JMX metrics. |
| 5557 | TCP | Prometheus | Required for scraping Tomcat JMX metrics. |
| 9100 | TCP | Prometheus | Required for scraping Node exporter metrics. |
| 9187 | TCP | Prometheus | Required for scraping PostgreSQL metrics. |
| 9800 | TCP | Prometheus | Required for scraping Taskomatic metrics. |
| 25151 | TCP | Cobbler |
Management Console
You can create the Security Group either through the AWS Management Console or using the AWS CLI. If creating one in the Management Console, search for EC2 in the Search Box. In the EC2 Dashboard view, select Security Groups in the left sidebar underneath Network & Security, then click on Create security group near the top of the page.
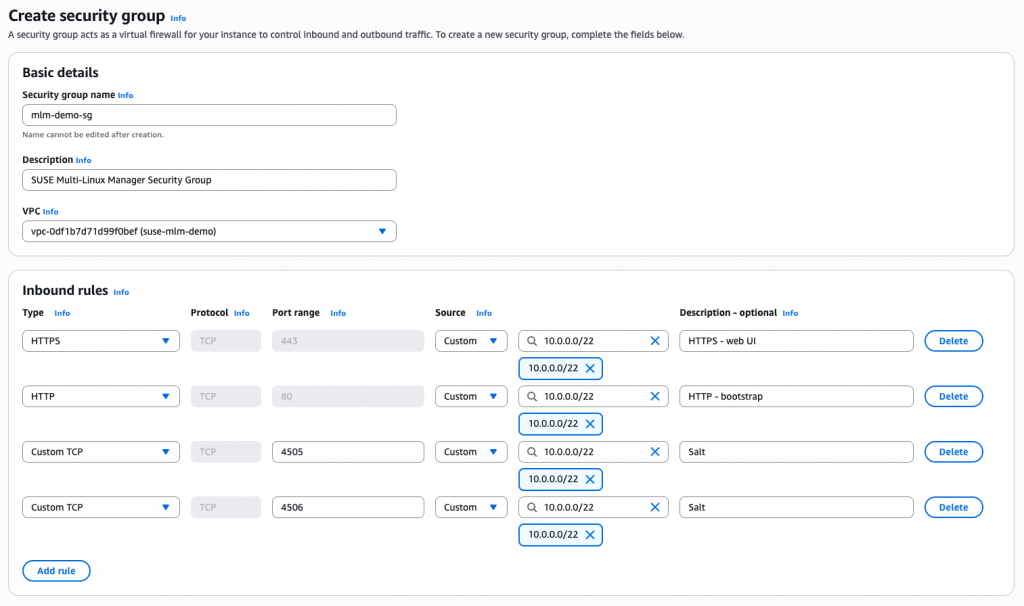
Make sure to give the security group a distinguishable name so that it is easier to identify when creating the EC2 instance. Also, verify that the selected VPC is where you intend to deploy the MLM instance.
Security group name: mlm-demo-sg
Description: SUSE Multi-Linux Manager Security Group
VPC: vpc-XXXXXXXXXX
Inbound rules: Include all ports required for your environment.
After you have added all the needed rules click on Create at the bottom of the page. When the processing is complete, move on to deploy the EC2 instance.
AWS CLI
When creating a security group using the AWS CLI, you will need to first create the security group and then apply the ingress rules. You will need the VPC ID for the VPC where you want to deploy Multi-Linux Manager. Add any additional ingress rules required for your environment. When the commands are complete, move on to deploy the EC2 instance.
# 1. Create the Security Group and store the ID
SG_ID=$(aws ec2 create-security-group \
--group-name 'suse-mlm-sg' \
--description 'SUSE Multi-Linux Manager Security Group' \
--vpc-id 'vpc-XXXXXXXXXXXXX' \
--query 'GroupId' --output text)
# 2. Add Ingress rules (HTTPS, HTTP, and Salt Stack)
aws ec2 authorize-security-group-ingress \
--group-id $SG_ID \
--ip-permissions \
IpProtocol=tcp,FromPort=443,ToPort=443,IpRanges='[{CidrIp=10.0.0.0/22,Description="HTTPS - Web UI"}]' \
IpProtocol=tcp,FromPort=80,ToPort=80,IpRanges='[{CidrIp=10.0.0.0/22,Description="HTTP - bootstrap"}]' \
IpProtocol=tcp,FromPort=4505,ToPort=4506,IpRanges='[{CidrIp=10.0.0.0/22,Description="Salt Stack"}]'
Deploy the EC2 Instance
SUSE Multi-Linux Manager requires a minimum of 4vCPU cores and 16 GB RAM. For production environments we recommend at least 32 GB RAM. Refer to the hardware requirements documentation for more information.
In the examples below, we use an m6a.xlarge instance type. This is adequate for a testing environment, but you should use an m6a.2xlarge or greater is recommended for production.
Management Console
To deploy the SLES EC2 instance in the Management Console, search for EC2 in the Search Box then click on Launch instance near the top of the page.
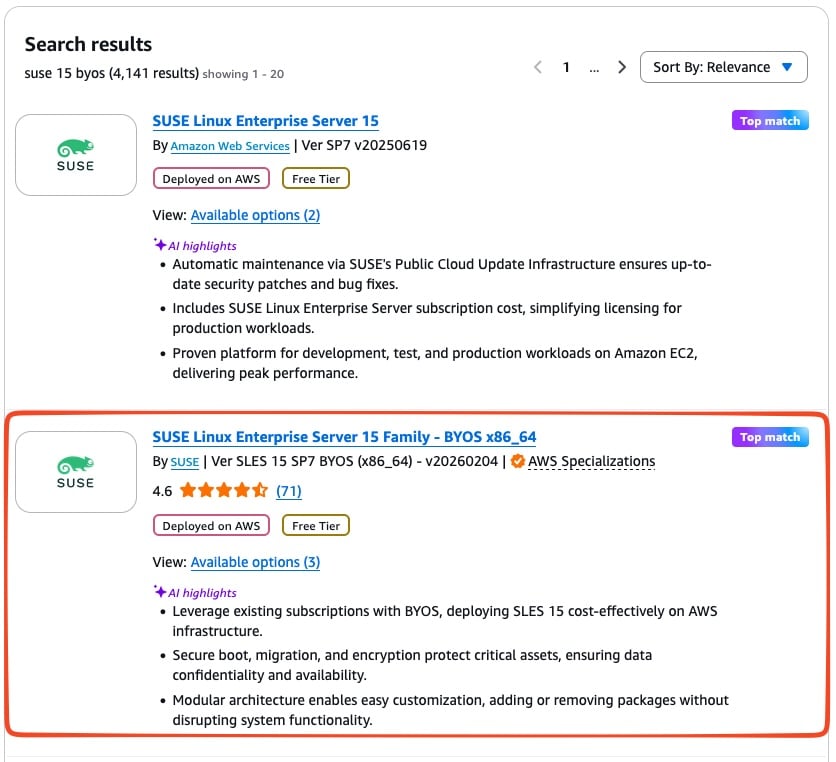
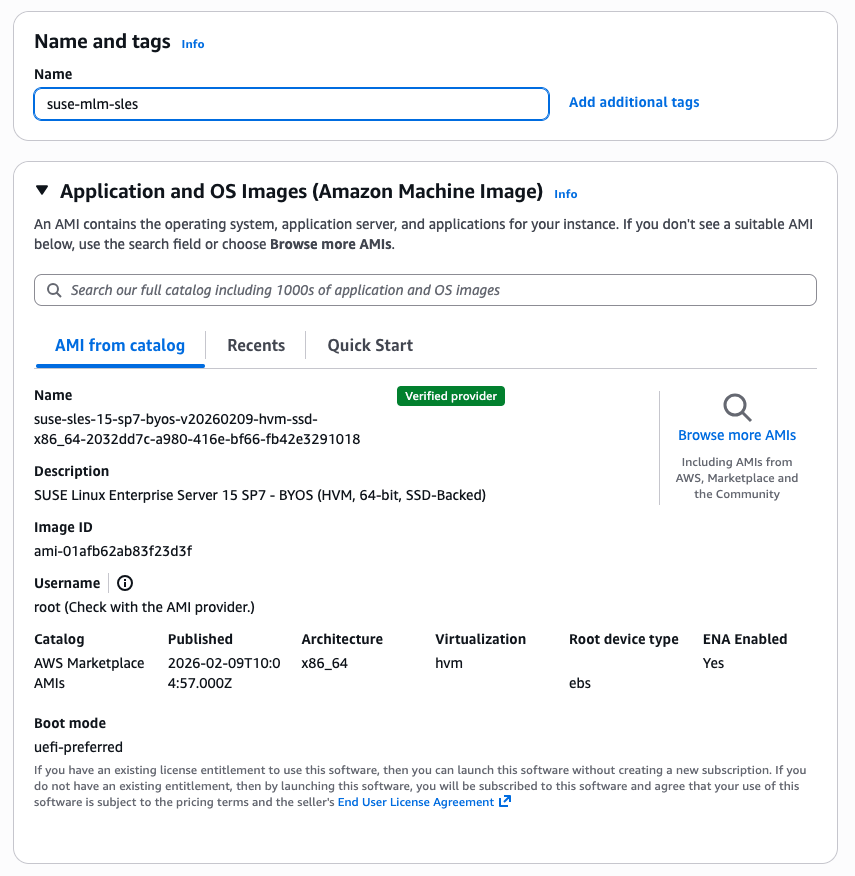
Give an identifiable name to the instance. Unless you have recently deployed other instances of SLES 15 SP7, you will need to search to find the correct listing. In the search box search for sles 15 byos this will provide a list of possible AMIs. Select the one name SUSE Linux Enterprise Server 15 Family – BYOS x86_64. It may prompt you to confirm a subscription, if so, then click on Subscribe now.
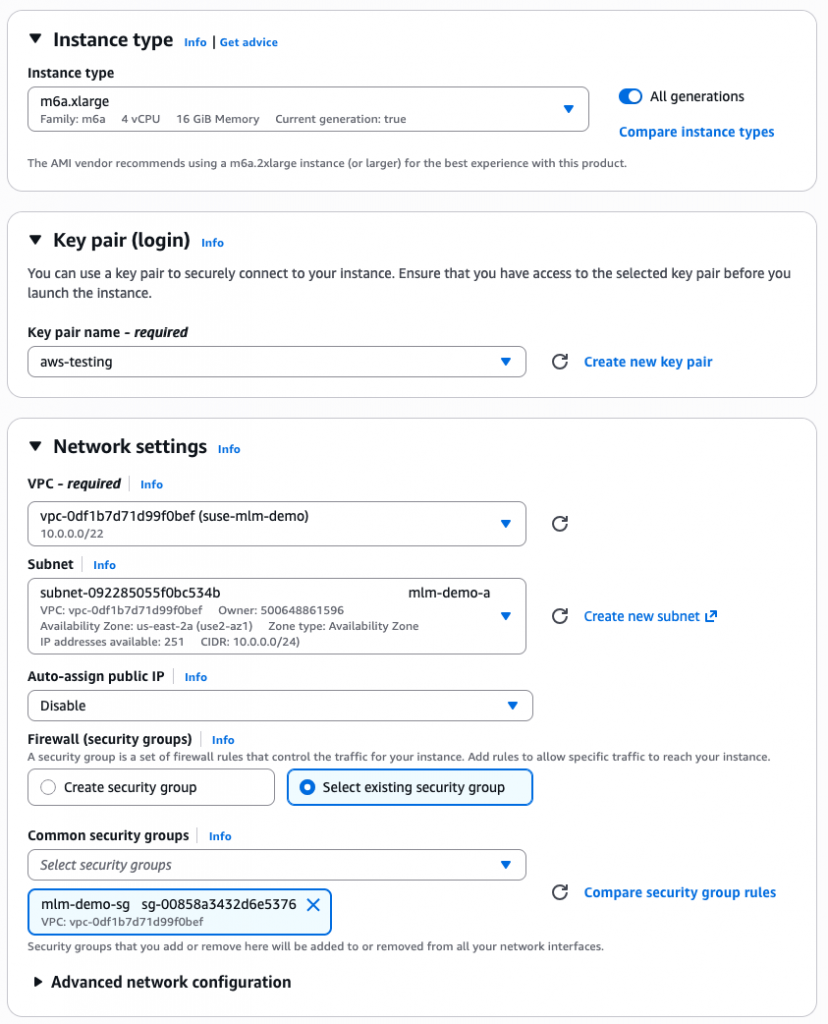
Select the dropdown for instance type and find m6a.xlarge in the list. This is an adequate size for a testing environment. Under Key pair, either select an existing key pair, or create a new one. Under Network Settings verify that you have the correct VPC and Subnet selected for the deployment. Select Select existing security group and find the previously created security group in the list.
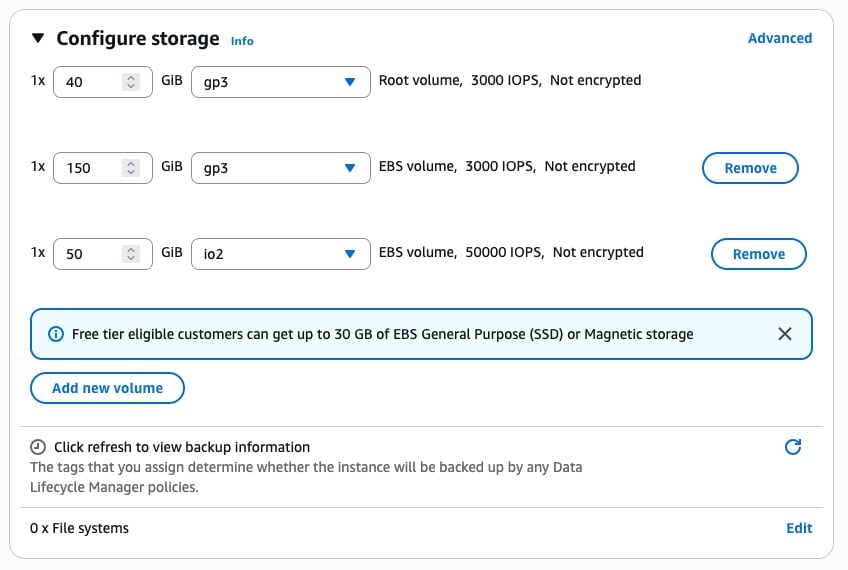
Storage will require additional configuration. The default 10 GiB sized volume will be insufficient for using Multi-Linux Manager. Adjust the size of the root volume to at least 40 GB. Then click on Add new volume. It is recommended to add two additional volumes with at least 150 GB and 50 GB, respectively, that will be used for storing the repository mirrors as well as the PostgreSQL database. Refer to the documentation link at the top of this section to understand sizing recommendations. For both the root and persistent storage volumes, EBS gp3 should be adequate for most deployments. The database volume should be placed on EBS io1 or io2 to ensure that it remains performant even under high loads. For testing environments using io1 should be sufficient, but io2 is recommended for production environments.
When all settings are ready, click on Launch instance on the right side of the page. It will take a few minutes to deploy the instance. You are now ready to install SUSE Multi-Linux Manager on the now deployed host.
AWS CLI
To deploy the SUSE Linux Enterprise Server 15 SP7 AMI you can use the following command as reference. Note, that it is using an AMI alias based on the latest patches, as of this writing that is v20260209. You can find the latest alias under the Marketplace subscription, or by querying the AWS Systems Manager. This command will return the latest AMI of SLES 15 SP7.
aws ssm get-parameters-by-path --path "/aws/service/marketplace/prod-wxbgca6rwkiry" --recursive --query "sort(Parameters[?contains(Name, 'sles-15-sp7-byos')].Name)[-1]"Remember to update the --key-name and --network-interfaces values to reflect your environment. This command will deploy an instance type of m6a.xlarge. This is fine for a testing environment, but m6a.2xlarge or greater is recommended for production environments.
Note
This command does not deploy a public IP address. It assumes that you have another way to access the host, either a jumpbox, EC2 Instance Connect, or SSM Session Manager.
aws ec2 run-instances \
--image-id resolve:ssm:/aws/service/marketplace/prod-wxbgca6rwkiry/sles-15-sp7-byos-x86_64---v20260209 \
--instance-type m6a.xlarge \
--key-name aws-testing \
--count 1 \
--network-interfaces "SubnetId=subnet-XXXXXXXXXXX,AssociatePublicIpAddress=false,DeviceIndex=0,Groups=$SG_ID" \
--tag-specifications "ResourceType=instance,Tags=[{Key=Name,Value=suse-mlm-sles}]" \
--block-device-mappings '[
{"DeviceName":"/dev/sda1","Ebs":{"VolumeSize":40,"VolumeType":"gp3","DeleteOnTermination":true}},
{"DeviceName":"/dev/sdb","Ebs":{"VolumeSize":150,"VolumeType":"gp3","DeleteOnTermination":false}},
{"DeviceName":"/dev/sdc","Ebs":{"VolumeSize":50,"VolumeType":"io1","Iops":25000,"DeleteOnTermination":false}}
]'
It will take a few minutes after running the command for the deploy to finish. You are now ready to install SUSE Multi-Linux Manager on the now deployed host.
Install Multi-Linux Manager
With the instance now deployed, you will need to connect to the instance for the remainder of the setup process. Remember, the default user on the instance is ec2-user.
The first thing to do after connecting to the system is to apply the registration codes for SUSE Linux Enterprise Server 15, SUSE Multi-Linux Manager Server Extension for SLE, and any System Packs. This registration will also install the base services and packages onto the host.
# SUSE Linux Enterprise Server 15 SP7
sudo suseconnect -r <ActivationCode> -e <EmailAddress>

# SLE Containers Module
sudo suseconnect -p sle-module-containers/15.7/x86_64

# SUSE Multi-Linux Manager
sudo suseconnect -p Multi-Linux-Manager-Server-SLE/5.1/x86_64 -r <ActivationCode>
After the registration is complete you can verify the status with sudo suseconnect -s. Ensure that your system has the latest available packages at this point.
sudo zypper refresh && sudo zypper updateOnce any updates are applied you can verify if a reboot is needed with sudo zypper needs-rebooting. Reboot the system if required. The system should now be ready to proceed with the base configuration.
After the registration and update is complete, ensure that the podman Systemd service is started and enabled to run at boot.
sudo systemctl enable --now podman.serviceNext, configure the storage devices for persistent storage and the database. In most cases these should be /dev/nvme1n1, but it may vary depending on the instance type. Verify the device names with lsblk, they should be listed near the bottom with no mount points listed. The base command to configure the storage is mgr-storage-server <storage-disk-device> [<database-disk-device>].
sudo mgr-storage-server /dev/nvme1n1 /dev/nvme2n1When the command completes you can verify that the disks are properly mounted with lsblk. The disks should be mounted /var/lib/containers/storage/volumes for the 150+ GB persistent storage volume and /var/lib/containers/storage/volumes/var-pgsql for the 50+ GB database volume.
At this stage it is also good to verify that forward and reverse DNS lookups are working correctly. Once those are verified, you can deploy Multi-Linux Manager. If you are using self-signed certificates, then run
sudo mgradm install podman <FQDN>This will deploy the system using the fully-qualified domain name specified. If you are using a third-party then you will need to specify the certificate.
mgradm install podman <FQDN> \
--ssl-ca-intermediate <strings> \
--ssl-ca-root <string> \
--ssl-server-cert <string> \
--ssl-server-key <string> \
--ssl-db-ca-intermediate <strings> \
--ssl-db-ca-root <string> \
--ssl-db-cert <string> \
--ssl-db-key <string>
Follow the prompts and wait for the installation to complete. When it is complete, navigate to the FQDN specified during the installation and login with the user admin and the password specified during the process.
What’s Next?
Once the installer finishes, you can log in to the dashboard. Check out our Setup Wizard guide to start configuring and mirroring your first repositories.
You’re now ready to connect your clients and gain a “single pane of glass” to view and manager your entire Linux estate, now running on the reliability of SLES and the scale of AWS.
Related Articles
Apr 11th, 2025