Creating Virtual WLAN Interfaces
 This article has been contributed by Felix Niederwanger, Software Engineer at SUSE.
Overview
When it comes to testing and virtual devices for testing purposes, the Linux kernel is always a surprisingly rich source. I’m at the moment working on setting up an openQA test for wpa_supplicant, probably the most widespread program for protected WiFi access. wpa_supplicant is also used in Android and is the part, that provides most of the higher level WiFi functionality. In order to verify that wpa_supplicant keeps working, I created an automated test that checks for every update if it still works. I used virtual WLAN interfaces and network namespace separation, so that the test is self-containing (i.e. it runs on a single virtual machine) and portable.
So, in this guide we are going to do the following:
- Set up two virtual WLAN interfaces (WLAN0 and WLAN1)
- Isolate WLAN0 and WLAN1 into two network namespaces
- Create a virtual access point using hostapd and dnsmasq
- Connect the WiFi client to the network
- Run basic network ping tests
You will need the following:
- A physical or virtual machine running openSUSE Leap/Tumbleweed (but it should work on other distributions as well)
- Root access to that machine
Requirements
First install the requirements for this guide:
leap-15_1:~ # zypper in hostapd dnsmasq wpa_supplicant iw
Set Up the WLAN Interfaces
The Linux kernel provides already everything we need via the mac80211_hwsim module. It’s a software simulator for IEEE 802.11 radio networks (commonly known as WLAN networks) written by Jouni Malinen. This kernel module is a piece of art – it creates an arbitrary amount of virtual WiFi interfaces that can communicate with each other if they are tuned to the same channel. Like this it’s possible to simulate various arbitrarily complex scenarios, ranging from a simple two device network (like we will be using) to complex setups with multiple clients connecting to various hotspots that run on different channels.
Set up the WiFi interfaces as follows:
leap-15_1:~ # modprobe mac80211_hwsim radios=2
The argument radios=2 defines how many virtual interfaces will be created and defaults to two devices. After successfully loading the kernel module,WLAN0 and WLAN1 are showing up, as shown in figure 1 below (execute ip link). The third interface that pops up is hwsim0. As stated before, WLAN interfaces can be tuned to channels and only can send and receive radio frames on that particular channel. hwsim0 is a virtual interface for debugging purposes, where you could listen to all radio frames on all channels. We won’t need it for this guide.
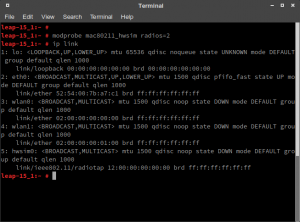
mac80211_hwsim module is loaded and shows two WLAN interfaces
Isolating the Interfaces into Namespaces
After setting up the interfaces, all of them are visible and accessible from the system. We need to separate the two WiFi interfaces, so that we are able to test the connectivity between them. Let’s assume WLAN0 has the IP address 192.168.200.1 and WLAN1 has the IP address 102.168.200.101. If you now perform a simple ping on one of the two addresses, the system will perform the ping directly on that interface. In this configuration we cannot test if the packets would go over the virtual WiFi.
Luckily, network namespace separation allows us, to separate interfaces from each other. More specifically, it allows us to run a separate shell, where one of the WLAN interfaces will be. In that configuration, the system has no other possibility than to route packets over the WLAN interface to reach the other one. See the following figures for an illustration of the separation:
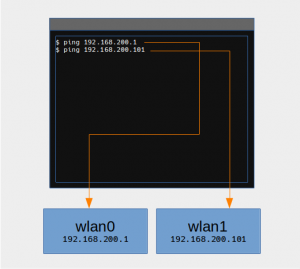
Without network namespace separation, both interfaces are visible

Interfaces in different network namespace don’t see each other. In this configuration, packets need to go over the virtual wifi to reach each other
We are going to create a network namespace called wifi_master for the WLAN0 interface and run a separate shell in that namespace. With that we end up having two shells: One for the WiFi hotspot (wifi_master) and one for the WiFi client. Both shells only see their corresponding WLAN interface and don’t know the other one exists.
First create the network namespace:
leap-15_1:~ # ip netns add wifi_master
leap-15_1:~ # ip netns list
wifi_master
One of the most convenient ways to assign network namespaces would be via ip link set. Unfortunately this doesn’t work with the virtual interfaces, thus we need to use the iw utility for that.
leap-15_1:~ # ip link set dev wlan1 netns wifi_master
RTNETLINK answers: Invalid argument
Assigning WLAN interfaces with the iw utility works on a process ID basis. So we first are going to launch our WiFi master shell in the new network namespace:
# Run this in a separate shell.
leap-15_1:~ # ip netns exec wifi_master bash
leap-15_1:~ # echo $BASHPID
3282
This will be our WiFi hotspot called wifi_master and has the pid 3282. Now, from our first shell, where WLAN0 is still visible, we are going to assign WLAN0 to the wifi_master namespace (replace 3282 with the pid of your wifi_master shell):
leap-15_1:~ # iw phy phy0 set netns 3282
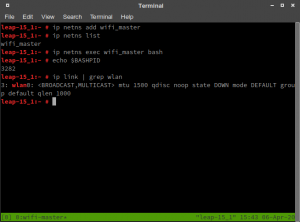
WiFi master shell
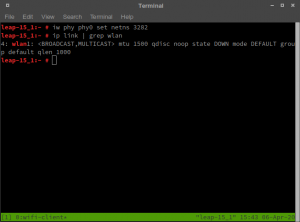
WiFi client shell
The result should be those two shells: WiFi master with the WLAN0 interface and WiFi client with the WLAN1 interface.
Configure the Access Point
In the WiFi master shell we configure now the access point. The interface gets a static IP, dnsmasq will run as DHCP server and hostapd for the WiFi setup. First we set the static IP and setup dnsmasq as DHCP server (and run it as background job):
leap-15_1:~ # ip addr add 192.168.200.1/24 dev wlan0
Next we setup dnsmasq as DHCP server and run it as background job:
leap-15_1:~ # dnsmasq -i wlan0 --dhcp-range=192.168.200.128,192.168.200.200 &
For hostapd we use the following, very trivial configuration file hostapd.conf:
# hostapd.conf
interface=wlan0
driver=nl80211
country_code=DE
ssid=Virtual Wifi
channel=0
hw_mode=b
wpa=3
wpa_key_mgmt=WPA-PSK
wpa_pairwise=TKIP CCMP
wpa_passphrase=TopSecretWifiPassphrase
auth_algs=3
beacon_int=100
Then we run hostapd with the following command:
leap-15_1:~ # hostapd hostapd.conf
You should see something similar to the screen below:
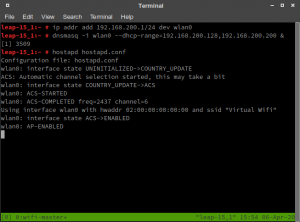
Wifi access point is started
Congratulations! The access point is up and running. The next step is to configure the WiFi client.
Connecting the WiFi Client
We use wpa_supplicant to connect to the WiFi access point. In the Wifi client shell, we first create the following very simple wpa_supplicant.conf file:
# wpa_supplicant.conf
network={
  ssid="Virtual Wifi"
  key_mgmt=WPA-PSK
  psk="TopSecretWifiPassphrase"
}
and connect to the access point via the following command:
# Run those commands in the wifi-client shell!
# Note: -B is for run in background
leap-15_1:~ # wpa_supplicant -B -i wlan1 -c wpa_supplicant.conf
You should now see the authentication in the WiFi master terminal:
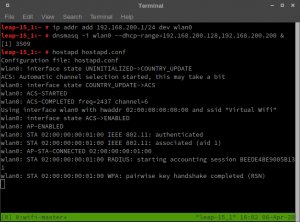
WPA handshake completed on the WiFi access point
DHCP Client Using Wicked
Create the following very basic configuration file for wicked:
# /etc/sysconfig/network/ifcfg-wlan1
BOOTPROTO='dhcp'
BROADCAST=''
ETHTOOL_OPTIONS=''
IPADDR=''
MTU=''
NAME=''
NETMASK=''
NETWORK=''
REMOTE_IPADDR=''
STARTMODE='auto'
Then restart wicked to get the new IP address:
leap-15_1:~ # systemctl restart wicked
leap-15_1:~ # ip addr show dev wlan1
4: wlan1: <NO-CARRIER,BROADCAST,MULTICAST,UP> mtu 1500 qdisc mq state DOWN
group default qlen 1000
    link/ether 02:00:00:00:01:00 brd ff:ff:ff:ff:ff:ff
    inet6 fe80::ff:fe00:100/64 scope link
       valid_lft forever preferred_lft forever
Finally ping the access point:
leap-15_1:~ # ping -c 4 192.168.200.1
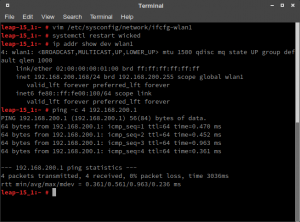
Ping works successfully in the WiFi client shell
Congratulations! You have successfully set up your virtual WLAN network!
Related Articles
Feb 17th, 2026
Comments
how do you have different shell for client and master
Luckily, network namespace separation allows us, to separate interfaces from each other. More specifically, it allows us to run a separate shell, where one of the WLAN interfaces will be. In that configuration, the system has no other possibility than to route packets over the WLAN interface to reach the other one. See the following figures for an illustration of the separation:
can you explain this a bit