How to set up KVM in an LPAR on SUSE Linux Enterprise Server 16
 This article was written by Hariharan T S, Team Lead for KVM in PowerVM LPARs at IBM.
Hariharan T S has 20 years of experience working on Linux kernel subsystems, virtualization, and device-driver testing across IBM Power and IBM Z systems. His background includes the functional verification of major Linux distributions on s390x and ppc64le architectures. Additionally, he has contributed to and maintained automation frameworks to support large-scale test execution and regression workflows. His work focuses on improving system reliability through structured testing, debugging, and collaboration with development teams.
Support for KVM in a PowerVM LPAR (logical partition) allows KVM guests to run inside an LPAR on PowerVM. This allows SUSE Linux Enterprise Server 16 KVM tools to create and manage lightweight Linux Virtual Machines (VM). A KVM-enabled LPAR uses dedicated cores which enables SUSE Linux Enterprise Server 16 to have full control of when Linux KVM guests are scheduled to run, just like KVM on other platforms.
Prerequisites
- Hardware:
- IBM Power10 System (S1014, S1022, S1022, S1024, E1050 and E1080)
- IBM Power11 System (E1150 and E1180)
- Firmware: IBM FW1060.10 and above
- HMC Levels: V10 R3 SP1060 and above
- LPAR:
- Configuration: KVM-enabled LPAR (see below for steps to enable KVM for an LPAR), and LPAR must be in Dedicated Mode.
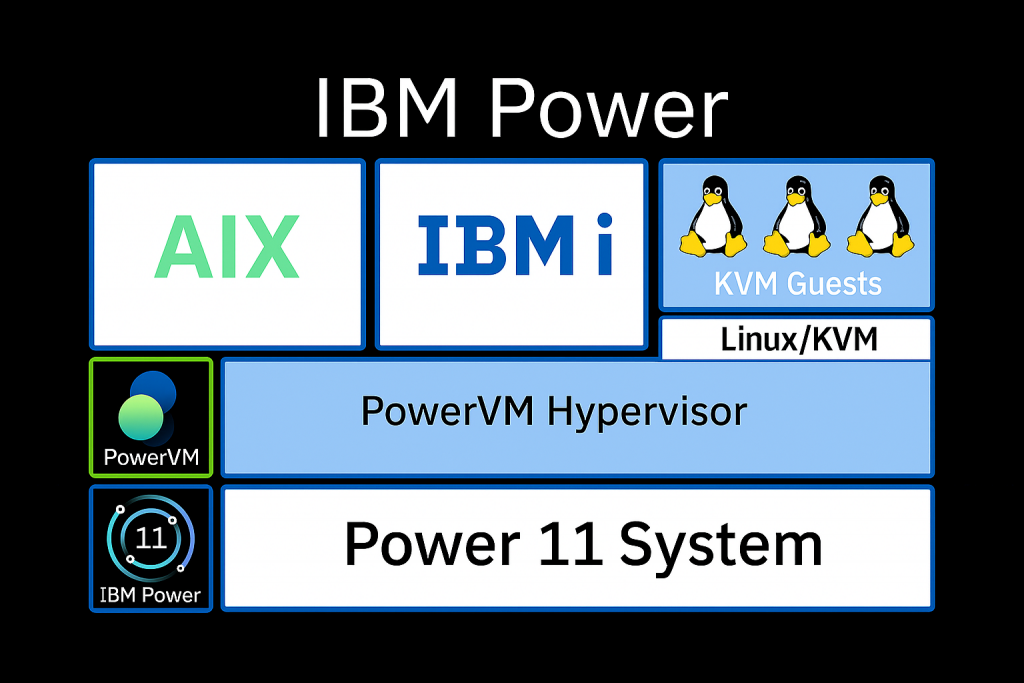
Fig. 1: KVM in an LPAR stack
Enabling KVM for an HMC-Managed PowerVM LPAR
Using the HMC GUI
Note: The following operation is allowed only on a deactivated LPAR and when the HMC-based LPAR console is closed.
Please refer to Fig. 2 below:
→ Select the Managed System.
→ Select the LPAR.
→ Click “Advanced Settings”.
→ Select the check-box “KVM Capable” to support KVM virtualization.
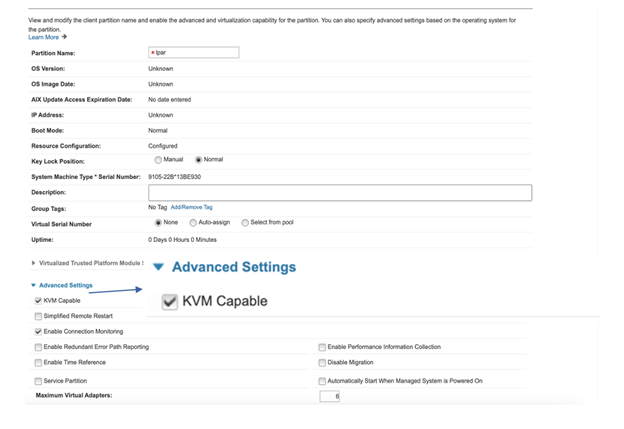
Fig. 2: HMC Management page for enabling KVM in a PowerVM LPAR
Using the HMC CLI
1. Log in to HMC via SSH.
2. To convert a regular LPAR to a KVM-capable LPAR, run the following command:
chsyscfg -r lpar -m <Managed System> -i "name=<lparname>,kvm_capable=1"
3. To convert a LPAR from KVM capable to regular LPAR, run:
chsyscfg -r lpar -m <Managed System> -i "name=<lparname>,kvm_capable=0"
4. To check the LPAR mode, run:
lssyscfg -r lpar -F kvm_capable -m <Managed System> --filter "lpar_names=<lpar-name>"
Sample Output:
# lssyscfg -r lpar -m ltcden6 --filter "lpar_names=ltcden6-lp1" -F kvm_capable 1
Enabling KVM for non-HMC-managed PowerVM LPAR (MDC mode)
Note: KVM in MDC mode is only supported with eBMC-based systems. MDC is supported in following servers:
- Power10: S1012, S1014, S1022s, S1022 and S1024
- Power11: S1124 and S1122
Please refer to Fig. 3 below:
→ Connect to the eBMC ASMI GUI at https://<eBMC IP>.
→ Navigate to “Server power operations”.
→ From the “Default partition environment” menu, select “Linux KVM”.
→ Click “Save” and reboot the system.
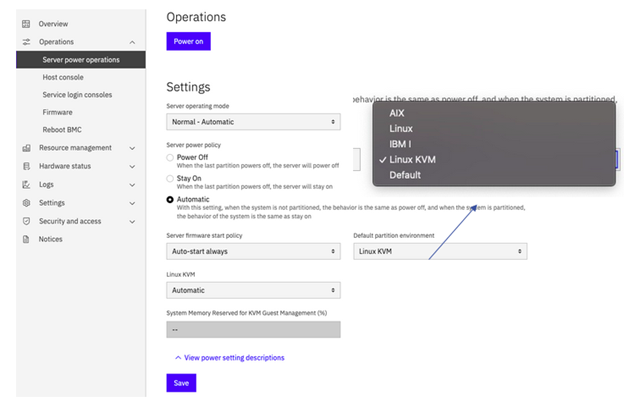
Fig. 3: eBMC page for enabling KVM in a PowerVM LPAR
SUSE Linux Enterprise Server 16 KVM host setup
Please refer to the IBM PowerVM documentation on how to set up a SUSE Linux Enterprise Server 16 instance in PowerVM LPARs managed by HMC, or as unmanaged eBMC system LPARs. Once the LPAR is installed with a supported distribution, follow the relevant steps outlined below.
SUSE Linux Enterprise Server 16
Install KVM/Qemu:
$ zypper install -t pattern kvm_server kvm_tools
Install libvirt:
$ zypper install libvirt-daemon
Install virt-customize, virt-sysprep and other tools:
$ zypper install guestfs-tools
Start libvirtd:
$ systemctl start libvirtd
$ systemctl enable libvirtd
Once the necessary packages are installed, to verify the libvirt daemon setup is working, run:
$ virsh list –all

Id Name State

--------------------
A non-error output indicates that the libvirsh services are active and ready to spawn KVM guests. The empty list output above indicates that currently no KVM guests are provisioned with libvirt.
SUSE Linux Enterprise Server 16 KVM host – Default network bridge setup
KVM guest need a networking bridge to be available for connectivity across guest to host and guest to outside network. Follow the steps below to set up a default network bridge.
Before proceeding with the Linux KVM guest setup, make sure the default network bridge is active.
$ virsh net-list

Name State Autostart Persistent

--------------------------------------------

default active no yes
In case the default network is not active, use the command below to start the default network interface:
$ virsh net-start default
Network default started
In the rare event that the default network is unavailable, use the following steps to configure it manually.
Create a default.xml file with following contents:
<network>
<name>default</name>
<forward mode='nat'/>
<bridge name='virbr0' stp='on' delay='0'/>
<ip address='192.168.122.1' netmask='255.255.255.0'/>
</network>
Configure the default network bridge:
$ virsh net-define default.xml
Start the default network bridge:
$ virsh net-start default
SUSE Linux Enterprise 16 KVM guest provisioning
To set up a Linux KVM guest, you can use one of the methods outlined below.
Create a KVM Guest using a cloud (qcow2) image
One of the simplest ways to set up a SUSE Linux Enterprise Server KVM guest is to use pre-built images from SUSE. To get started, simply download the required guest qcow2 images from https://www.suse.com/download/sles/
Once downloaded, the guest qcow2 images need to be provisioned and configured using the virt-install command depending upon VM block size. Please be aware that currently, for PPC64LE, guest images in QCOW2 and RAW formats are available with block-sizes 4096-Bytes and 512-Bytes. The configured block size is part of the guest image name itself.
VM block size 512 :
$virt-install --name SLES16-512-Guest --memory 4096 --disk path=/home/SLES-16.0-Minimal-VM.ppc64le-512-qcow2-Build5.1.qcow2 --vcpus 4 --os-variant generic --network bridge=virbr0 --import --graphics none --autoconsole text
VM block size 4096 :
$ virt-install --memory 2048 --import --disk source.file=SLES-16.0-Minimal-VM.ppc64le-ppc64le-4096-qcow2-PublicRC.qcow2,blockio.logical_block_size=4096,blockio.physical_block_size=4096 --name SLES16-Test --graphics none --autoconsole text
Create a KVM guest using the SUSE Linux Enterprise Server 16 installation image (ISO)
Another method to set up a KVM guest is using the traditional ISO-based installation method. To use this method, first download a DVD-based ISO image for the IBM Power ppc64le architecture. In the example below, we create a libvirt domain with 4 GiB memory, 4 vCPUs and a 40 GiB virtual disk:
For SUSE Linux Enterprise Server, download the installer image from https://www.suse.com/download/sles/.
$ virt-install --name guest --memory 4096 --vcpus 4 --os-variant sles16 --network bridge=virbr0 --disk path=/home/guest.qcow2,size=8 --graphics none --cdrom /home/SLES-16.0-Full-ppc64le-GMC2pre2.install.iso
Follow the install screens to complete the Linux distro installation. Once completed successfully, your Linux KVM guest is now ready for use. You can verify the guest creation by listing the available domains via virsh:
$ virsh list

Id   Name        State

---------------------------

1    guest   running
Summary
This article covered the basics of a SUSE Linux Enterprise Server based KVM guest in a PowerVM LPAR, including how to configure and set up a new KVM-capable LPAR. This article also covered bootstrapping a KVM guest using various mechanisms including using pre-built distro qcow2 images.
Related Articles
Jun 10th, 2024