Breaking Free: A Step-by-Step Guide to Migrating from Red Hat OpenShift to SUSE Rancher Prime
The enterprise container market is hitting a turning point. For years, Red Hat OpenShift was the choice for organizations wanting an all-in-one Kubernetes platform. However, the tide has turned as businesses grow weary of rigid architectures and escalating licensing fees.
The most frequent question I hear from teams today is: “How do we move from OpenShift to SUSE Rancher Prime?” This guide serves as your roadmap for that transition.
Understanding the Landscape
To understand why this move matters, it helps to look at how these platforms handle your infrastructure:
-
Red Hat OpenShift: Think of this as a highly customized, “opinionated” version of Kubernetes. It mandates specific operating systems (like RHEL CoreOS) and proprietary resources. While powerful, it often results in vendor lock-in, making it difficult to move your applications elsewhere.
-
SUSE Rancher Prime: This is a “management-first” platform. It doesn’t rewrite the rules of Kubernetes; instead, it provides a unified management layer that sits atop any standard, CNCF-certified cluster.
The Difference: OpenShift is an ecosystem you live inside; Rancher is a cockpit that lets you fly any plane you choose.
Why Organizations are Making the Switch
| Feature | Red Hat OpenShift | SUSE Rancher Prime |
| Flexibility | Proprietary and restrictive | Open and “management-first” |
| OS Requirements | Heavily tied to RHEL/CoreOS | OS-agnostic |
| Lock-in Risk | High (Custom resources/APIs) | Low (Standard CNCF Kubernetes) |
| Cost Structure | Typically higher licensing | Focus on value and interoperability |
Your Path to Kubernetes Freedom
Whether you are a newcomer treating Kubernetes as your “cloud operating system” or a veteran architect looking to untangle complex workloads, the migration process follows a logical flow.
By shifting to SUSE Rancher Prime, you regain control over your stack without sacrificing enterprise-grade security or multi-cluster oversight. This guide will walk you through the technical steps to decommission your OpenShift dependencies and embrace a more flexible, standard Kubernetes environment.
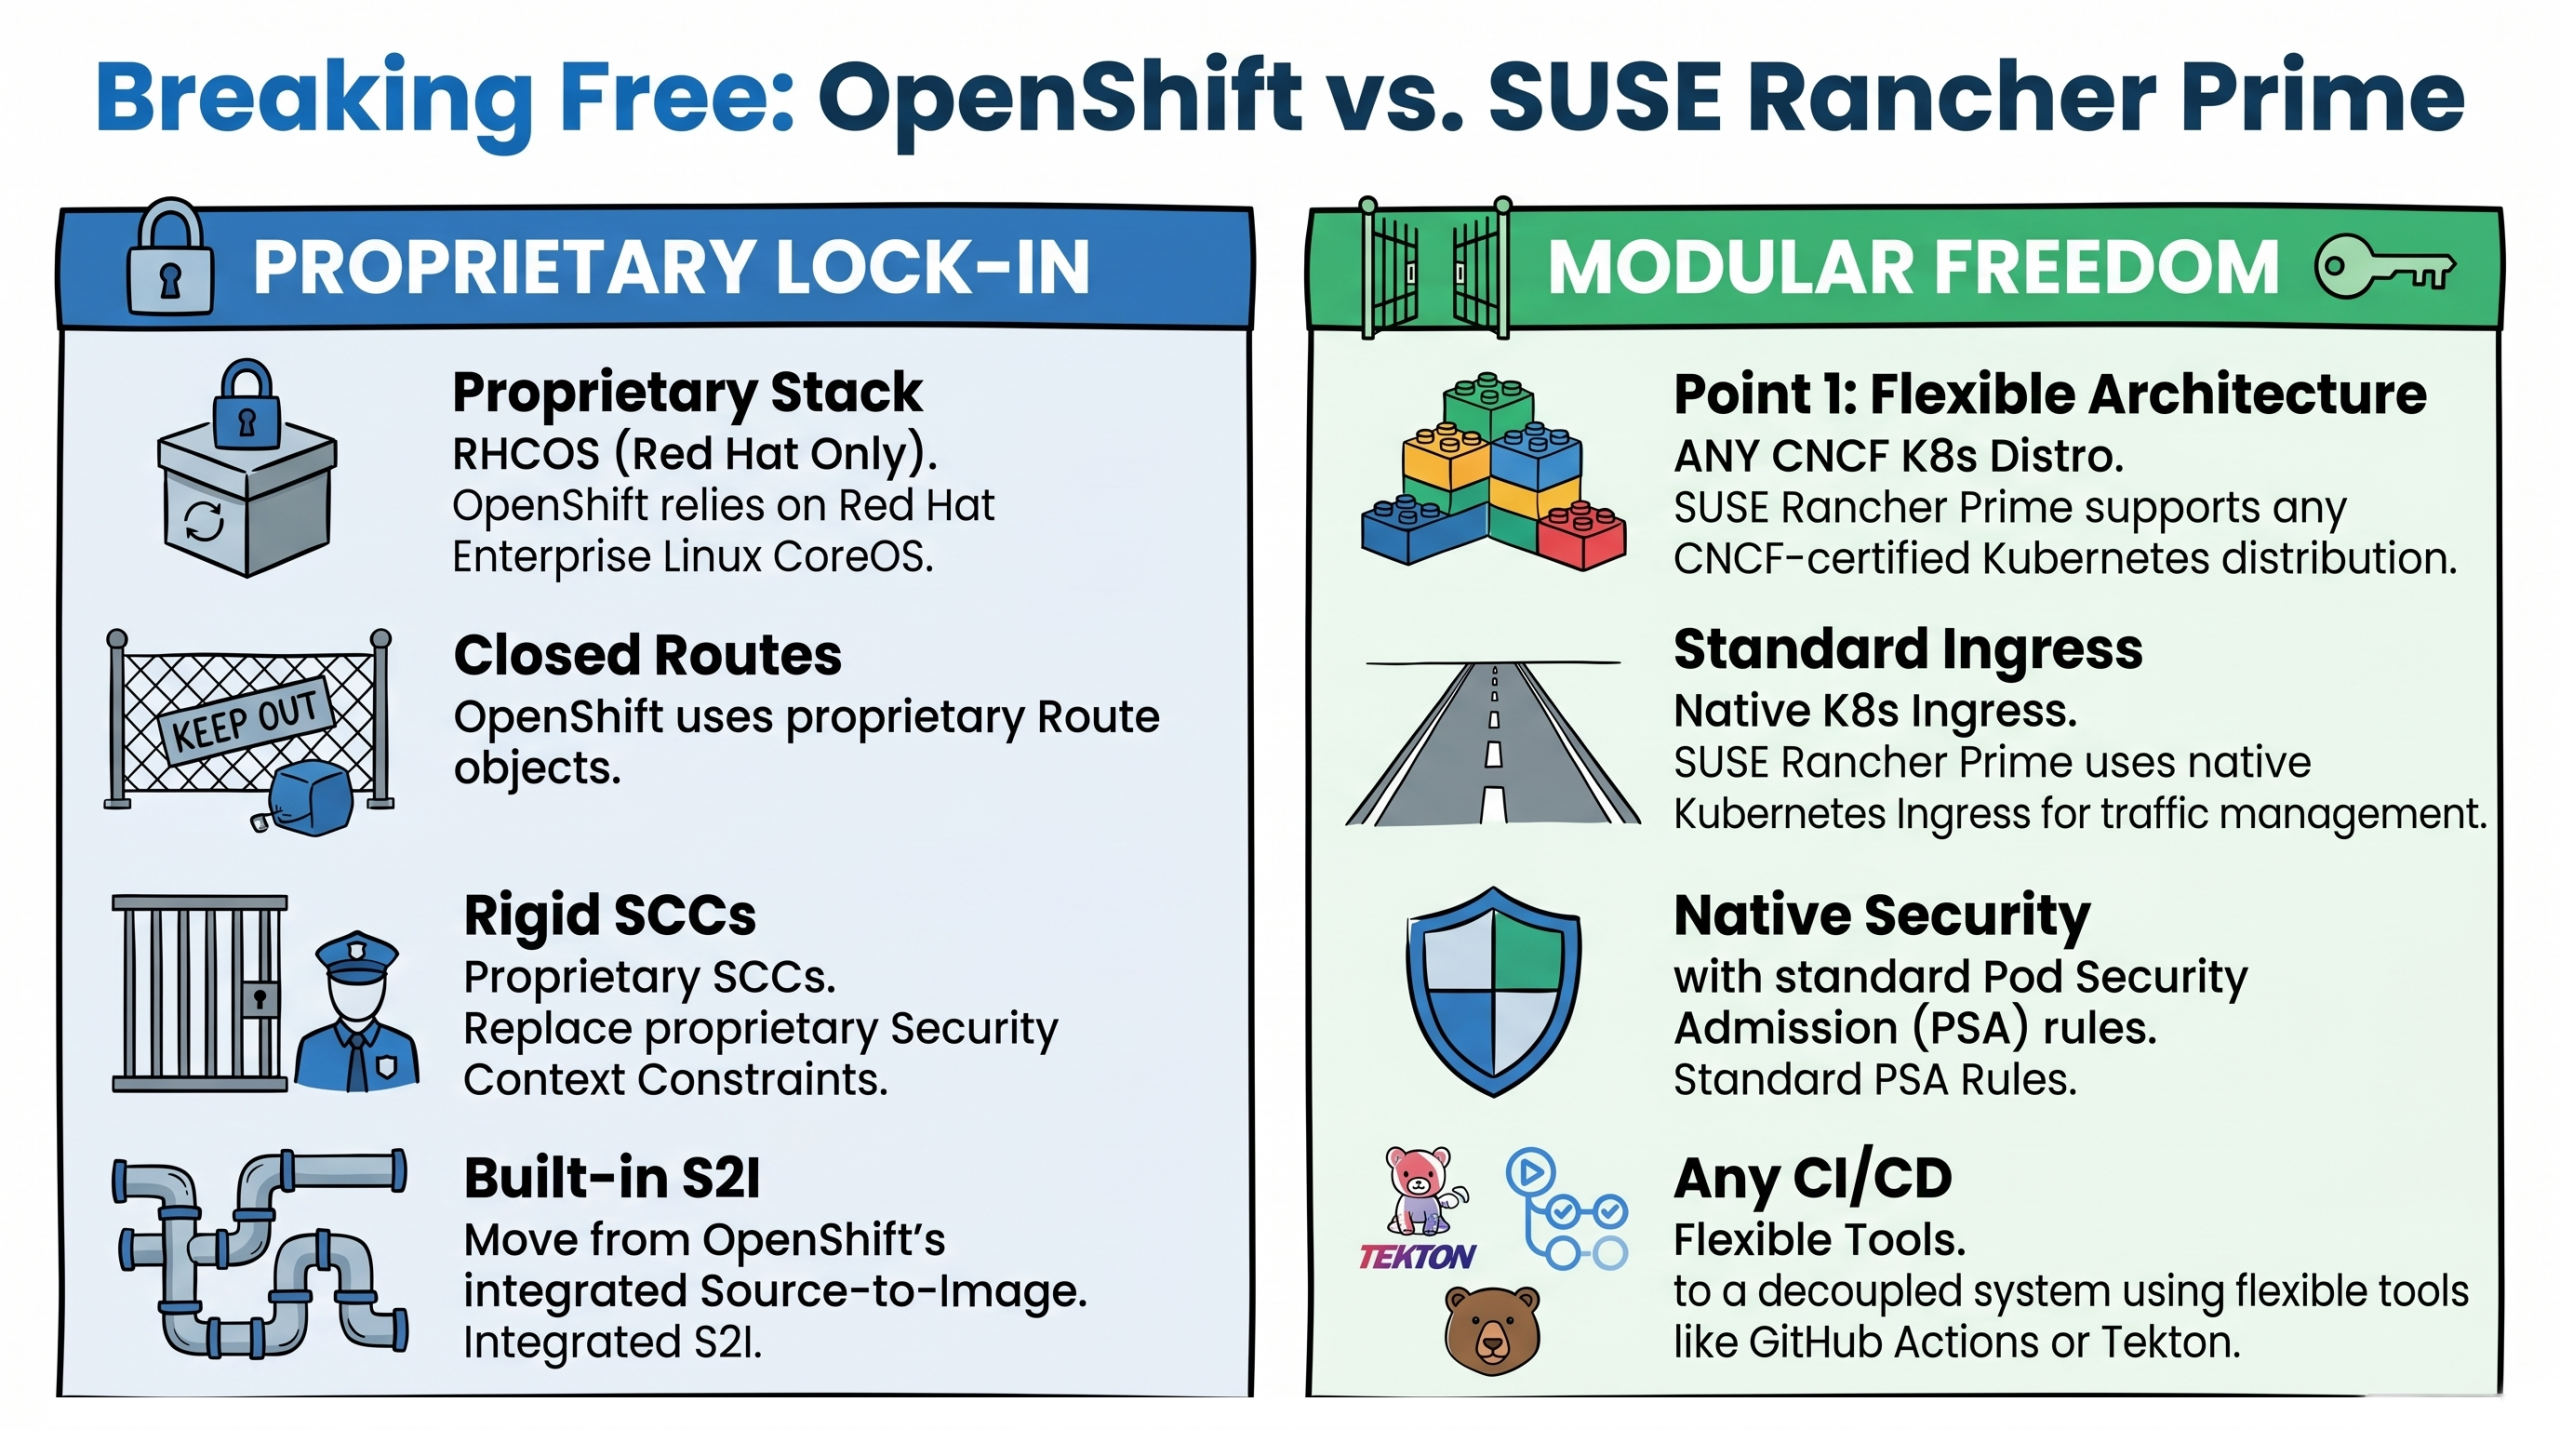
Figure 1 The Trap of OpenShift Vendor Lock-In
Because OpenShift replaces vanilla Kubernetes with its own integrated stack, it creates deep vendor dependencies through proprietary Custom Resource Definitions (CRDs). A CRD is essentially a custom blueprint for how an application should run. If you attempt to leave OpenShift, you will immediately hit walls built by these proprietary Red Hat blueprints:
- DeploymentConfig: This tells the cluster how to run your application. OpenShift uses this pre-standard resource instead of the native Kubernetes Deployment. It includes proprietary automated triggers that rebuild your app when a new container image is detected—something standard Kubernetes handles differently.
- Route: Think of this as the front door to your application. Instead of using standard Kubernetes Ingress to let web traffic in, OpenShift uses proprietary Route objects.
- BuildConfig and S2I: OpenShift has its own Source-to-Image (S2I) build system directly built into the cluster. Standard Kubernetes separates the building of the app from the running of the app.
- Security Context Constraints (SCCs): These are security rules for your containers. OpenShift uses strict, proprietary SCCs to enforce permissions instead of the native Kubernetes Pod Security Admission (PSA) standards.
These proprietary resources act as a retention mechanism—making migration feel daunting. But with the right strategy, you can convert these blueprints and regain control of your infrastructure.
Step-by-Step Migration Guide
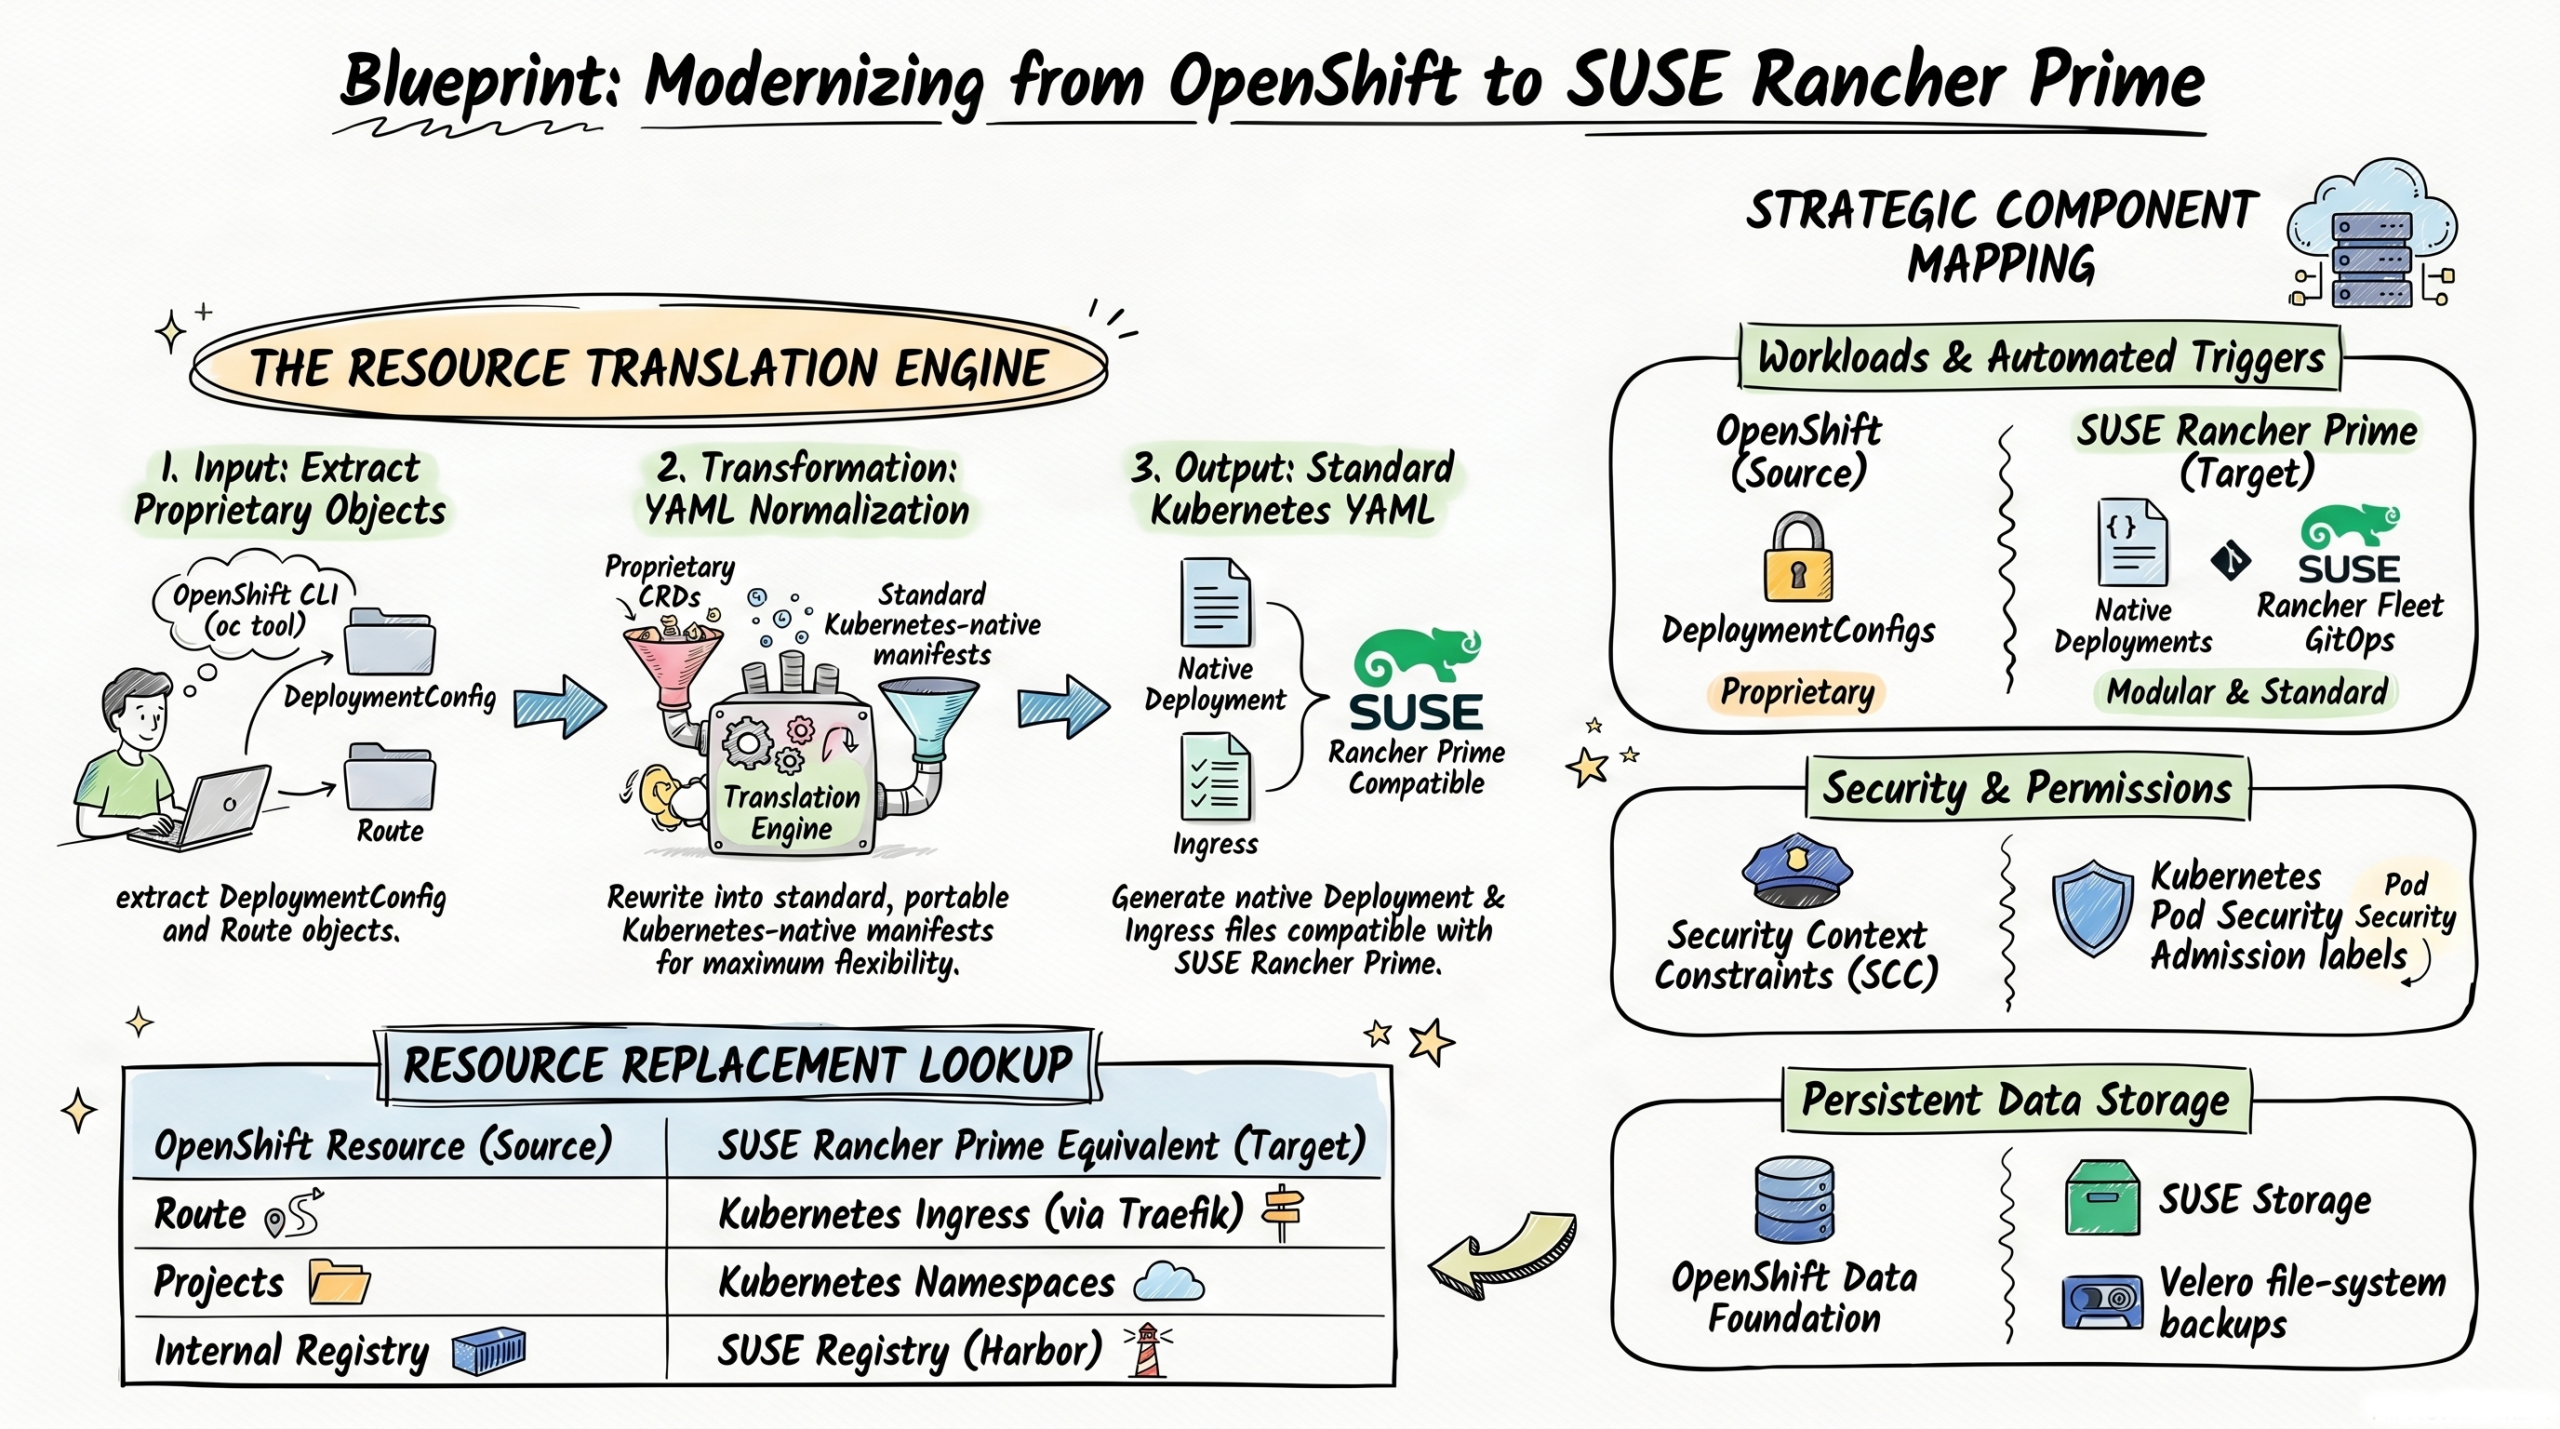
Figure 2 – The Resource Translation Flow
To ensure zero downtime (meaning your application never goes offline) and prevent data loss, a phased “side-by-side” migration strategy is highly recommended.
Step 1: Audit and Export OpenShift Resources
Before moving any data, you need to know exactly what you are running. You must conduct a full inventory of your source OpenShift environment to identify every proprietary blueprint that requires conversion.
You will use the OpenShift Command Line Interface (the oc tool) to download your configurations into simple text files. Run the following inventory commands on your computer:
oc get projects -o json > projects.json (Saves your projects/folders).

oc get routes -A -o yaml > routes.yaml (Saves your web traffic rules).

oc get buildconfigs -A -o yaml > builds.yaml (Saves your build rules).

oc get pv,pvc -A -o yaml > storage.yaml (Saves your storage configurations).

oc get scc -o yaml > security.yaml (Saves your security permissions).
Step 2: Migrate Container Images Using Skopeo
Your applications are packaged into “container images” (like a zip file containing your app’s code and dependencies). OpenShift has an internal container registry (a storage locker for these images) that must be replaced with an enterprise-grade external registry. You can use SUSE Private Registry/Harbor, Quay, or Artifactory as your new destination.
To move your images securely and efficiently, use Skopeo, a command-line tool designed for working with remote image registries. Skopeo is the absolute best tool for this job because it seamlessly transfers images between registries while preserving essential metadata and layers, all without requiring a heavy, privileged Docker daemon to be installed or running on your computer.
Instead of using a heavy, multi-step pull, tag, and push workflow, Skopeo allows you to copy images directly in a single command. If your source and destination registries require passwords, Skopeo natively handles credentials.
Here is an example of how you can structure your Skopeo command to migrate an image from OpenShift to your new SUSE Registry (Harbor):
skopeo copy \
  --src-creds admin:openshift_password \
  --dest-creds admin:harbor_password \
docker://internal-registry.openshift.com/myproject/myimage:latest \
docker://harbor.mycompany.com/myproject/myimage:v1.0
Pro Tip: If you have a massive registry with hundreds of images, you do not have to move them one by one. You can write a simple script to loop through your repositories and parallelize the skopeo copy tasks to dramatically speed up the migration process.
Step 3: Transform Proprietary Blueprints (CRDs) to Native Kubernetes
This is the most critical phase. You must rewrite your OpenShift-specific YAML files into standard Kubernetes files that Rancher understands.
- Convert Routes to Ingress: Rewrite your Route manifests (the OpenShift front door) into standard Ingress resources (the Kubernetes front door). You will need to configure TLS (security certificates) via secrets and specific annotations for the traffic controller running on your Rancher cluster, such as Traefik.
- Convert DeploymentConfig to Deployment: Convert your workloads to use standard Kubernetes Deployments. OpenShift utilizes a proprietary resource called DeploymentConfig which features built-in, automated image-change triggers that automatically redeploy your application whenever a new container image is pushed to the internal registry. Because SUSE Rancher Prime relies on standard native Kubernetes Deployment resources, it does not have this automatic image-change trigger functionality built directly into the workload resource. To replace this functionality, you can utilize Rancher Fleet, which is Rancher’s built-in GitOps engine. Rancher Fleet replaces OpenShift’s image triggers by actively monitoring your external container image registry, and whenever it detects that a new image tag has been pushed, it can automatically update your deployment manifests and roll out the new application version to your cluster.
- Map SCCs to Pod Security Admission (PSA): OpenShift uses Security Context Constraints (SCCs) to define what an app is allowed to do. Standard Kubernetes uses Pod Security Admission (PSA). Apply the standard PSA labels to your namespaces (folders) in Rancher: map OpenShift’s restricted to pod-security.kubernetes.io/enforce=restricted, map nonroot to baseline, and privileged to privileged. Also, ensure your container images specify a standard USER identity, as Rancher does not automatically generate fake User IDs like OpenShift does.
Step 4: Restructure CI/CD Build Pipelines
CI/CD stands for Continuous Integration and Continuous Deployment—the automated assembly line that tests and builds your code. OpenShift includes a built-in build system (Source-to-Image and BuildConfig). Because SUSE Rancher Prime follows a “management-first” philosophy, it separates building code from running code.
You must transition your assembly line to an external framework. Tools like Tekton, Argo CD, GitHub Actions, or GitLab CI are highly recommended to provide flexible, standard continuous integration outside of your live cluster environment.
Step 5: Migrate Persistent Storage Data
“Stateful” workloads (like databases) need to save data to a hard drive so it isn’t lost if the application restarts. In Kubernetes, this storage is called a Persistent Volume (PV). OpenShift typically uses its own storage engine based on Ceph (OpenShift Data Foundation), while SUSE Rancher Prime environments often use SUSE Storage (Longhorn) for cloud-native distributed block storage.
Because taking a raw “snapshot” of a hard drive rarely translates well between two completely different storage engines, you must perform a file-system level migration using an open-source backup tool like Velero.
- Source Setup: Install Velero on your old OpenShift cluster and configure it to connect to a shared cloud storage bucket (like AWS S3).
- Backup: Use Velero’s “File System Backup” (FSB) capability. This dives into the hard drive and copies the actual files (using tools called restic or kopia) rather than taking a block-level snapshot.
- Target Setup: Install Velero on the new SUSE Rancher Prime cluster and point it to the exact same shared S3 bucket.
- Restore: Instruct Velero to restore the backup. It will automatically recreate the storage claims and copy the file-level data onto your new Longhorn storage drives.
Step 6: Deploy, Validate, and Cutover
With your new blueprints written and your data safely moved, it’s time to bring your application online in SUSE Rancher Prime. Because you are treating this as a fresh start for your applications, follow these detailed steps to ensure success:
- Deploy:
- Recreate the Structure: Start by creating your “Namespaces” in Rancher, which is the standard Kubernetes equivalent for OpenShift’s “Projects”.
- Apply Foundations: Before starting the apps, apply your Secrets (which hold passwords or API keys) and ConfigMaps (which hold application settings) into these namespaces.
- Start Workloads: Finally, apply your newly converted Kubernetes Deployment and Ingress files. Kubernetes will immediately begin downloading your container images from your new SUSE Registry (Harbor) and spinning up the application pods.
- Validate:
- Health Checks: Do not assume the apps are working just because you deployed them. Check the status of your pods in the SUSE Rancher Prime dashboard. Every pod should show a status of “Running” or “Completed”. If you see pods crashing or a high “restart count,” it indicates an underlying configuration issue you must fix.
- Integration Checks: Verify that your application can successfully read and write data to your new SUSE Storage (Longhorn) persistent storage. Ensure it can successfully pull images from your new container registry.
- Parity Testing: Perform rigorous functional, performance, and security testing on these new workloads to guarantee they behave exactly as they did in the legacy OpenShift environment.
- Traffic Cutover:
- Prepare the Front Door: Once you have completely verified that the application is healthy in SUSE Rancher Prime, you must route your external users to it. You will do this by updating your DNS records (the internet’s phonebook) or your global load balancers to point traffic away from OpenShift and toward your new SUSE Rancher Prime ingress endpoints.
- Canary Rollout: Do not send 100% of your users to SUSE Rancher Prime all at once. Execute a phased, “canary-style” cutover. For example, update your load balancer to send just 5% of traffic to the new SUSE Rancher Prime cluster. Monitor your application logs and dashboards for real-time issues or errors. If everything looks stable, gradually increase the traffic to 25%, then 50%, and finally 100%.
- Decommission:
- Burn-in Period: Let the application run with 100% of its traffic on Rancher for a designated “burn-in” period (such as a few days to a week) to ensure absolute stability.
- Power Down: Once you are confident that full traffic migration is verified and there is no straggling traffic hitting the old environment, you can securely power down and delete the legacy OpenShift clusters. This officially completes your migration and frees you from the ongoing Red Hat licensing costs!
Conclusion
Migrating from Red Hat OpenShift to SUSE Rancher Prime is a strategic move from monolithic vendor lock-in to modular agility. By systematically transforming proprietary OpenShift blueprints (like Routes, DeploymentConfigs, and SCC) into native Kubernetes standards, you completely future-proof your environment. With your workloads now running on SUSE Rancher Prime, you gain the freedom to seamlessly manage any CNCF-certified Kubernetes distribution across any cloud, data center, or edge environment.