Developing a Commit-Based CI/CD System Using Rancher
At 360pi, we deliver commerce analytics that
enable retailers to make sense of retail and shopper big data, which
will then be used to improve their commerce strategy. Our infrastructure
is all in Amazon Web Services, and up until now, was simply Ec2
instances built with our own AMIs. We used to maintain the traditional
dev/test/master branch hierarchy in GitHub for our monolithic Python
application, and we deployed those branches with Jenkins and Ansible
scripts. Recently, performance, reliability, and ease of use drove us to
rethink our platform architecture, and devise a more streamlined
approach to the development and deployment of our application. A
microservices architecture would give each of our developers a small
enough piece of the system to deploy, which reduces the footprint of
failure when something goes wrong. Things always break; it’s how quickly
you can react and move on that’s key.
Goals for Re-architecting
We had a few key goals for this effort, but our main goal was to have
everyone who checks into the master repository own the deployment of his
or her changes to production. To do this well, you first need to give
developers complete control of the deployment of the code commit.
Secondly, you need to instill the mindset that a developer owns his or
her changes from merge to master until they are running in production.
First up, we built an easy-to-manage-and-maintain Docker environment
with a good management UI, which Rancher provided for us. We decided to
use Rancher’s orchestrator, since its UI at the time was the most
mature, and we don’t yet have the scale that would require Kubernetes.
Our infrastructure is all in AWS, so we deployed three instances with
the Rancher stack on it, and some instances for our Rancher hosts.
Transitioning to Microservices
We had already started development of our microservices, which are
effectively the main areas of concern for our application. Each
microservice is self-contained, with its own database, RESTful API, and
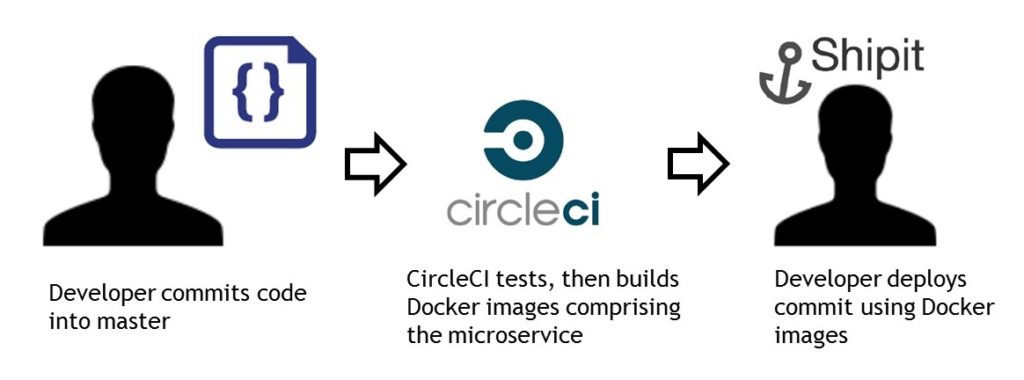
deployment scripts. We use CircleCI at 360pi, which made it quite
straightforward to run tests. We then packaged these as Docker images –
if the build was good, we uploaded them to our Docker repository. So
now, we have small, composable pieces of our system, all using Docker.
We have a way to test the code, and to build Docker images that
represent each microservice. The key point here is this: every
successful merge into master results in a new Docker image, which is
tagged with the commit SHA for that change.

Deployment Time
 Our
Our
newly-updated eBook walks you through incorporating containers into your
CI/CD pipeline The most important piece left was actually
deploying the changes. For this, we turned to an awesome open source
project called Shipit,
created and maintained by the folks over at Shopify. Shipit is a Rails
project that allows you to deploy in pretty much anyway you want, but
does so on a commit-by-commit basis. Every commit is a shippable piece
of code; for us, every commit was a shippable Docker image (you can read
more on Shipit in this excellent write
up). Since
all Shipit does is call shell scripts to do the deploy, it’s quite
simple to bring Rancher into the picture. We create a
docker_compose.yml file, and in some cases, a rancher_compose.yml
file in each microservices project. We then installed the Rancher
CLI on our Shipit
environment so we could manipulate Rancher from our Shipit instances in
AWS. Each microservice has a deploy folder with a few shell scripts,
which simply contain Rancher CLI calls that instruct the Rancher API to
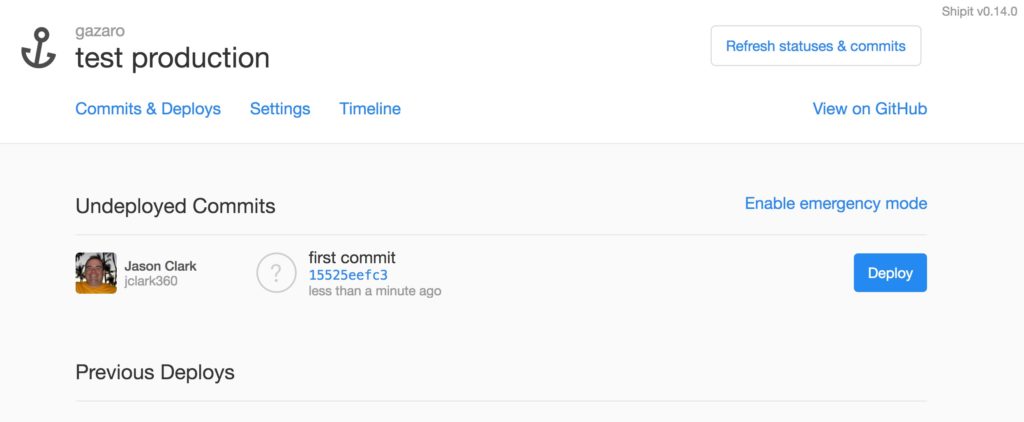
deploy new images to the stack in Rancher. From the Shipit UI, the
developer simply clicks the deploy button next to the commit they want
to deploy; that person watches their deployment happen, and is
responsible for ensuring that it completes properly. The magic here is
that Shipit sets an environment variable with the current commit SHA
being deployed, so we just read that environment variable in the Docker
Compose file (shown below) to know which image to deploy.  ShipIt UI
Shipit deploy.sh sample
rancher --environment MyEnvironment up my-service --stack 360-micro-service --force-upgrade --batch-size 1 -d
Rancher docker_compose.yml sample
my-service:
  labels:
    io.rancher.container.pull_image: always
  tty: true
  image: my_repo/360_service:${REVISION}  # this is the Shipit commit SHA environment var
  stdin_open: true
Rolling Back
Sometimes, things go wrong (welcome to building and shipping software).
Luckily, since we’re using Docker images, getting back to sanity is
easy. Shipit supports rollbacks, which is again just a call to the
deploy shell script that uses the Rancher CLI. The script tells Rancher
to deploy a different Docker image version, this time using the prior
commit SHA. To handle database changes and our reliance on them, we
require our code to be compatible at least one version back, which means
schema changes must be deployed without code changes so that rollback is
possible. So there you have it: a complete CI/CD scenario, made possible
by the power of Rancher and its wonderful API. Jason Clark is a
Systems Architect at 360pi who is passionate about efficient, lean
systems architecture. Follow Jason on Twitter
@jclarknet.
Related Articles
Feb 01st, 2023
How To Simplify Your Kubernetes Adoption Using Rancher
Jun 10th, 2022
Rancher Desktop 1.4: Now With Credential Helpers and More
Apr 18th, 2023