Building a Continuous Integration Environment using Docker, Jenkins and OpenVPN
 Since
Since
I started playing with Docker I have been thinking that its network
implementation is something that will need to be improved before I could
really use it in production. It is based on container links and service
discovery but it only works for host-local containers. This creates
issues for a few use cases, for example when you are setting up services
that need advanced network features like broadcasting/multicasting for
clustering. In this case you must deploy your application stack
containers in the same Docker host, but it makes no sense to deploy a
whole cluster in the same physical or virtual host. Also I would like
containers networking to function without performing any action like
managing port mappings or exposing new ports. This is why networking is
one of my favorite features of Rancher, because it overcomes Docker
network limitations using a software defined network that connects all
docker containers under the same network as if all of them were
physically connected. This feature makes it much easier to interconnect
your deployed services because you don’t have to configure anything. It
just works. **** ****However I was still missing the possibility to
easily reach my containers and services from my PC as if I also was on
the same network again without configuring new firewall rules or mapping
ports. That is why I created a Docker image that extends Rancher network
using OpenVPN. This allows any device that may run OpenVPN client
including PCs, gateways, and even mobile devices or embedded systems to
access your Rancher network in an easy and secure way because all its
traffic is encrypted. There are many use cases and possibilities for
using this, I list some examples:
- Allow all users in your office to access your containers
- Enabling oncall sysadmins to access your containers from anywhere at
any time - Or the example that we are carrying out: allowing a user who works
at home to access your containers
And all this without reconfiguring your Rancher environment every time
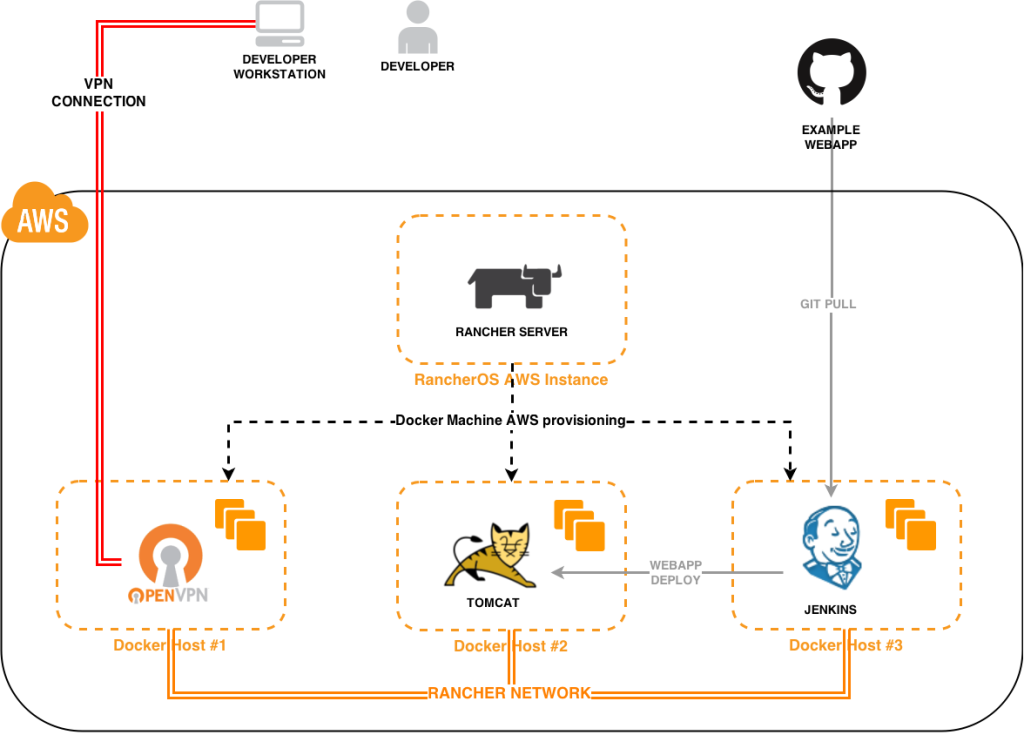
that you grant access to someone. In this post we are installing a
minimalistic Continuous Integration (CI) environment on AWS using
Rancher and RancherOS. The main idea is to create a scenario where a
developer who teleworks can easily access our CI environment, without
adding IPs to a whitelist, exposing services to the Internet nor
performing special configurations. To do so we are installing and
configuring these docker images:
- jenkins: a Jenkins instance to compile a sample WAR hosted in
github. Jenkins will automatically deploy this application in tomcat
after compiling it. - tutum/tomcat:7.0 – a Tomcat instance for deploying the sample WAR
- nixel/rancher-vpn-server: a custom OpenVPN image I have created
specially to extend Rancher network
And we are using a total of 4 Amazon EC2 instances:
- 1 for running Rancher Server
- 1 for running VPN server
- 1 for running Tomcat server
- 1 for running Jenkins
* * At the end the
developer will be able to browse to Jenkins and Tomcat webapp using his
VPN connection. As you will see, this is easy to achieve because you are
not configuring anything for accessing Tomcat or Jenkins from your PC,
you just launch a container and you are able to connect to it.
Preparing AWS cloud
You need to perform these actions on AWS before setting up the CI
environment. Creating a Key Pair Go to EC2 Console and enter Key
Pairs section. When you create the Key Pair your browser will download
a private key that you will need later for connecting to your Rancher
Server instance using SSH if you want to. Save this file because you
won’t be able to download it from AWS anymore. Creating a Security
Group Before creating a Security Group go to VPC Console and choose
one VPC and Subnet where you will deploy your EC2 instances. Copy the
VPC ID and Subnet ID and CIDR. Go to EC2 Console and create a Security
Group named Rancher which will allow this inbound traffic:
- Allow 22/tcp, 2376/tcp and 8080/tcp ports from any source, needed
for Docker machine to provision hosts - Allow 500/udp and 4500/udp ports from any source, needed for Rancher
network - Allow 9345/tcp and 9346/tcp ports from any source, needed for UI
features like graphs, view logs, and execute shell - Allow 1194/tcp and 2222/tcp ports from any source, needed to publish
our VPN server container
Be sure to select the appropriate VPC in the Security Group dialog.
Creating an Access Key On EC2 Console click your name in the top
menu bar and go to Security Credentials. Expand Access Keys (Access
Key ID and Secret Access Key) option and create a new Access Key.
Finally click Download Key File because again you won’t be able to do
it later. You will need this for Rancher Server to create Docker hosts
for you.
Installing Rancher Server
Create a new instance on EC2 console that uses rancheros-0.2.1 AMI,
search for it in Community AMIS section. For this tutorial I am using
a basic t1.micro instance with 8GB disk, you may change this to better
fit your environment needs. Now enter Configure Instance Details
screen and select the appropriated Network and Subnet. Then expand
Advanced Details section and enter this user data:
#!/bin/bash
docker run -d -p 8080:8080 rancher/server:v0.14.2
This will install and run Rancher Server 0.14.2 when the instance boots.
Before launching the new instance be sure to choose the Security Group
and Key Pair we just created before. Finally go to Instances menu and
get your Rancher Server instance public IP. After some minutes navigate
to
http://RANCER_SERVER_PUBLIC_IP:8080
and you will enter Rancher UI.
Provisioning Docker hosts
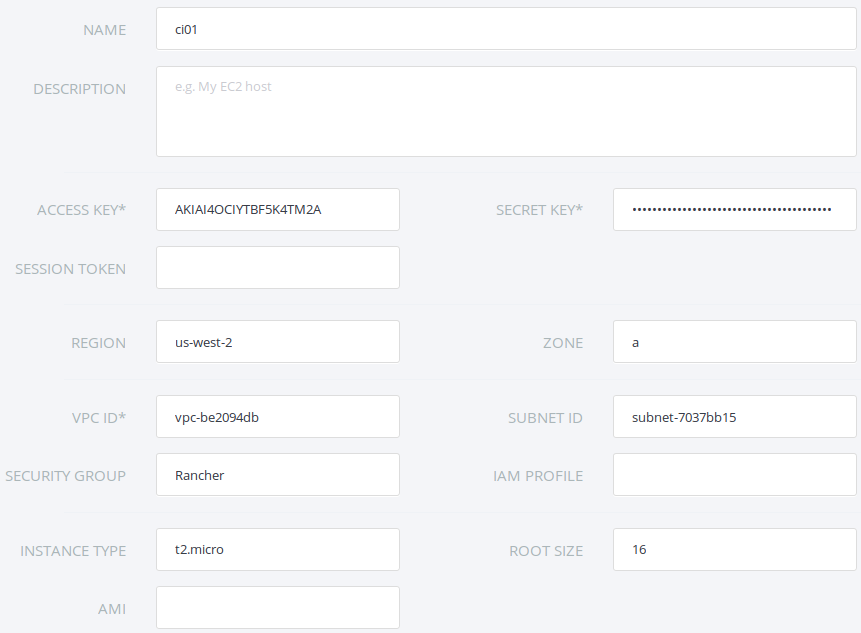
In this section we are creating our Docker hosts. Go to Rancher UI and
click Add Host button, confirm your Rancher Server public IP and then
click Amazon EC2 provider. In this form you need to enter the
following data: host name, Access Key, Secret Key, Region, Zone, VPC
ID, Subnet ID, and Security Group. Be sure to enter the appropriated
values for Region, Zone, VPC ID and Subnet ID because they must
match those used by Rancher Server instance. You must specify Security
Group name instead its ID, in our case it is named Rancher.
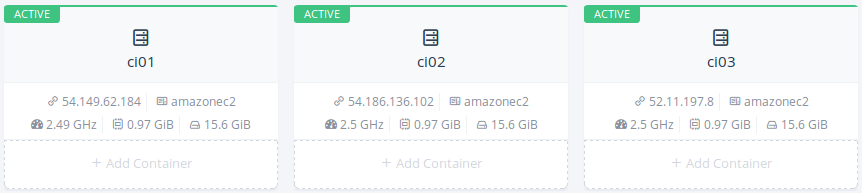
Repeat this step three times so Rancher will provision our three Docker
hosts. After some minutes you will see your hosts running in Rancher UI.
Installing VPN container
Now it’s time to deploy our VPN server container that will extend the
Rancher network. Go to your first host, click Add Container button and
follow these steps:
- Enter a name for this container like rancher-vpn-server
- Enter docker image: nixel/rancher-vpn-server:latest
- Add this TCP port map: 1194 (on Host) to 1194 (in Container)
- Add this TCP port map: 2222 (on Host) to 2222 (in Container)
Now expand Advanced Options section and follow these steps:
- In Volume section add this new volume to persist VPN
configuration: /etc/openvpn:/etc/openvpn - In Networking section be sure to select Managed Network on
docker0 - In Security/Host section be sure to enable the Give the container
full access to the host checkbox
After a while you will see your rancher-vpn-server container running on
your first host.
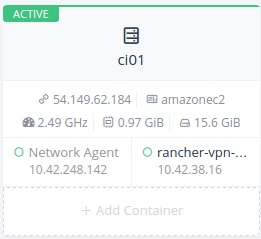
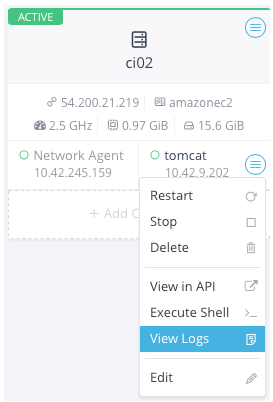
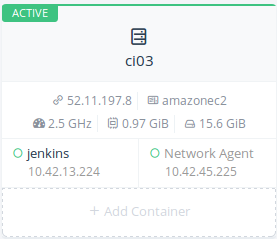
Now you are about to use another nice Rancher feature. Expand your
rancher-vpn-server container menu and click View Logs button as you can
see in the following image:
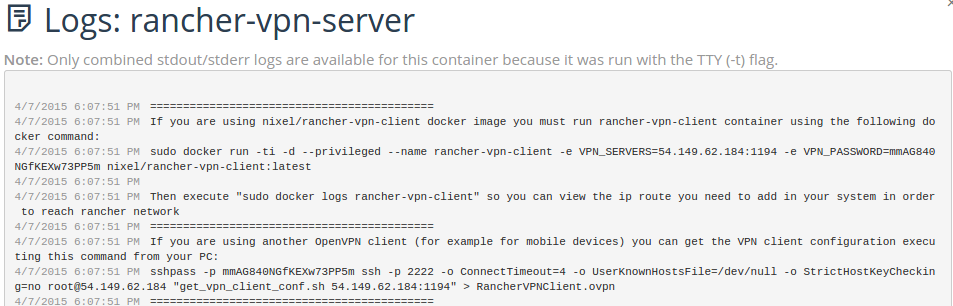
Now scroll to top and you will find the information you need in order to
connect with your VPN client. We are using this data later.
****  ****
****
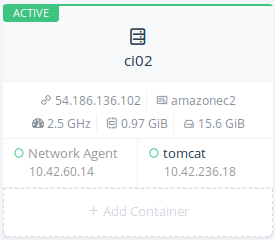
Installing Tomcat container
To install Tomcat container you have to click Add Container button on
your second host and follow these steps:
- Enter a name for this container like tomcat
- Enter docker image: tutum/tomcat:7.0
- *No port map is required*
- Expand Advanced Options and in Networking section be sure to
select Managed Network on docker0
After a while you will see your Tomcat container running on your second
host.
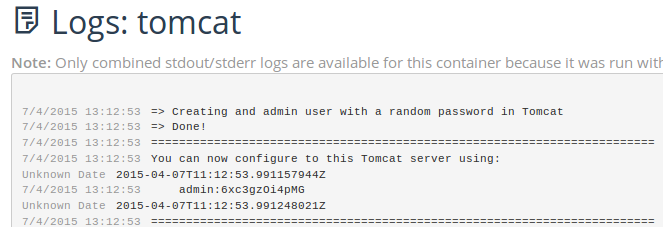
Now open Tomcat container logs in order to get its admin password, you
are needing it later when configuring Jenkins.
Installing Jenkins container
Click Add Container button on your third host and execute the following
steps:
- Enter a name for this container like jenkins
- Enter docker image: jenkins
- No port map is required
Now expand Advanced Options section and follow these steps:
- In Volume section add this new volume to persist Jenkins
configuration: /var/jenkins_home - In Networking section be sure to select Managed Network on
docker0
After a while you will see your Jenkins container running on your third
host.
Putting it all together
In this final step you are going to install and run the VPN client.
There are two ways to get the client working: using a Docker image I
have prepared that does not require any configuration, or using any
OpenVPN client that you will need to configure. Once the VPN client is
working you are browsing to Jenkins in order to create an example CI job
that will deploy the sample WAR application on Tomcat. You will finally
browse to the sample application so you can see how all this works
together. Installing Dockerized VPN client In a PC with Docker
installed you will execute the command that we saw before in
rancher-vpn-server container logs. According to my example I will
execute this command:
sudo docker run -ti -d --privileged --name rancher-vpn-client -e VPN_SERVERS=54.149.62.184:1194 -e VPN_PASSWORD=mmAG840NGfKEXw73PP5m nixel/rancher-vpn-client:latest
Adapt it to your environment. Then show rancher-vpn-client container
logs:
sudo docker logs rancher-vpn-client
You will see a message printing the route you need to add in your system
in order to be able to reach Rancher network.
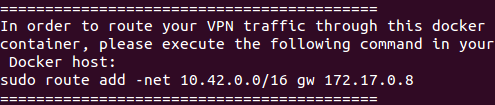
In my case I’m executing this command:
sudo route add -net 10.42.0.0/16 gw 172.17.0.8
At this point you are able to ping all your containers, no matter in
which host they run. Now your PC is actually connected to Rancher
network and you can reach any container and service running on your
Rancher infrastructure. If you repeat this step in a Linux Gateway at
your office you will, in fact, expose Rancher network to all the
computers connected in your LAN, which is really interesting.
Installing a custom OpenVPN client If you prefer to use an existing
or custom OpenVPN client, you can do it. You will need your OpenVPN
configuration file that you can get executing the SSH command that we
got before in rancher-vpn-server container log. In my case I can get
RancherVPNClient.ovpn file executing this command:
sshpass -p mmAG840NGfKEXw73PP5m ssh -p 2222 -o ConnectTimeout=4 -o UserKnownHostsFile=/dev/null -o StrictHostKeyChecking=no root@54.149.62.184 "get_vpn_client_conf.sh 54.149.62.184:1194" > RancherVPNClient.ovpn
Now, for example, you can execute OpenVPN executing this command:
/usr/sbin/openvpn --config RancherVPNClient.ovpn
You can also use OpenVPN iOS/Android application with this
RancherVPNClient.ovpn file and you will also be able to access your
Rancher network from your mobile or tablet. Again, you can extend your
VPN for all users in your LAN if you repeat this step in a Linux Gateway
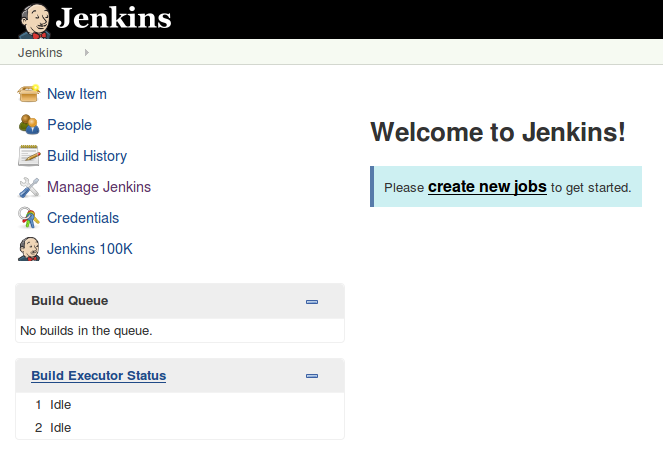
in your office. Configuring Jenkins Now it’s time to configure
Jenkins to compile and deploy our sample WAR in Tomcat. Browse to
http://JENKINS_CONTAINER_IP:8080
(in my case http://10.42.13.224:8080) and you will see Jenkins
Dashboard.
Before starting you must install Github Plugin and Maven following these
steps:
- Click Manage Jenkins menu option and then Manage Plugins
- Go to Available tab and search for Github plugin, named “Github
Plugin”. Activate its checkbox - Click Download now and install after restart button
- When the plugin is installed enable checkbox Restart Jenkins when
installation is complete and no jobs are running, and then wait for
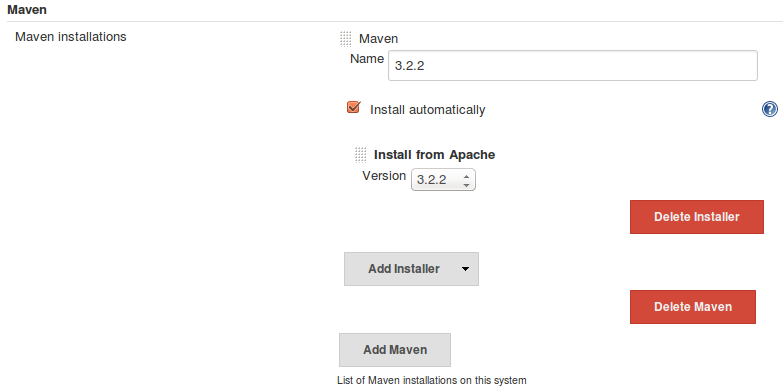
Jenkins to be restarted - When Jenkins is running again, go to Manage Jenkins and click
Configure System - In Maven section click Add Maven button, enter a name for the
installation and choose last maven version. - Click Save button to finish
When you are back in Dashboard click create new jobs link and follow
these instructions:
- Enter a job name, for example CI_Sample
- Choose Maven project option and click OK
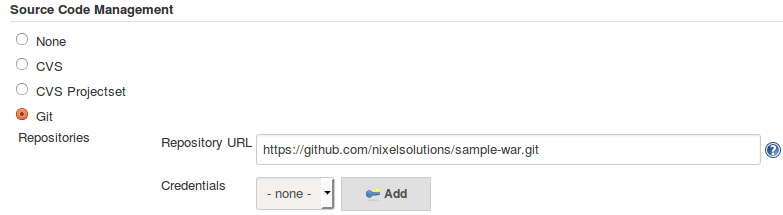
- In Source Code Management section choose Git and enter this
Repository URL: https://github.com/nixelsolutions/sample-war.git
- In Build section enter the following maven goals and options.
Replace TOMCAT_CONTAINER_IP with the IP assigned to your
Tomcat container (10.42.236.18 in my case) and
TOMCAT_ADMIN_PASSWORD with the password we saw before for
admin user (6xc3gzOi4pMG in my case).
clean package tomcat7:redeploy -DTOMCAT_HOST=TOMCAT_CONTAINER_IP -DTOMCAT_PORT=8080 -DTOMCAT_USER=admin -DTOMCAT_PASS=TOMCAT_ADMIN_PASSWORD
I am setting this maven configuration:
clean package tomcat7:redeploy -DTOMCAT_HOST=10.42.236.18 -DTOMCAT_PORT=8080 -DTOMCAT_USER=admin -DTOMCAT_PASS=6xc3gzOi4pMG
- Save your job

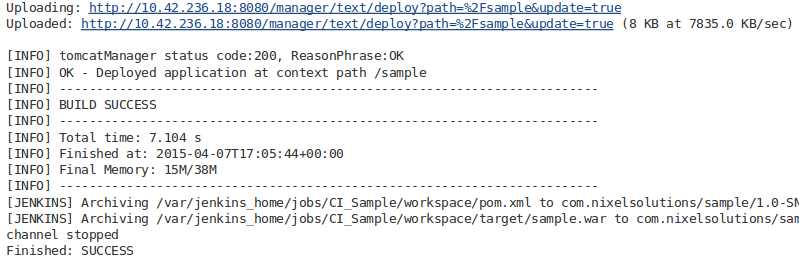
Now you can click Build Now button to run your job. Open your
execution (listed in Build History table) and then click Console
Output option. If you go to the bottom you will see something like
this:
Testing the sample application Now browse to
http://TOMCAT_CONTAINER_IP:8080/sample/
and you will see this page showing information about Tomcat server and
your browser client.

Conclusion
In this post we have installed a basic Continuous Integration
environment as an example to make your Docker containers reachable from
your PC, your LAN, and even a mobile device or any system that can
execute an OpenVPN client. This is possible thanks to Rancher Network, a
great functionality that improves Docker networking by connecting your
containers under the same network. What we actually did was to extend
Rancher network using an OpenVPN link that is really easy to configure
with Docker, and secure to use because all your traffic is being
encrypted. This functionality can help many companies to better manage
the way they give access to their containers from any unknown or
uncontrolled network. Now you don’t need to think anymore about exposing
or mapping ports, changing firewall rules, or taking care about what
services you publish to the Internet. For more information on managing
docker with Rancher, please join our next online meetup, where we’ll be
demonstrating Rancher, Docker Compose, service discovery and many other
capabilities. Manel Martinez is a Linux
systems engineer with experience in the design and management of
scalable, distributable and highly available open source web
infrastructures based on products like KVM, Docker, Apache, Nginx,
Tomcat, Jboss, RabbitMQ, HAProxy, MySQL and XtraDB. He lives in Spain,
and you can find him on Twitter
@manel_martinezg.