Introduction
Having trouble deploying Kubernetes in a highly available mode and have a backup remote database? This blog is for you. I will explain how to deploy K3s in HA configuration with an external database Postgres. K3s is a certified Kubernetes distribution for IoT and Edge computing. I deployed it on virtual machines in an IBM Z mainframe. Instead of etcd, I choose Postgres as my storage for my K3s clusters. I deployed Postgres in non HA mode. For information on how to deploy Postgres in HA mode, go through their official documentation. The communication between Postgres and the K3s cluster is SSL secured. I used nginx at layer 4 in front of my K3s servers for load balancing. This is because that we may add new server nodes or a server might go down. So, instead of the K3s server IPs, if we use the loadbalancer, we don’t face such issues and also achieve HA. Note that the nginx load balancer can also become a single point of failure. For information on deploying nginx in HA mode go through docs.
HA Configuration
The following image describes how I deployed my K3s cluster with two nodes in HA mode. Even if one server goes down, then the other server is still reachable and the load balancer routes all requests to the other one. Since all components of K3s are stateless even if a server goes down, we don’t lose any information. All information is stored in Postgres and it must be HA.
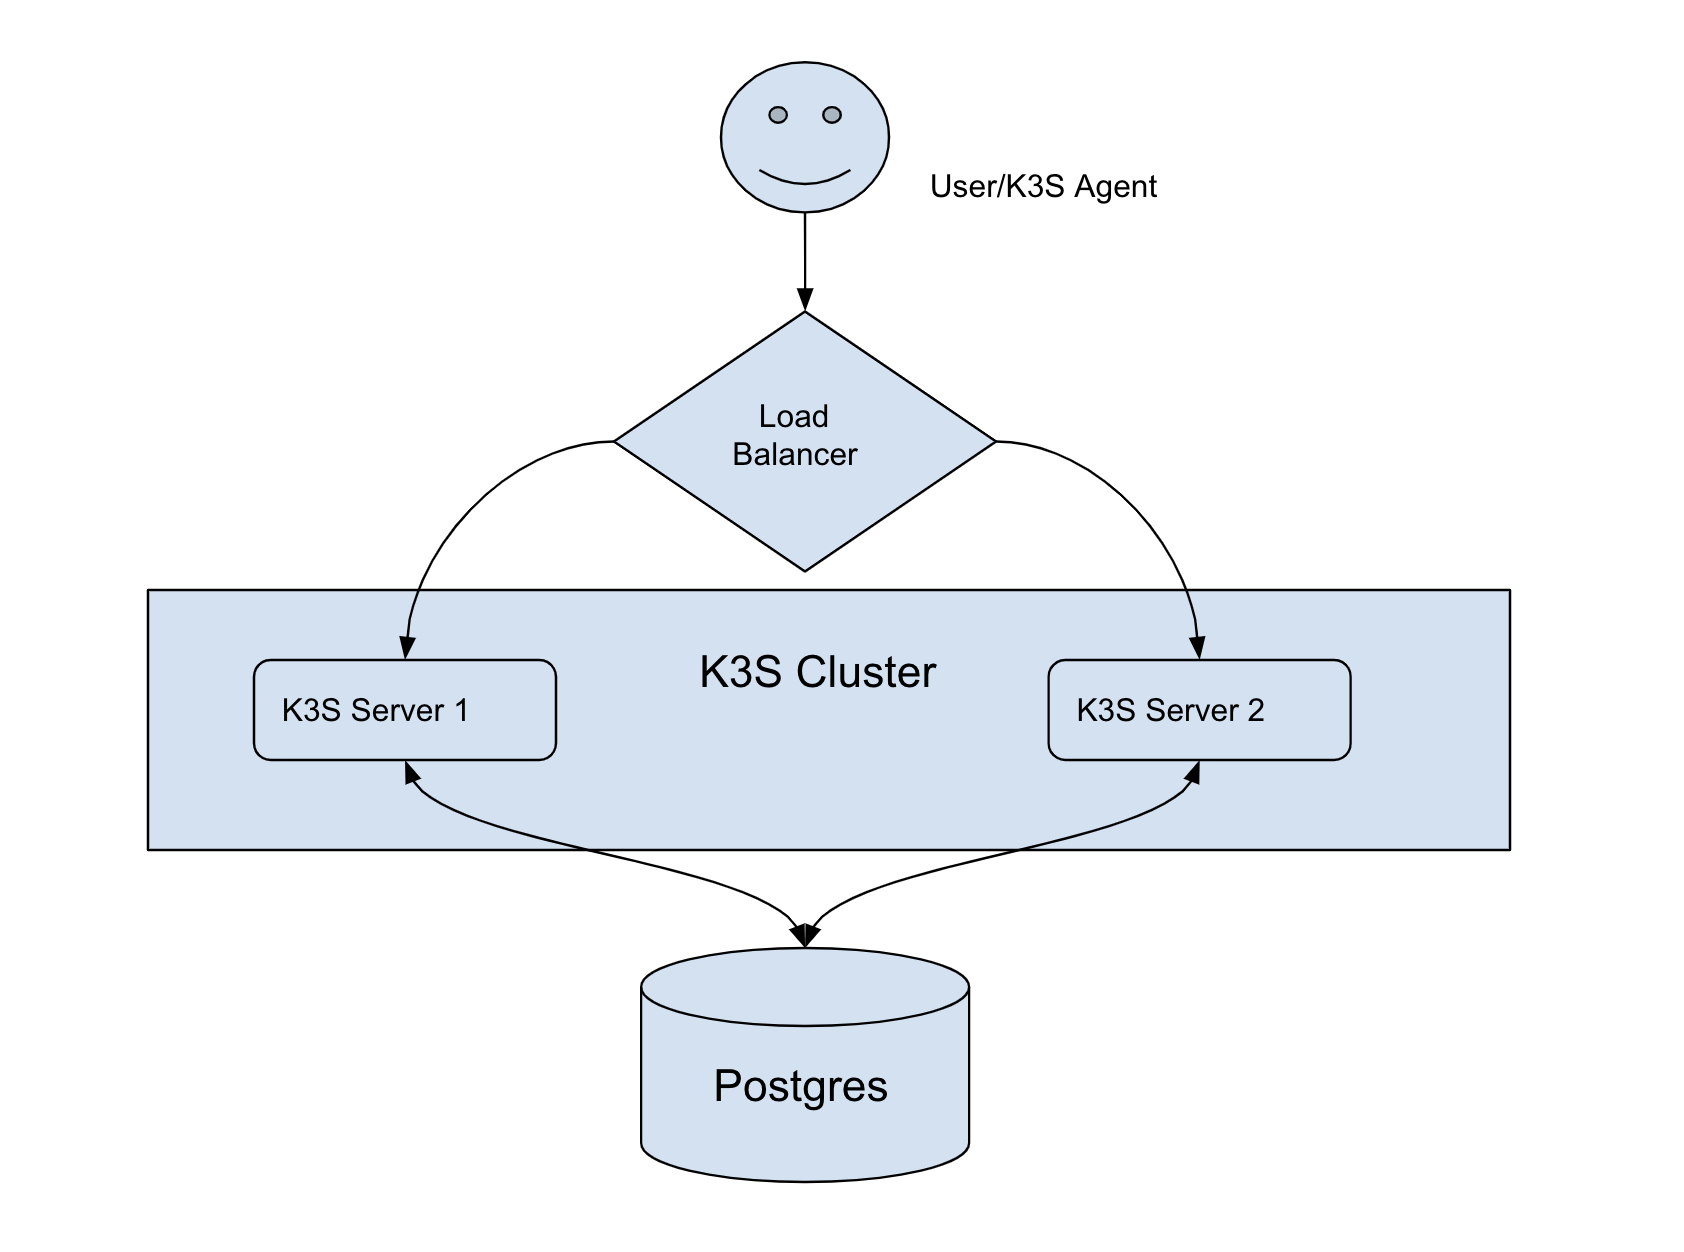
K3s in HA mode with a Load Balancer and Database
Environment
You need the following environment before you get started.
Operating System – SLE15SP2 Virtual Machines – 5 VCPU – 2 RAM – 8 GB Disk – 30 GB Arch – s390x
The following are my IP addresses for different virtual machines. I will be using these IP addresses in this blog and you can always look up here for what the IP address represents.
K3s Server 1 – 10.161.129.54 K3s Server 2 – 10.161.129.154 K3s Agent – 10.161.129.196 Postgres – 10.161.129.212 nginx – 10.161.129.118
I am deploying in mainframe (s390x) virtual machines but the same commands can be used for any other architecture. Now, let’s get to the commands to install Postgres and K3s cluster.
Installation of Postgres
I installed postgres10 on one of the virtual machines. Let’s name the virtual machine as Postgres. Copy paste the below commands to install Postgres. I ensured that there is mutual TLS communication between the Postgres database and the K3s clusters for security. I have used self-signed certificates for identifying Postgres which were created using openssl.
Postgres Virtual Machine
- Install Postgres package using zypper
zypper -n in postgresql10 postgresql10-server
systemctl start postgresql- Create K3s database, user role and grant all access to the user role
sudo -u postgres psql
create database K3s;
create user K3s with encrypted password 'K3s';
grant all privileges on database K3s to K3s;
exit;
We will be using K3s database for storing the cluster information. We will use the user K3s for K3s cluster to authenticate with the Postgres database.
- Create self-signed certificates that identify the postgres server and store them in
/var/lib/pgsql/data/
openssl req -new -x509 -days 365 -nodes -text -out /var/lib/pgsql/data/postgres.crt -keyout /var/lib/pgsql/data/postgres.key -subj "/CN=postgres.rancher.rke2" -addext "subjectAltName=DNS:postgres.rancher.rke2" - Ensure limited access to the private key otherwise Postgres server would complain about it.
chmod 0600 /var/lib/pgsql/data/postgres.key
chown postgres:postgres /var/lib/pgsql/data/postgres.key- Copy the public key certificate identifying Postgres to the two K3s servers so that the K3s servers can verify the identity of Postgres for SSL communication.
scp /var/lib/pgsql/data/postgres.crt sles@10.161.129.54:
scp /var/lib/pgsql/data/postgres.crt sles@10.161.129.154:- Replace the contents of the
/var/lib/pgsql/data/pg_hba.confwith the following content.
# TYPE  DATABASE        USER            ADDRESS                 METHOD

# "local" is for Unix domain socket connections onlyf
local   all             all                                     peer
# IPv4 local connections:
host    all             all             127.0.0.1/32            ident
hostssl all             all             0.0.0.0/0               md5 clientcert=verify-full
The contents of the file say that for localhost connections there is no need for a password or SSL communication to connect to the database. But for all other connections to the Postgres, communication must happen only through SSL with client verification (K3s server is the client for Postgres) and password authentication.
Now, before we proceed further in setting up Postgres database, we shall create certificates identifying the K3s cluster and copy the certificate to Postgres virtual machine so that Postgres can verify the identity of K3s server.
K3s Server 1 Virtual Machine
- Create a self-signed certificate identifying K3s cluster and give the right permissions to the private key
openssl req -new -x509 -days 365 -nodes -text -out K3s.crt -keyout K3s.key -subj "/CN=K3s" -addext "subjectAltName=DNS:K3s"
chmod 0600 K3s.key- Copy the public key certificate to the Postgres machine so that Postgres can verify the K3s client.
scp /home/sles/K3s.crt sles@10.161.129.212:- Copy the public and private keys to the other K3s server. The two servers together represent the K3s cluster.
scp /home/sles/K3s.crt /home/sles/K3s.key sles@10.161.129.154:Now, lets shift back to our Postgres virtual machine.
Postgres Virtual Machine
- Move the K3s.crt into
/var/lib/pgsql/datadirectory so that Postgres configuration file could use it.
mv /home/sles/K3s.crt /var/lib/pgsql/data/- Modify the contents of
/var/lib/pgsql/data/postgresql.confwith the following values
listen_addresses = '*'
ssl = on
#ssl_ciphers = 'HIGH:MEDIUM:+3DES:!aNULL' # allowed SSL ciphers
#ssl_prefer_server_ciphers = on
#ssl_ecdh_curve = 'prime256v1'
#ssl_dh_params_file = ''
ssl_cert_file = '/var/lib/pgsql/data/postgres.crt'
ssl_key_file = '/var/lib/pgsql/data/postgres.key'
ssl_ca_file = '/var/lib/pgsql/data/K3s.crt'
listen_addresses : should be * or the IP of your Postgres server. This makes sure that Postgres server is listening on the node’s IP address.
ssl : Turn on the SSL so that communication only happens in a secured way. ssl_cert_file ssl_key_file : These certificates identify the Postgres database. We already created them at the start of the blog. Now, we just point them to the cert locations.
ssl_ca_file : This is a CA (Certificate Authority) certificate which identifies the clients of Postgres. In our example, K3s is the client. So, I created a self signed certificate for K3s and pointed out ssl_ca_file to the self signed public certificate of K3s cluster.
- Restart Postgres server to adopt the new configuration
systemctl restart postgresqlNow that we successfully deployed our Postgres database, let’s shift to the K3s virtual machine and install K3s there.
K3s Server 1 Virtual Machine
- Install K3s server with the right flags and values.
curl -sfL https://get.k3s.io | sh -s - server --datastore-endpoint="postgres://K3s:K3s@postgres.rancher.rke2:5432/K3s" --datastore-cafile="/home/sles/postgres.crt" --token=K3s --datastore-certfile="/home/sles/K3s.crt" --datastore-keyfile="/home/sles/K3s.key" --tls-san=10.161.129.118--datastore-endpoint : the format is postgres://username:password@hostname:port/database-name for Postgres. In my case, I created a role K3s with password K3s and the database name is also K3s. For the hostname, I put a name postgres.rancher.rke since the certs were created with the CN value as this name.
--datastore-cafile : Put the public key certificate of Postgres so that K3s can verify the identity of Postgres using this certificate. In a self-signed certificate, the public certificate acts as the CA authority and can verify itself.
--datastore-certfile : this is the public certificate that identifies the K3s cluster.
--datastore-keyfile : this is the private key which belongs to the K3s cluster.
--token : a secret password is to be created so that other servers or agents can connect to this K3s cluster.
--tls-san : this is the load balancer IP address.
- For K3s to resolve
postgres.rancher.rke2I appended my/etc/hostsfile with the following
10.161.129.212 postgres.rancher.rke2where 10.161.129.212 is the IP address of the Postgres server.
- Let’s verify if our K3s server is running properly and is connected to the Postgres or not
export KUBECONFIG=/etc/rancher/k3s/k3s.yaml
kubectl get pods -A
You should see a list of pods with all in running status. If not, you could use
journalctl -xeto look for errors that occurred while installing K3s server.
K3s Server 2 Virtual Machine
- Install the 2nd K3s server with the same command as used for installing the first server
curl -sfL https://get.k3s.io | sh -s - server --datastore-endpoint="postgres://K3s:K3s@postgres.rancher.rke2:5432/K3s" --datastore-cafile="/home/sles/postgres.crt" --token=K3s --datastore-certfile="/home/sles/K3s.crt" --datastore-keyfile="/home/sles/K3s.key" --tls-san=10.161.129.118- Verify if K3s server is running properly and is connected to Postgres or not
export KUBECONFIG=/etc/rancher/k3s/k3s.yaml
kubectl get pods -A
You should see something like this
NAMESPACE     NAME                                      READY   STATUS    RESTARTS   AGE
kube-system   svclb-traefik-55frd                       2/2     Running   0          11m
kube-system   svclb-traefik-x59vc                       2/2     Running   0          2m43s
kube-system   local-path-provisioner-6c79684f77-55tkc   1/1     Running   0          107s
kube-system   coredns-d76bd69b-5n8s7                    1/1     Running   0          107s
kube-system   traefik-df4ff85d6-88phx                   1/1     Running   0          107s
kube-system metrics-server-7cd5fcb6b7-x7t2r 1/1 Running 0 107s- You could also check if the cluster has two servers and if they have the
masterrole by running this command
kubectl get nodesYou should see something like this
NAME           STATUS   ROLES                  AGE   VERSION
k3s-server-1   Ready    control-plane,master   14m   v1.23.6+K3s1
k3s-server-2   Ready    control-plane,master   29s   v1.23.6+K3s1
Now, before connecting a K3s agent where we K3s schedules its workload, we need to add a load balancer in front of our servers so that users or K3s agents can talk to it.
Nginx Load Balancer Virtual Machine
I used nginx in front of the K3s cluster server nodes at layer 4 of the network stack. We are forwarding all the requests that come at port 6443 to the load balancer to one of K3s servers. The Kubernetes API server listens to that port.
- Install nginx package
zypper in nginx- Create a file
/etc/nginx/nginx.confand fill in with the contents below
load_module /usr/lib64/nginx/modules/ngx_stream_module.so;

worker_processes 4;
worker_rlimit_nofile 40000;


events {
    worker_connections 8192;
}

stream {
    log_format logs '$remote_addr - - [$time_local] $protocol $status $bytes_sent $bytes_received $session_time "$upstream_addr"';

    access_log /var/log/nginx/access.log logs;

    upstream K3s_api_server {
        least_conn;
        server 10.161.129.54:6443 max_fails=3 fail_timeout=5s;
        server 10.161.129.154:6443 max_fails=3 fail_timeout=5s;
    }
    server {
        listen 6443;
        proxy_pass K3s_api_server;
    }
}
We are using the least_conn algorithm to decide which K3s server should the request go to. Nginx will route the request to the server which has the least active connections according to this algorithm.
- Start nginx for these changes to take effect
nginx -s reload
systemctl reload nginx && systemctl restart nginx
Now, we setup our load balancer and so anyone can now talk to our K3s servers. Let’s now add a K3s agent which talks to this load balancer and registers itself.
K3s Agent Virtual Machine
- Install K3s agent using the following command
--server : mention the loadbalancer IP address
curl -sfL https://get.k3s.io | sh -s - agent --token=K3s --server https://10.161.129.118:6443K3s Server 1 Virtual Machine
- Now, you could check if the K3s agent is successfully registered by running this command
kubectl get nodesYou should see something like this
NAME           STATUS   ROLES                  AGE    VERSION
k3s-server-1   Ready    control-plane,master   41m    v1.23.6+K3s1
k3s-server-2   Ready    control-plane,master   28m    v1.23.6+K3s1
k3s-agent      Ready    <none>                 105s   v1.23.6+K3s1
So, we have successfully installed Postgres, K3s servers and a K3s agent. You now have a highly available K3s cluster with an external database. Note that full HA is only achieved if Postgres and nginx are also deployed in HA configuration. For more information, you can check out the links in the reference section.
Give K3s a Try!
References
- K3s Architechture Docs – https://rancher.com/docs/k3s/latest/en/architecture/#high-availability-with-an-external-db
- K3s Datastore Docs – https://rancher.com/docs/k3s/latest/en/installation/datastore/
- K3s installation Docs – https://rancher.com/docs/k3s/latest/en/installation/ha/
- Nginx Load Balancer Docs – https://rancher.com/docs/rancher/v2.5/en/installation/resources/k8s-tutorials/infrastructure-tutorials/nginx/