Debugging boot issues in the Public Cloud
Let’s face it, sometimes everything just seems to go wrong and that darn instance just will not boot. Now what? Well the first step is to look at the serial log.
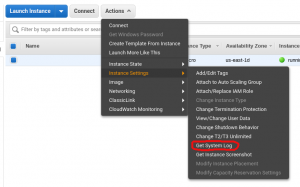
In AWS EC2 this is accomplished from the UI by selecting the “Actions” drop down menu in the instance view screen while the instance of interest is selected and then clicking on “Get System Log” from the “Instance Settings” menu.

From the command line this works with
aws ec2 get-console-output –instance-id
In Azure with the VM overview showing in your browser use the scrollbar on the left to scroll down to the “Support + troubleshooting” section, then click “Serial console”. More information about the serial console in Azure can be found here .

Using the “az” command line tool getting the boot log works as follows:
az vm boot-diagnostics get-boot-log –ids
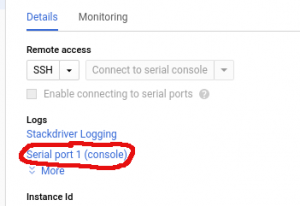
In GCE in the VM instance overview screen click on the name of the instance of interest to get to the details view. Once there click on the “Serial port 1 (console)” link to see the serial log. We do not package the “gcloud” command line tools thus I’ll skip over the command line incantation to get the information.

But what shows up on the serial console is often not enough to really dig in and figure out what’s going on. Thus access to the full logs is necessary but the darn thing will not boot, so now what?
To get access to the full logs we need to use the boot disk of the instance that doesn’t boot and attach it to a running instance. Here is how that works:
In AWS EC2 in the instance overview screen with the troubled instance selected in the instance details panel below and click on the link next to “Root device” (/dev/sda1) then click on the volume ID shown, starts with “vol-“. In the volume overview screen click the “Actions” drop down menu and the click “Create snapshot“, enter a description if you’d like and create the snapshot. Click the link on the following page to follow along with the snapshot creation. Time to get a beverage. Once the snapshot is complete click the “Actions” drop-down menu and click “Create Volume“. Make sure to create the volume in the AZ (Availability Zone) where you intent to start, or have a running, instance to attach the disk to. Once the volume is created attach it to the running instance.
In Azure you want to navigate to the resource group in which you started the troubled instance. In the resource group select the “Virtual machine” that has trouble, and delete it. This will leave the boot disk behind. You can than attach the disk to a running or new instance in the same region and resource group.
In GCE in the VM instance overview screen click on the name of the instance of interest to get to the details view. Once there click on “Edit“in the top action bar. Scroll down to the “Boot Disk” section and modify the “When deleting instance” attribute via the drop down menu to “Keep disk” then scroll to the bottom and click “Save“. Once the changes have been changed you can delete the troubled instance and the disk will be left behind. You can then attach the disk to a new or running instance in the same zone.
Now we have a running instance with the boot disk from the failed instance boot attached. Use ssh to connect to the instance with the attached disk from the failed boot. I am going to assume you are using a SUSE published image as the instance from which debugging happens and you are investigating a boot issue for an instance that at some point started out as a SUSE published image.
Once you are logged in switch the user to become root (sudo -i). Then look at the block devices attached with the “lsblk” command.
In AWS and GCE our images have 3 partitions as the images are configured to boot via UEFI or BIOS firmware and in Azure our images have 4 partitions with the extra partition being the boot partition.
Here is an example of the lsblk output from a t2.small instance in AWS
# lsblk
NAME MAJ:MIN RM SIZE RO TYPE MOUNTPOINT
xvda 202:0 0 10G 0 disk
├─xvda1 202:1 0 2M 0 part
├─xvda2 202:2 0 20M 0 part /boot/efi
└─xvda3 202:3 0 10G 0 part /
xvdf 202:80 0 10G 0 disk
├─xvdf1 202:81 0 2M 0 part
├─xvdf2 202:82 0 20M 0 part
└─xvdf3 202:83 0 10G 0 part
The last partition in SUSE images is the root filesystem. Form the lsblk output you can figure out the device id for the root filesystem of the disk from the failed instance boot. In this example it would be xvdf3. Note that depending on instance type and cloud framework the protocol for disk attachment may also be NVMe instead of SCSI and thus the device ids would look different. The next step is to mount the device, here an example from Azure:
# mount /dev/sdc4 /mnt
mount: /mnt: wrong fs type, bad option, bad superblock on /dev/sdc4, missing codepage or helper program, or other error.
Oops, what just happened? The root file system of SUSE images is XFS and XFS keeps track filesystems by UUID. In this case I am using an instance from the same image for debugging then the instance that failed to boot. Therefore the UUID of the root filesystem on the running instance and the filesystem from the instance that failed to boot are the same and xfs will not mount the secondary filesystem. You can confirm this by running “dmesg” which will contain a message like the following:
XFS (sdb3): Filesystem has duplicate UUID 71e1d38b-e181-4e47-978f-184e42366ab8 – can’t mount
In this case the example is from a GCE instance. The UUID on an XFS filesystem can be manipulated with the “xfs_admin” command. Continuing to use the GCE instance as an example this looks as follows:
# xfs_admin -U 81e1d38b-e181-4e47-978f-184e42366ab8 /dev/sdb3
Clearing log and setting UUID
writing all SBs
new UUID = 81e1d38b-e181-4e47-978f-184e42366ab8
Notice that I simply change the first digit of the UUID that generated the conflict. And after this change:
mount /dev/sdb3 /mnt
works just fine. Now you can pull the logs off the system that failed to boot onto your system or you can look at them in your favorite editor from the running instance.
But what if the filesystem is btrfs?
With the introduction of SUSE Linux Enterprise Micro images, called SUSE Linux Micro starting with version 6.0, we also introduced images that do not use XFS as the root file system. Micro images use btrfs and we make use of btrfs subvolumes for various purposes. And of course you can build your own images with btrfs. Attaching the volume to a running instance, finding the device, and mounting the file system work in the same way as shown above. The /var content for SUSE images is on a subvolume and therefore, lets assume you mounted the file system being inspected on /mnt, you will find that
# ls /mnt/var
will be empty. A surprising result without knowing that /var is a subvolume. But fear not all the information we need to look at the content of /var from the file system under inspection can be found and we’ll get to the logs in just a few steps. First let’s get the subvolume id:
btrfs subvolume list /mnt | grep var
again assuming you mounted the filesystem you want to inspect on /mnt. In my case this returned
ID 263 gen 32 top level 256 path @/var
Next we want to get the UUID and that information is in etc/fstab of the filesystem we want to inxpect, i.e.
cat /mnt/etc/fstab | grep var
which in my case shows the following information
UUID=44869c1d-6880-4c8e-bc4c-b0260f280e83 /var btrfs defaults,subvol=@/var,x-initrd.mount 0 0
With this we have the information we need to make the content of var on the filesystem we are inspecting visible as follows
mount -osubvolid=263 UUID=44869c1d-6880-4c8e-bc4c-b0260f280e83 /mnt/var
or the generalized command is
mount -osubvolid=$VOLUME_ID_FROM_LIST_CMD UUID=$UUID_FROM_ETC_FSTAB $MOUNT_POINT
Now if you run
ls /mnt/var
you’ll will find the customary directory structure and files. Not really all that difficult, but the information is surprisingly cumbersome to piece together by just searching the Internet.
Hopefully you will not need this very often but as I said, sometimes everything just goes wrong and bad stuff happens.
Related Articles
Jul 22nd, 2022
No comments yet