Setup secure private Docker registry in SUSE Linux Enterprise server 15Sp2
Containerized application delivery has become the latest trend in today’s IT environment. These container images are distributed by respective Organizations/Communities through their official Docker container registries hosted online. Docker container registries are applications that manages storing and delivering of container images.
Container images can be pulled from any online registry you can access to ,and you will also able to push your images to online registries. These online registries are public (unless you pay for online space ) and can be accessed by anyone else . It is important to setup an offline / private docker registry so that images can be securely stored offline. A private Docker registry allows you to share your custom images within your organization, keeping a consistent, private, and centralized source of building blocks of your architecture. A private Docker registry gives you better performances for big clusters and high-frequency roll-outs, plus added features like access authentication.
Let us see how to setup a secured private docker registry on SUSE Linux Enterprise Server 15Sp2 . Before setting up your private registry make sure all patches and updates are available to your server and you have enough space on your local hard drive. I have used the RMT server to download all patches and updates offline . Since this server has enough space I have setup the private registry on the RMT server. You can setup your RMT server by following this URL https://documentation.suse.com/sles/15-SP2/single-html/SLES-rmt/#book-rmt
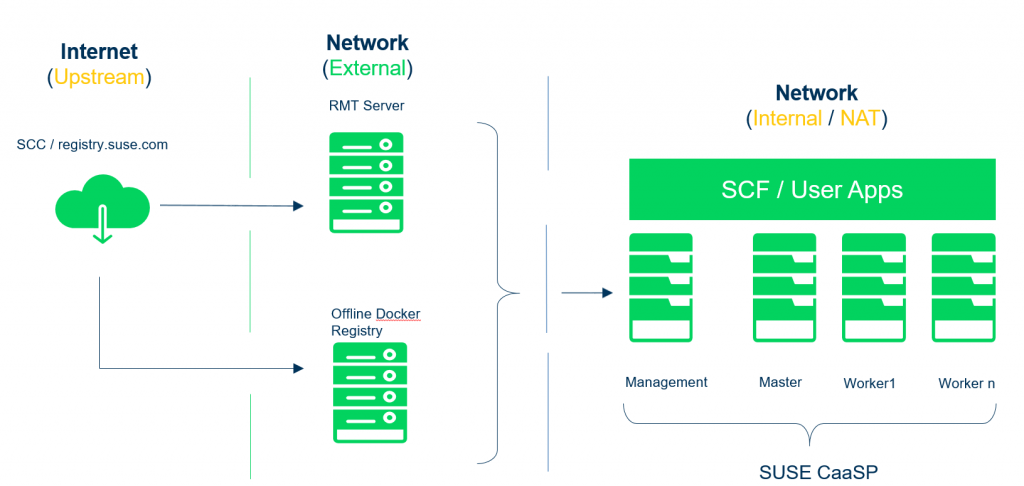
You can setup your private registry on a dedicated host as well as shown in the diagram below. In case of dedicated host please make sure you are using the CA certificates published by RMT server on registry server.
The host server should have minimum configuration of 4GB RAM, 2 VCPU , 40 GB Disc space to host the private docker registry . In case you are trying to download larger images like SUSE Application delivery platform you will need more than 100 GB disk space.
Once the Base OS ie SLES 15Sp2 is setup, make sure to patch the server up to date . Make sure SUSE Package Hub 15Sp2 package repository is enabled on the server and refresh the repositories,
# zypper refresh
Once the repositories are refreshed you should be able to search for the package docker-distribution-registry
# zypper se docker-distribution-registry
Loading repository data…
Reading installed packages…
S | Name | Summary | Type
–+——————————+—————————-+——-
| docker-distribution-registry | Registry server for Docker | package
Now let’s go ahead and install Docker and docker-distribution-registry package
# zypper install docker docker-distribution-registry
Once the packages are installed we will have to edit the registry configuration file to adjust the values. The default registry path is /var/lib/docker-registry , which you can change it to other path as well In our example this path is /var/lib/registry (registry directory has to be created in advance). It is a good practice to mount logical volumes on /var/lib/registry so that it can be extended in future. Make sure the tls section is enabled and points to server certificate and server key of RMT server. Since I have installed the private registry on RMT server I have used the default certificate and server key from /etc/rmt/ssl/rmt-server.crt and /etc/rmt/ssl/rmt-server.key
rmt:~ # cat /etc/registry/config.yml
version: 0.1
log:
level: info
storage:
filesystem:
rootdirectory: /var/lib/registry
http:
addr: 0.0.0.0:5000
headers:
X-Content-Type-Options: [nosniff]
tls:
certificate: /etc/rmt/ssl/rmt-server.crt
key: /etc/rmt/ssl/rmt-server.key
health:
storagedriver:
enabled: true
interval: 10s
threshold: 3
***********************************************************************************************************************************************************************
Note : If your registry is insecure disable, registry security verification by editing
/etc/docker/daemon.json to ,
{
“insecure-registries” : [“rmt.example.com:5000”]
}
***********************************************************************************************************************************************************************
Make sure CA certificate is available system wide, so that we can test the registry on local server. This has to be updated on all other servers trying to push images into private registry,
# cp /etc/rmt/ssl/rmt-ca.crt /etc/pki/trust/anchors/
# update-ca-certificates
Enable and start Docker registry on boot
# systemctl enable –now registry
Enable and start Docker service on boot
# systemctl enable –now docker
Now that the offline registry is setup let us test if the registry is working using docker pull , tag and push commands , Let’s pull a basic SLES15sp1 container image from official SUSE’s registry registry.suse.com ,
# docker pull registry.suse.com/suse/sle15:15.1
Tag the image to choice of your name so that it can be pushed to local registry,
# docker tag registry.suse.com/suse/sle15:15.1 rmt.example.com:5000/suse/sle15:15.1
Now lets go ahead and test the private registry by pushing the SLES15sp1 container image we just downloaded
# docker push rmt.example.com:5000/suse/sle15:15.1
Note : above command should result with status pushed .
Now we have successfully pushed the image to local registry. In order to access the registry from browser using the API we will have to setup Reverse proxy and Virtual host using Nginx
Create reverse proxy and virtual host configuration file for registry
Login to registry server and create /etc/nginx/vhosts.d/registry-server-https.conf . Replace mymirror.local with the hostname of your mirror server for which you created the SSL certificates.
# vim /etc/nginx/vhosts.d/registry-server-https.conf
*********************************************************************
upstream docker-registry {
server 127.0.0.1:5000;
}
map $upstream_http_docker_distribution_api_version $docker_distribution_api_version {
” ‘registry/2.0’;
}
server {
listen 443 ssl;
server_name registry.example.com;
access_log /var/log/nginx/registry_https_access.log;
error_log /var/log/nginx/registry_https_error.log;
root /usr/share/rmt/public;
ssl_certificate /etc/rmt/ssl/rmt-server.crt;
ssl_certificate_key /etc/rmt/ssl/rmt-server.key;
ssl_protocols TLSv1.2 TLSv1.3;
# disable any limits to avoid HTTP 413 for large image uploads
client_max_body_size 0;
location /v2/ {
# Do not allow connections from docker 1.5 and earlier
# docker pre-1.6.0 did not properly set the user agent on ping, catch “Go *” user agents
if ($http_user_agent ~ “^(docker\/1\.(3|4|5(?!\.[0-9]-dev))|Go ).*$” ) {
return 404;
}
## If $docker_distribution_api_version is empty, the header is not added.
## See the map directive above where this variable is defined.
add_header ‘Docker-Distribution-Api-Version’ $docker_distribution_api_version always;
proxy_pass http://docker-registry;
proxy_set_header Host $http_host; # required for docker client’s sake
proxy_set_header X-Real-IP $remote_addr; # pass on real client’s IP
proxy_set_header X-Forwarded-For $proxy_add_x_forwarded_for;
proxy_set_header X-Forwarded-Proto $scheme;
proxy_read_timeout 900;
}
}
******************************************************************************
Save the file and restart nginx
# systemctl restart nginx
Create a link of registry folder at document root’s folder
# ln -s /var/lib/registry/docker/registry/v2 /usr/share/rmt/public/
Now check the file permission
# ls -la /usr/share/rmt/public/
total 12
drwxr-xr-x 3 _rmt nginx 4096 Apr 27 02:44 .
drwxr-xr-x 12 _rmt nginx 4096 Apr 26 15:41 ..
lrwxrwxrwx 1 _rmt nginx 24 Apr 3 18:48 repo -> /var/lib/rmt/public/repo
lrwxrwxrwx 1 _rmt nginx 24 Apr 3 18:48 suma -> /var/lib/rmt/public/suma
drwxr-xr-x 2 _rmt nginx 4096 Apr 26 15:41 tools
lrwxrwxrwx 1 root root 36 Apr 27 02:44 v2 -> /var/lib/registry/docker/registry/v2
now softlink is created for registry under /usr/share/rmt/public . You will have to change the ownership of this link from root:root to _rmt:nginx
# chown -R _rmt:nginx /usr/share/rmt/public/v2
rmt:~ #
total 12
drwxr-xr-x 3 _rmt nginx 4096 Apr 27 02:44 .
drwxr-xr-x 12 _rmt nginx 4096 Apr 26 15:41 ..
lrwxrwxrwx 1 _rmt nginx 24 Apr 3 18:48 repo -> /var/lib/rmt/public/repo
lrwxrwxrwx 1 _rmt nginx 24 Apr 3 18:48 suma -> /var/lib/rmt/public/suma
drwxr-xr-x 2 _rmt nginx 4096 Apr 26 15:41 tools
lrwxrwxrwx 1 _rmt nginx 36 Apr 27 02:44 v2 -> /var/lib/registry/docker/registry/v2
You can confirm if the ownership is changed . Restart the nginx service
# systemctl restart nginx
On your browser go to below URL and verify if your registry catalog is listed,
https://registry.example.com:5000/v2/_catalog

Now the private docker registry is setup and ready to serve the container images. You can find more instructions to create and store SLES based container images from official SUSE documentation,
https://documentation.suse.com/sles/15-SP2/html/SLES-all/cha-registry-installation.html
Related Articles
Oct 07th, 2022
Meet the latest SUSE documentation “accrual”
Sep 23rd, 2022
TCS Cognix Enterprise CaaS Solution with SUSE Rancher
Jul 13th, 2022
No comments yet