Data Center Automation with SUSE Manager
Author: Since 2010, Ralf Bueker has been working for SUSE as a Dedicated Support Engineer (DSE), at Bundesagentur für Arbeit, the German Federal Employment Agency. Previously, he worked at Novell as a Support Engineer in different knowledge teams. These included working with the Remote Support team as a DSE at Star Alliance from 2005 to 2010 and with the Major Accounts team, starting in 2002, and working with Airbus, K&S, BRZ and other companies.
The Customer
A governmental organization based in Nuremberg, the Federal Employment Agency (Bundesagentur für Arbeit or BA) is the largest provider of labor market services in Germany. With more than 800 branch offices nationwide, it employs approximately 100,000 people with an IT staff of about 2,100 internal and external administrators and engineers who are responsible for around 100 different customized applications.
The Task
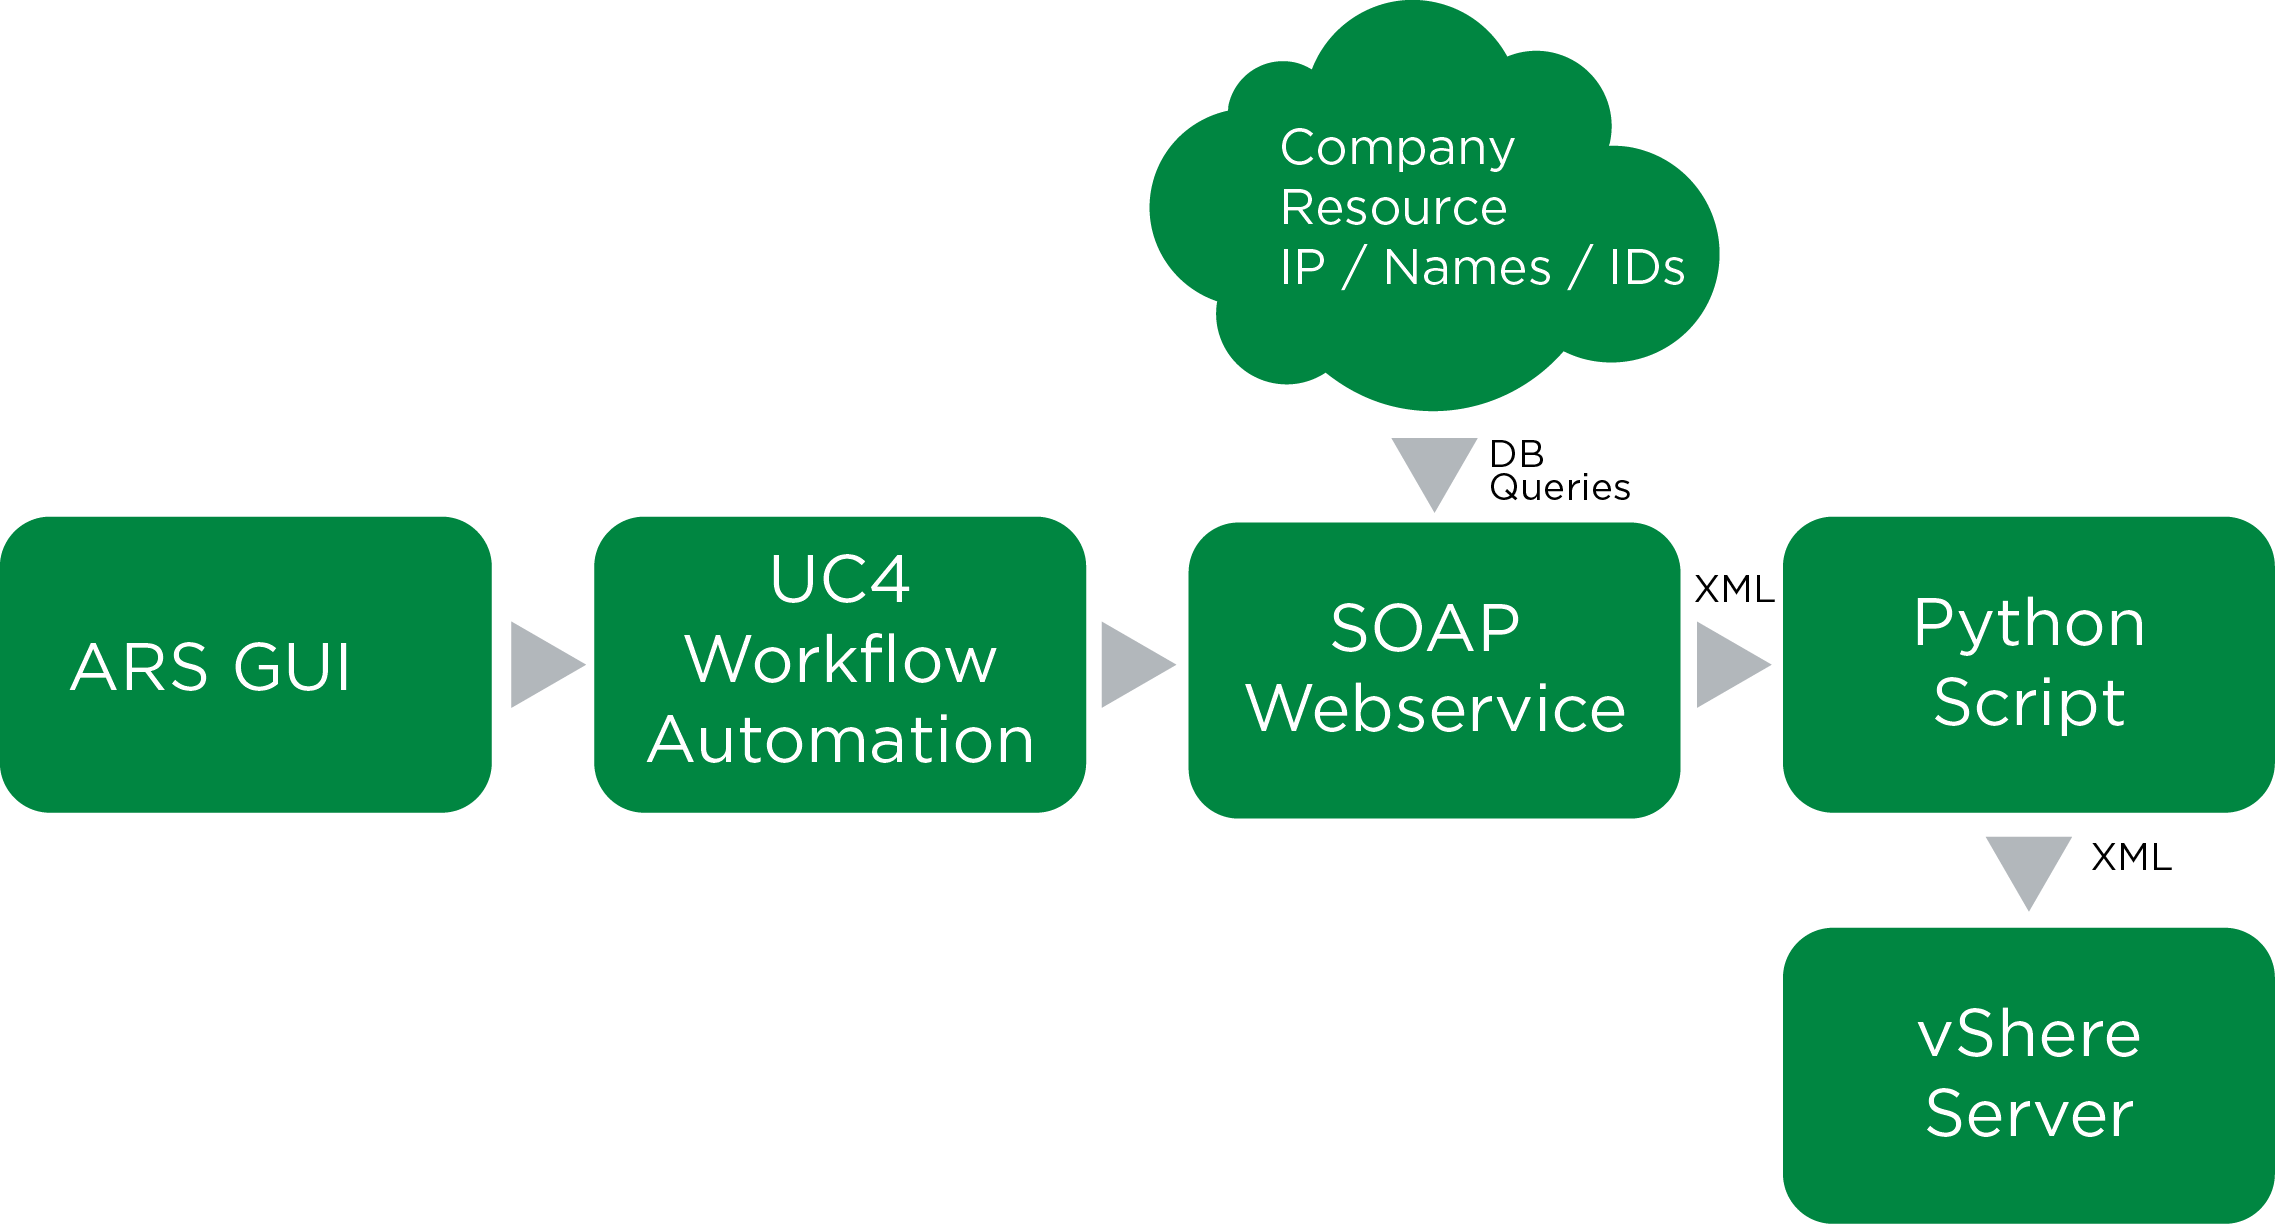
SUSE was engaged by BA for the DCA (Data Center Automation) Project to provision a functional server from a web front end. The plan was to start the entire process with a minimum of input and then execute it in full automatically. The web front end would offer a Windows Server and a SUSE Linux Enterprise Server from the same interface. This article looks at the Linux part of this project.
The prototype for automatic installation was a standard Weblogic server on SUSE Linux Enterprise Server, with the Weblogic server provisioned on a VMware ESX Server farm. Because no PXE network was available, it needed to be created and installed automatically in the farm.
Because the new servers were provisioned in a productive live environment, they had to seamlessly match the current admin/update/monitoring infrastructure. This included, among other components, an Active Directory connection, MS SCOM (Microsoft Systems Center Operations Manager) monitoring and instant DNS (Domain Name Service) resolution.
The Data Center Automation project was obliged to follow the ITIL1 process to obtain all necessary resources (such as IP addresses, server names, and virtual machines) for the installation. This process also included the creation of changes. It was a challenge to find (and get access granted to) all of the necessary APIs. The clear and complete documentation (thanks to ITIL) for the installation process was helpful.
For BA, the solution is the first step in creating a Platform-as-a-Service (PaaS) cloud service in the existing architecture. The installation in an existing environment led to some interesting observations on timing. The new, automatic process then needed only 20 to 30 minutes for server provisioning. (The old, semi-automatic approach needed three to four weeks.) The faster pace led to some issues with caches and database (like DNS or AD) updates, especially in testing, where machines with the same names and IPs were created and deleted regularly. In the beginning, the project team needed to allocate days for server creation and for server deletion to overcome these caching issues. Next, we deployed some ad-hoc methods. Nevertheless, the final aim was to create a cloud infrastructure with SUSE OpenStack Cloud.
The Process
The following description explains the role of SUSE Manager in the process. The necessary steps were implemented by a collection of scripts running on the SUSE Manager Server, referred to as the “DCA Program” or just the “DCA” (Data Center Automation).
“ITIL, formerly known as the Information Technology Infrastructure Library, is a set of practices for IT service management (ITSM) that focuses on aligning IT services with the needs of business.” Wikipedia, http://en.wikipedia.org/wiki/ITIL
SUSE Manager Preparation
For an automated distribution, we executed the following steps on the SUSE Manager Server:
- Create Distribution //An automatic installation cannot be performed without a Distribution.
- Create profile(s) //Including basis hardware and partitioning information
- Create configuration channels // All server configuration is performed by SUSE Manager Configuration Channels
- Create software channel //Software (SUSE and customized) for the automatically installed servers
- Create activation key(s)
- /etc/cobbler/settings and set: redhat_management_permissive: 1 // allows login to cobbler api
XML and Schema
For the server provisioning process, several pieces of data were needed:
- Customization data for the AutoYaST installation (IP address/es, GW, DNS Server, and so forth)
- Specific data for server configuration (server class, security class, environment)
- Data for creating the virtual machine on ESX (VLAN, disk size, VMware Cluster, and so forth)
- Customer internal process data (object ID, change number, and so forth)
- The command (Do we want to install or delete a server; do we want an ISO installation or a template-based installation?)
Parameters were transferred by an XML file. To control data availability and the validity of the parameters, we created an XML schema, against which incoming XML data were verified. The provisioning process started with the XML file containing all the necessary data being copied to a folder on the DCA machine. A cron process watches the input folder every 30 seconds. If there are new files in the folder, it starts processing the file.
The first step is that the data is validated against the schema. If the validation fails, the installation is canceled, and a message is sent to the back end. If the file is valid, we proceed with the creation of a new profile for this installation in SUSE Manager.
Profile Creation
The basis for creating the profile is a standard minimal AutoYaST file for a 1 NIC / 1 HD server with standard partitioning. For a different hardware /partitioning configuration, different AutoYaST files must be created. The variable parameters needed for the server installation, such as server name, IP address, and so forth, are referenced as variables in the AutoYaST file.
The only part to add to the minimal AutoYaST file is an init script to bootstrap the new server for SUSE Manager.
SUSE Manager Configuration Channels perform all other configuration tasks on the server later.
Init script:
<verbatim><scripts>
<init-scripts config:type="list">
<script>
<filename>bootstrap.sh</filename>
<interpreter>shell</interpreter>
<source>
<![CDATA[
 #!/bin/bash
 curl -Sks http://<IP_SUSE_MANAGER_SERVER>/pub/bootstrap/bootstrap_dca.sh | /bin/bash
 /root/install/install.sh
 exit 0
]]>
</source>
</script>
</init-scripts>
</scripts></verbatim>
Comments:
- The activation key should be configured for “Configuration File Deployment,” so configuration files are copied to the server at bootstrap.
- At this point there is no name resolution. Therefore, you need to provide the SUSE Manager IP address in the curl line.
- Executable files (<128kb) are provided in the config channels. They can be automatically installed with an install script called during installation.
- The bootstrap file must be chosen according the server class (see below).
SUSE Manager Profile
The AutoYaST files are stored under /var/lib/rhn/kickstarts/upload/.
The minimal AutoYaST template file with the variables for dynamic values is located here. We created a new AutoYaST file for current installation with the variables filled in by simple text processing from the XML input.
Other specific values like distribution or the kernel parameter are stored in /var/lib/cobbler/config/profiles.d/<servname>:<org_nummer>:<rg_name>.json Both of them together constitute the profile.
Input data for this must also be evaluated from the input XML file.
To create the json file, use the SUSE Manager API, which can be accessed via:
cobbler_api = xmlrpclib.Server("http://" + 127.0.0.1 + "/cobbler_api") # DCA scripts are running on SUSE Manager Servertoken = cobbler_api.login(login,password)
Then the new profile is created.
profile_id = server.new_profile(token) # Creates the new profile in SUSE Manager. Next, the profile is customized according to the XML- data:
server.modify_profile(profile_id, 'name', bcpname, token) # Name of the profile (that is, “DCA_<servername>:<org_nummer>:<org_name>)
A distribution is added to the profile:
server.modify_profile(profile_id, ‘distro’, bcpdistro, token) # SUSE Manager Distribution used for profile (that is, SUSE Linus Enterprise Server 11 Service Pack 3)
server.modify_profile(profile_id, 'kopts', bcpkopts, token) # Kernel Options (something like ‘netmask=255.255.255.0 gateway=<gw_ip> hostip=<host_ip> hostname=<host_name>’)
server.modify_profile(profile_id, 'kickstart', bcpkickstart, token) # base AutoYaST file, created above for the profile, is added.
This profile is visible in the SUSE Manager GUI, but cannot be edited. This is not necessary because it is deleted again after the installation has finished.
The Kernel Options are necessary to have network connectivity right after the start and to find the SUSE Manager Server.
Because we want to boot from CD, we need to create an appropriate boot ISO.
ISO Creation
SUSE Manager Server provides a cobbler CLI, which enables the creation of an ISO image for a given profile via the command line.
(cobbler buildiso --help provides the necessary information.)
There is also a Python module to access cobbler functionality on the SUSE Manager Server. (pydoc cobbler.api shows the associated documentation.)
Up to this point, there is no command in the cobbler xmlrpc API to create an ISO image.
Build ISO Template
Unfortunately, we cannot easily use cobbler to create the boot ISO for the new profile because cobbler uses a template for the boot menu. The boot menu template defaults to boot from a local disk, but we want to boot in our new profile.
Therefore, we have to change the template file /etc/cobbler/iso/buildiso.template It should look like this:
DEFAULT MENU
PROMPT o
MENU TITLE DCA Boot Menu
TIMEOUT 10
TOTALTIMEOUT 600
ONTIMEOUT <our_new_profiles>

LABEL local
MENU LABEL (local)
LABEL local
MENU DEFAULT
KERNEL chain.c32
APPEND hd0 0
(It is a good idea to restore the original file after creating the boot ISO for the new server.)
Making the ISO Image Accessible for Virtualization
VMware ESX allows virtual machines to boot from an ISO image stored on a folder accessible to the VMware ESX server. For this purpose, we mount a directory that VMware ESX server can use and we copy the ISO image there.
The ISO image does not necessarily need to be booted on VMware vCenter. It can be booted from any infrastructure where an ISO can be mounted, such as XEN, KVM or the ILO of a physical machine.
VMware vCenter Back End
VMware vCenter provides an API for its services. For DCA, this API has been published as a web service and is partially customized. The customization was necessary to add some additional internal data to the installation process. Sending XML to the web service triggers a requested function in the API and provides necessary information or performs requested tasks.
The DCA program queries the web service-wrapped API for the data needed to create the virtual machine i.e., for LUNs (with enough storage), necessary VLANs, and so forth. The response and the data from the input XML are merged into a new XML file, which is then finally sent to the vCenter to create the new virtual machine. As part of the return value from the vCenter API, we receive the Mac address(es) for the new virtual machine. It is provisioned switched off because machines with multiple NICs might need to customize udev rules in the profile. This is necessary to ensure that the NICs are switched to the correct VLAN. With the next command, the virtual machine is switched on. It finds the ISO image and starts the installation of the new server.
Server Configuration
The SUSE Manager Configuration Channels can perform the server configuration completely. The channels can be implemented in modular form, so that you can assemble server classes with specific channel collections.
You might set up the following channels for a modular configuration:
- Basic configuration // This is the configuration that is applied on all servers
- Task-specific configuration
- Web server specific config channel
- DB server specific
- GUI server specific
- Environment specific configuration
- Production specific
- Staging specific
- Test specific
- Security class specific information
- High
- Medium
- Low
- Special functions
- Mount points
- Special users
- And so forth
The necessary input for the server configuration is provided with a “server class” parameter and an “environment” parameter in the input XML file. The configuration channels are assigned accordingly to an activation key. In the process, different configurations are mapped using different bootstrap files / activation keys.
Reporting the Installation Status
The server installation steps are monitored, and intermediate data is reported back to the calling web service.
The DCA service provides the following status information:
- File received (Found an XML)
- ISO image created
- Virtual machine created
- Virtual machine can be pinged
- Registered in SUSE Manager: queries SUSE Manager if the server is already registered. If it is monitored, it gets the SUSE Manger System I.
To report the next installation states, we already get information from the newly created machine. To obtain this, we need another great function of SUSE Manager: remove script execution.
Executing Remote Scripts
After the server has been registered to SUSE Manager, we can execute scripts remotely.
We can execute a script via the API call:
scriptid = client.system.scheduleScriptRun(key, sumaid, “root”, “root”, timeout, script, now)
key is the authentication key from the SUSE Manager API.
sumaid is the SUSE Manager ID from the server you created.
timeout is the length of time during which we try to get a result.
script is the script we want to execute (basically, a string like: #!/bin/sh \n ls /root/install/inst_status.txt”), and the rest is obvious :-).
The return value can be checked via:
scriptresult = client.system.getScriptResults(key, scriptid)
where scriptid is from the above. The return value “scriptresult” is a dictionary that includes script return code and output (sometimes b64 encoded—see the API reference).
This is how we verify certain stages of the installation. For example, we know that the Configuration Channels have not been applied properly if “ls” from a remote script does not come back with a positive result.
However, there is just one problem. A server usually checks in just once every hour, but we want our scripts to be executed as soon as possible. So, it would be great if we could issue an osa-ping via the API. Unfortunately, this is not possible yet. If you want the workaround, you can contact me (rbueker@suse.de). Meanwhile, you can sponsor https://fate.suse.com/317938.
Monitoring the Completion of the Installation
We can now identify the following steps and report the result back to the calling procedure:
- Wait For Bootstrap End: executes a remote script to see if a certain file is already in the server.
- Config Done: uses the same as above to see if all configuration from the channel is complete.
- Check Config Log: parses the remote “/var/adm/autoinstall/logs/bootstrap.sh.log” if there are any errors.
- Last Boot: reboots the new server.
- Final Up: issues a “ping” to see if the server is up and a client.system.getDmi(key, sumaid) to verify that the server has properly registered to SUSE Manager.
- Remote Cleanup: cleans all the remains from installation from the server.
When this is done, we send a success message to the calling web service, and the new system is available.
This all might seem complicated, but, in fact, the DCA Program has run successfully for almost 1 1/2 years now, and we have installed more than 400 SUSE Linux Enterprise Servers this way.
Related Articles
May 31st, 2022
HTML on documentation.suse.com – Shape it up!
Jun 08th, 2022
SUSE HA for SAP HANA scale-up cost-optimized improved
Aug 23rd, 2022
Kubernetes-native object storage with MinIO for SUSE Rancher
Mar 27th, 2023
No comments yet