Cloud Native Applications in AWS supporting Hybrid Cloud – Part 2
In my previous post , I wrote about using SUSE Cloud Application Platform on AWS for cloud native application delivery. In this follow-up, I’ll discuss two ways to get SUSE Cloud Application Platform installed on AWS and configure the service broker:
- Use the AWS Quick Start for SUSE Cloud Application Platform on Amazon EKS to stand up the platform on a managed k8s cluster automatically
- Build it using Helm Charts
In this blog I am focusing on installing SUSE CAP on AWS using helm charts.
Installing SUSE Cloud Application Platform on AWS:
Note: For all Yaml scripts, please use :set paste in the vi editor and make sure to remove the extra lines and spaces.
Note: for the commands, whenever you got a permission error, please use sudo. And whenever you get error please remove the \ which resembles a newline extra in the command.
1- From your machine install eksctl and AWS CLI:
First install AWS cli:
-
pip3 install awscli --upgrade –user
-
pip install --upgrade pip
-
cp ls ./.local/bin/aws /sbin
Configure AWS:
-
aws configure
Log in to the AWS Console and get the access credentials from IAM service and the AWS region used as well as the output format. It is recommended to do it as JSON.
Install eksctl:
-
curl --silent --location "https://github.com/weaveworks/eksctl/releases/download/latest_release/eksctl_$(uname -s)_amd64.tar.gz" | tar xz -C /tmp
-
sudo mv /tmp/eksctl /usr/local/bin
Note: Make sure the timezone and the date/time is setup correctly. If needed, run the below command to fix the time:
-
sudo date -s "$(wget -qSO- --max-redirect=0 google.com 2>&1 | grep Date: | cut -d' ' -f5-8)Z"
Install Kubectl:
-
curl -LO https://storage.googleapis.com/kubernetes-release/release/$(curl -s https://storage.googleapis.com/kubernetes-release/release/stable.txt)/bin/linux/amd64/kubectl
-
chmod +x ./kubectl
-
sudo mv ./kubectl /usr/local/bin/kubectl
2- Create a cluster.
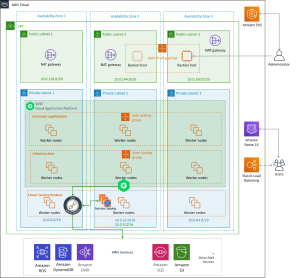
You can have as many workers as you need. SUSE Cloud Application Platform runs on Kubernetes as PODs and the recommendation is to have three worker nodes each in different AZ to support High Availability deployment. For the purposes of this test, we will do it using two worker nodes. The minimum as per SUSE Cloud Application Platform documentation is t2.large with a minimum of 100 GB volume.
The below figure resembles one of the solution recommended for running SUSE Cloud Application Platform in HA mode in AWS.
-
eksctl create cluster --name suse-cap --nodegroup-name suse-cap-node-group --node-type t2.large --node-volume-size 100 --nodes 2 --nodes-min 1 --nodes-max 4 --node-ami auto
Once the cluster is created, you can see that a cloud formation template is created which you can manage in the future to change the number of worker nodes (min and max) as well as the node types.
You many need to configure kubectl if you have already created the cluster from the console or another machine using the below command:
-
aws eks --region XXXX update-kubeconfig --name XXXXX
3- Install Tiller on the AWS EKS
This is because the SUSE Cloud Application Platform deployment is done using Helm Charts, so helm server (tiller) must be first installed
-
cat <<EoF > ~/tiller-rbac.yaml
---
apiVersion: v1
kind: ServiceAccount
metadata:
  name: tiller
  namespace: kube-system
---
apiVersion: rbac.authorization.k8s.io/v1beta1
kind: ClusterRoleBinding
metadata:
  name: tiller
roleRef:
  apiGroup: rbac.authorization.k8s.io
  kind: ClusterRole
  name: cluster-admin
subjects:
  - kind: ServiceAccount
    name: tiller
    namespace: kube-system
EoF
-
kubectl apply -f ~/tiller-rbac.yaml
-
curl https://raw.githubusercontent.com/kubernetes/helm/master/scripts/get > get_helm.sh
-
chmod +x get_helm.sh
-
./get_helm.sh
-
helm init --service-account tiller --upgrade
4- Create the domain which will be used by SUSE Cloud Application Platform using AWS Route53:
- Login to the AWS Console and select Route53 service. Navigate to Register Domain and select a domain. We will name it in our example susecapaws.org. wait until the domain registration is done to continue with the next steps. Once it is registered you can see the domain in the hosted zones.
5- Create AWS S3 storage for SUSE Cloud Application Platform using the following yaml file (Aws-ebs.yaml):
apiVersion: storage.k8s.io/v1
kind: StorageClass
metadata:
 name: aws-ebs
 annotations:
 storageclass.kubernetes.io/is-default-class: "true"
 labels:
 kubernetes.io/cluster-service: "true"
provisioner: kubernetes.io/aws-ebs
parameters:
 type: gp2
allowVolumeExpansion: true
then run:
-
kubectl create -f Aws-ebs.yaml
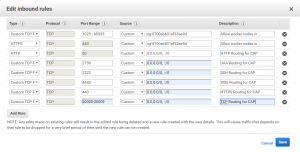
6- Navigate to the EC2 services under the region you used for the creation of the cluster and edit any of the security groups assigned to the work nodes EC2 instances by adding the following ports in the inbound:
Once this is done, then all defined ports are enabled/opened on all cluster worker nodes.
7- Create the SUSE Cloud Application Platform configuration file. It should look like the following (scf-config-values.yaml):
env:
 DOMAIN: susecapaws.org
 UAA_HOST: uaa.susecapaws.org
 UAA_PORT: 2793

GARDEN_ROOTFS_DRIVER: overlay-xfs
 GARDEN_APPARMOR_PROFILE: ""

services:
 loadbalanced: true

kube:
 storage_class:
 # Change the value to the storage class you use
 persistent: "aws-ebs"
 shared: "gp2"

# The default registry images are fetched from
 registry:
 hostname: "registry.suse.com"
 username: ""
 password: ""
 organization: "cap"

secrets:
 # Create a very strong password for user 'admin'
 CLUSTER_ADMIN_PASSWORD: xxxxx

# Create a very strong password, and protect it because it
 # provides root access to everything
 UAA_ADMIN_CLIENT_SECRET: xxxxx

enable:
 uaa: true
8- Add the SUSE Helm repo using the below command:
-
helm repo add suse https://kubernetes-charts.suse.com/
9- Deploy UAA (the authorization and authentication Component of SUSE Cloud Application Platform):
-
helm install suse/uaa \--name susecf-uaa \--namespace uaa \--values scf-config-values.yaml
10- Watch the pods (uaa-0 and mysql-0) until they are all successfully up and running.
11- Map the services to the hosted domain created:
- Run the following command to get the uaa-uaa-public service external IP:
kubectl get services -o wide -n uaa
- Copy the external IP of the uaa-uaa-public service, navigate to the created hosted zone, then create a record set of type A. Mark it as an alias.
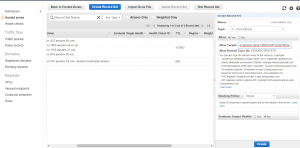
- Repeat the previous step but let the name be *.uaa
Note: if you changed the name of the domain in the scf-config-values.yaml from uaa then change it in the created A records.
12- Now uaa console is ready https://uaa.susecapaws.org:2793/login
13- Install the SUSE Cloud Application Platform Chart:
-
SECRET=$(kubectl get pods --namespace uaa \--output jsonpath='{.items[?(.metadata.name=="uaa-0")].spec.containers[?(.name=="uaa")].env[?(.name=="INTERNAL_CA_CERT")].valueFrom.secretKeyRef.name}') -
CA_CERT="$(kubectl get secret $SECRET --namespace uaa \--output jsonpath="{.data['internal-ca-cert']}" | base64 --decode -)" -
helm install suse/cf \--name susecf-scf \--namespace scf \--values scf-config-values.yaml \--set "secrets.UAA_CA_CERT=${CA_CERT}"
14- Watch the pods until they are all successfully up and running.
15- Map the services to the hosted domain created:
- Run the following command to get the diego-ssh-ssh-proxy-public, router-gorouter-public and tcp-router-tcp-router-public services external-ip:
kubectl get services -n scf | grep elb
- Copy the external IP of the each service and map it to the correct pattern. Navigate to the created hosted zone then create records set of type A and mark it as alias and paste the services in the target
| susecapaws.org | router-gorouter-public |
| *.susecapaws.org | router-gorouter-public |
| tcp.susecapaws.org | tcp-router-tcp-router-public |
| ssh.susecapaws.org | diego-ssh-ssh-proxy-public |
16- Run the following command to update the healthcheck port for the tcp-router-public service:
-
kubectl patch service tcp-router-tcp-router-public --namespace scf \--type strategic \--patch '{"spec": {"ports": [{"name": "healthcheck", "port": 8080}]}}'
17- Run the following command to get the name of the ELB associated to the tcp-router-tcp-router-public:
-
kubectl get service tcp-router-tcp-router-public -n scf
Take the first part of the load balancer (for example if the load balancer service is a72653c48b2ab11e9a7f20aeea98fb86-2035732797.us-east-1.elb.amazonaws.com then the ELB name will be a72653c48b2ab11e9a7f20aeea98fb86) and run the following command to delete the 8080 port from the ELB:
-
aws elb delete-load-balancer-listeners --load-balancer-name a72653c48b2ab11e9a7f20aeea98fb86 --load-balancer-ports 8080
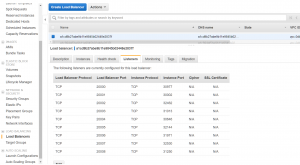
Please note that we have only deleted a port listener from the aws load balancer, you may validate that by opening the AWS console and validating then navigate to the EC2 Dashboard and then click on the load balancers, select the load balancer (a72653c48b2ab11e9a7f20aeea98fb86 ) then open the listener tab and validate that port 8080 is deleted.
18- Now SUSE Cloud Application Platform is deployed so we will deploy the AWS service broker.
19- Create a Dynamodb table which will be used by the AWS service broker:
-
aws dynamodb create-table --attribute-definitions AttributeName=id,AttributeType=S AttributeName=userid,AttributeType=S AttributeName=type,AttributeType=S --key-schema AttributeName=id,KeyType=HASH AttributeName=userid,KeyType=RANGE --global-secondary-indexes 'IndexName=type-userid-index,KeySchema=[{AttributeName=type,KeyType=HASH},{AttributeName=userid,KeyType=RANGE}],Projection={ProjectionType=INCLUDE,NonKeyAttributes=[id,userid,type,locked]},ProvisionedThroughput={ReadCapacityUnits=5,WriteCapacityUnits=5}' --provisioned-throughput ReadCapacityUnits=5,WriteCapacityUnits=5 --region us-east-1 --table-name awsservicebrokertb
Note: for simplicity purposes, I called the table awsservicebrokertb and used us-east-1 as my AWS region, but you can choose any other name and any other region.
20- Set the name space that will be having the aws service broker:
-
BROKER_NAMESPACE=aws-sb
Note: Don’t change the namespace as right now it must kept as aws-sb
21- Create the requested IAM roles for the deployment of the service broker:
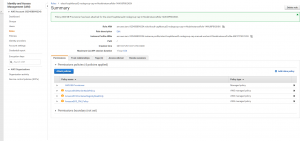
- Create a Policy with the name AWS-SB-Provisioner from the IAM AWS console or using AWS console, here is the policy json text:
{
 "Version":"2012-10-17",
 "Statement":[
 {
 "Sid":"VisualEditor0",
 "Effect":"Allow",
 "Action":[
 "ssm:PutParameter",
 "s3:GetObject",
 "cloudformation:CancelUpdateStack",
 "cloudformation:DescribeStackEvents",
 "cloudformation:CreateStack",
 "cloudformation:DeleteStack",
 "cloudformation:UpdateStack",
 "cloudformation:DescribeStacks"
 ],
 "Resource":[
 "arn:aws:s3:::awsservicebroker/templates/*",
 "arn:aws:ssm:REGION_NAME:ACCOUNT_NUMBER:parameter/asb-*",
 "arn:aws:cloudformation:REGION_NAME:ACCOUNT_NUMBER:stack/aws-service-broker-*/*"
 ]
 },
 {
 "Sid":"VisualEditor1",
 "Effect":"Allow",
 "Action":[
 "sns:*",
 "s3:PutAccountPublicAccessBlock",
 "rds:*",
 "s3:*",
 "redshift:*",
 "s3:ListJobs",
 "dynamodb:*",
 "sqs:*",
 "athena:*",
 "iam:*",
 "s3:GetAccountPublicAccessBlock",
 "s3:ListAllMyBuckets",
 "kms:*",
 "route53:*",
 "lambda:*",
 "ec2:*",
 "kinesis:*",
 "s3:CreateJob",
 "s3:HeadBucket",
 "elasticmapreduce:*",
 "elasticache:*"
 ],
 "Resource":"*"
 }
 ]
}
Note: Please replace REGION_NAME and ACCOUNT_NUMBER with the aws region you are using for the cluster and your AWS Account Id.
- Assign the role to the nodegroup role:
22- Install the service catalog and the Service broker using helm
-
Set up the certification between the installation machine and aws cluster nodes
-
mkdir /tmp/aws-service-broker-certificates && cd $_
-
kubectl get secret --namespace scf --output jsonpath='{.items[*].data.internal-ca-cert}' | base64 -di > ca.pem -
kubectl get secret --namespace scf --output jsonpath='{.items[*].data.internal-ca-cert-key}' | base64 -di > ca.key -
openssl req -newkey rsa:4096 -keyout tls.key.encrypted -out tls.req -days 365 \ -passout pass:1234 \ -subj '/CN=aws-servicebroker.'${BROKER_NAMESPACE} -batch \ </dev/null -
openssl rsa -in tls.key.encrypted -passin pass:1234 -out tls.key
-
openssl x509 -req -CA ca.pem -CAkey ca.key -CAcreateserial -in tls.req -out tls.pem
Start installing the service catalog
-
helm repo add svc-cat https://svc-catalog-charts.storage.googleapis.com
-
helm install svc-cat/catalog --name catalog --namespace catalog
-
watch for the svccat pods to be available
-
install the svcat cli using the following commands
-
curl -sLO https://download.svcat.sh/cli/latest/linux/amd64/svcat
-
chmod +x ./svcat
-
sudo mv ./svcat /usr/local/bin/
-
svcat version --client
-
Now set up the certifications between the AWS service broker and SUSE Cloud Application Platform:
-
mkdir /tmp/aws-service-broker-certificates_CF && cd $_
-
kubectl get secret --namespace scf --output jsonpath='{.items[*].data.internal-ca-cert}' | base64 -di > ca.pem -
kubectl get secret --namespace scf --output jsonpath='{.items[*].data.internal-ca-cert-key}' | base64 -di > ca.key - openssl req -newkey rsa:4096 -keyout tls.key.encrypted -out tls.req -days 365 \ -passout pass:1234 \ -subj ‘/CN=aws-servicebroker-aws-servicebroker.aws-sb.svc.cluster.local’ -batch \ </dev/null
-
openssl rsa -in tls.key.encrypted -passin pass:1234 -out tls.key
-
openssl x509 -req -CA ca.pem -CAkey ca.key -CAcreateserial -in tls.req -out tls.pem
Add the AWS Service Broker repo to Helm repos:
-
helm repo add aws-sb https://awsservicebroker.s3.amazonaws.com/charts
-
To understand the parameters of the chart, you can inspect it using the following command:
-
helm inspect aws-sb/aws-servicebroker
-
Install the AWS service broker:
-
helm install aws-sb/aws-servicebroker --name aws-servicebroker --namespace aws-sb --set aws.secretkey=$aws_access_key --set aws.accesskeyid=$aws_key_id --set tls.cert="$(base64 -w0 tls.pem)" --set tls.key="$(base64 -w0 tls.key)" --set-string aws.targetaccountid=ACCOUNT_ID --version 1.0.1 --set aws.tablename=awsservicebrokertb --set aws.vpcid=$vpcid --set aws.region=REGION_NAME --set authenticate=false --wait
Note: Please replace REGION_NAME and ACCOUNT_NUMBER with the aws region you are using for the cluster and your AWS Account Id.
-
Run the following command to get the service broker link, wait for the broker to be in a ready state:
-
svcat get brokers
23- Install the cf-cli on SLES 15 SP1
-
sudo zypper addrepo --refresh https://download.opensuse.org/repositories/system:/snappy/openSUSE_Leap_15.0 snappy
-
sudo zypper --gpg-auto-import-keys refresh
-
sudo zypper dup --from snappy
-
sudo zypper install snapd
-
sudo systemctl enable snapd
-
sudo systemctl start snapd
- reboot then run the following command
-
sudo snap install cf --beta
24- Connect to scf using cf:
-
cf api --skip-ssl-validation https://api.susecapaws.org
-
cf login -u admin -p password in the scf-config-values.yaml
25- Connect to SUSE Cloud Application Platform and bind the service broker to it:
-
cf create-service-broker aws-servicebroker dummyusername dummypassword https://aws-servicebroker-aws-servicebroker.aws-sb.svc.cluster.local
26- Deploy Stratos, the SUSE Cloud Application Platform dashboard and web console:
-
Create a separate storage instance which will host the gathered metrics and logs from the configured platform on stratos and apps (create a retainStorageClass.yaml):
kind: StorageClass
apiVersion: storage.k8s.io/v1
metadata:
 name: retained-aws-ebs-storage
provisioner: kubernetes.io/aws-ebs
parameters:
 type: gp2
#this is the ebs region and zone, use one of the zones of the created worker nodes
 zone: "us-east-1a"
reclaimPolicy: Retain
mountOptions:
 - debug
-
kubectl create -f retainStorageClass.yaml
-
Run kubectl get storageclass and make sure that you have only one default storage class
-
Install Stratos Helm Chart
-
helm install suse/console \ --name susecf-console \ --namespace stratos \ --values scf-config-values.yaml \ --set kube.storage_class.persistent=retained-aws-ebs-storage --set services.loadbalanced=true \ --set console.service.http.nodePort=8080
-
Watch for all Stratos pods to be up and running.
-
Create an A record for the stratos service
- Run the following command to get the external Address to the loadbalancer service
-
kubectl get service susecf-console-ui-ext --namespace stratos
- Copy the external IP of the each service and map it to Stratos. Navigate to the created hosted zone and create a record set of type A. Mark it as alias and paste the services in the target.

- Validate Stratos is up and running by https://stratos.susecapaws.org
27- Deploy Metrics and link it to Stratos:
-
Create the Prometheus configurations (metrics-config.yaml)
env:
 DOPPLER_PORT: 443
kubernetes:
 authEndpoint: XXXX --> replace this by the Kubernetes API server URL
prometheus:
 kubeStateMetrics:
 enabled: true
nginx:
 username: username
 password: password
useLb: true
-
Apply the configuration: kubectl create -f metrics-config.yaml
-
Install the Helm Chart:
-
helm install suse/metrics \ --name susecf-metrics \ --namespace metrics \ --values scf-config-values.yaml \ --values metrics-config.yaml
-
Wait for all metrics pods to get created.
-
Create an Alias record in the hosted zone for the metrics service
- Run the following command to get the service external address:
kubectl get service susecf-metrics-metrics-nginx --namespace metrics
- Copy the external IP of the each service and map it to the metrics. Navigate to the created hosted zone and create a record set of type A. Mark it as alias and paste the services in the target .
- Navigate to Stratos console login using the cluster password and admin user then click on endpoint tab and click the add (+) button.
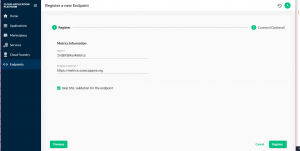
-
Click the register button. Enter the user name and password and click Connect.
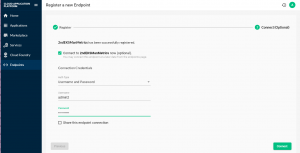
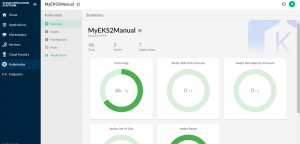
28- You can connect the Kubernetes cluster in the same way to monitor its metrics as well.
Comments
great and concise blog. Goes straight to the point.
What’s Going down i am new to this, I stumbled upon this I have
discovered It positively helpful and it has
aided me out loads. I hope to give a contribution & assist different customers like
its aided me. Good job.